I had the privilege of being in a lovely garden in the hill country in Sri Lanka. Thanks to all of the people who looked after us there at Kelburne Cottages, Haputale.
It is a 6 hour trip by car along winding roads and it feels nice to move your spine in different ways when you have been sitting for so long.
I felt like doing some sidebends in particular.
Spinal side bending is when the spine actually lengthens on one side relative to the other rather than just tipping your body sideways with both sides equal length.
I emphasised the side bending of the spine with some shoulder/arm movements and it is those that are deconstructed a little more in this video.
I lift the shoulder, then the elbow, then I roll the upper arm out (that is where you see the elbow start to point down), then I reach out my forearm and fingers from there.
In the video I move my head last. I move it in a way that keeps the sides of the neck feeling long. Only move your head and neck in ways that feel comfortable. For many people that might mean you stay looking down.
I had this lovely grass to practice on with birds singing and a beautiful garden behind me. In the video that looks amazing. Yet when I practice my focus is inward and directed more towards noticing how it feels to move.
This practice is repetitive and the movements start to flow nicely and I could have stayed repeating them for much longer. The video lasts for 8 minutes and I finished more because I was conscious of how long it would take to upload the video rather than because I was ready to finish.
When you practice you could go for longer or shorter. You could try the upper body and arm movements from sitting if you are too tired to stand. You could even lie down and imagine yourself doing them.
Do not do anything that hurts. It is always better to find an actual person and learn from them. Happy and safe practicing.
Much metta,
Samantha
PS Canberra yogis, we are back for our outdoor practice from Sunday 6 May 2018.
I am up at about 5000 ft in the mountains of Haputale, Sri Lanka. It's pretty spectacular.
Here I created a mountain mandala flow.
We often do this in class but facing the one direction.
But here there are beautiful views from every direction here and so I wanted to move and take them all in.
So here I repeat the same movement pattern but just turning 90 degrees each time.
It also gives you a 360 degree view of the movements so you get a better perspective.
Ok, I realise there are wardrobe malfunctions here but those who know me know my yoga wardrobe is the least of my concerns. Hopefully no one will be offended.
I particularly wanted to create this for Karen and Dave, my mountain friends in Nepal. Hope this helps with your practice.
Looking forward to travelling to Colombo, Sri Lanka for a holiday and to run these yoga workshops in April. We will be outdoors but under cover at Sooriya Village.
We will get a chance to explore movement and poses and work towards improving your practice or maybe starting one. I particularly want you to learn about spinal movement, about active movement, and pain-free movement.
Please contact either myself or Tilak for more details.
samanthawhybrow@hotmail.com
tilak@antsglobal.lk
If you know you want to book just contact Tilak but if you have any questions about what we will do, whether it is suitable for you, any concerns about injuries etc that you might have then feel free to contact me. Oh, Tilak is the guy in the photo in the batman t-shirt raising his leg quite impressively in a standing balance!
Join me for my 4-day yoga retreat in Sri Lanka this Sept 29th - Oct 2nd 2016!
This retreat is for people who want to explore movement and yoga with fun and friends.
I will be teaching ways to use your internal power and energy to move gracefully and with ease, to move away from pain and towards free movement.
You will learn the importance of using active movements and how the key to better stability, mobility, and freedom is to learn how to firm parts that need to be firm and, significantly, relax what needs to be relaxed.
In this retreat I hope to help you move closer to understanding and experiencing how this movement of energy will help every cell in your body to sing!
I have a lot of experience working with people with various injuries and I encourage you to contact me beforehand if you do have some sort of condition so that we can figure out if the retreat is appropriate for you at this time and how I might be able to help you.
Because I am interested in you learning how to be your own best teacher, I will be offering sessions between the classes for questions and answers and for us to think deeply about particular issues or postures, so come along with some of your own ideas and questions and I can help make the retreat more personal for you.
Check-in Thursday 29th Sept 1 pm- Depart Sunday 2nd Oct after breakfast by Noon
Classes: Six 2 hour classes. First yoga class starts on Thursday afternoon at 4.30pm. From then we will have 2 classes on Friday, 2 on Saturday, and 1 on Sunday.
Aside from the usual yoga there is the opportunity to relax by the pool or at the beach, surf, get a massage, or just hang out.
Because there are limited rooms I am encouraging people to please consider sharing so that as many people can participate as possible. Rooms need to be confirmed with full payment received by 29th August 2016.
The rate includes:
•All yoga classes
•Full board (tea/fruit before yoga; buffet style breakfast served at table; a la carte lunch (there is a menu to choose an item from), buffet style dinner)
•Accommodation
You need to pay for any extra drinks or snacks you might have if the mega breakfast and dinner and light lunch still leaves you hungry!
Normal timetable is as follows
6.30am tea/fruit (if desired)
7.00-9.00am yoga
9.00 breakfast
RELAX (have massage, swim, surf, read, have lunch around 1 or 2ish depending on how full you are after brekkie)
4.30-6.30pm yoga
7pm dinner
The prices quoted below are based on 3 nightsper person. You need to find a person to share with if you opt for double or triple and Tilak can put you in touch with other people who may also want to share.
Payment
Full payment is required by 29th August.You can make your booking directly with Tilak (tilak@antsglobal.lk +94-773-912-100) and pay Tilak directly or he can provide a Sri Lankan or Australian bank account details for you to transfer to if that is easier.
Retreat Rates are as follows:
Sri Lankan citizens or with those with a Sri Lanka Resident visa:
Single 3 nights Rs. 55,000/-
Double (share) 3 nights Rs. 43,000/- per person
Triple (share) 3 nights Rs. 40,000/- per person
Non-Sri Lankan citizens without a Sri Lanka Resident visa
I have never had a problem with urdhva dhanurasana.
But I have had lots of students who have or do have difficulty with it.
One thing I always emphasise is the spine should not feel squashed at any part or at any point from ground to lift and down again.
People can tend to squash in their lower backs.
I have even had people tell me they thought it was supposed to squash their lower back.
I tell people they are practicing something else but not the pose I am trying to teach if they feel squashing.
If you are in my class I want you to remember a few things when it comes to this part of the sequence.
Practice without squashing.
Don't be attached to the outcome.
Move slowly.
With this in mind, a part of not being attached to the outcome is realising you don't need to do anything at all if it does not feel right.
You certainly don't need to come all the way up.
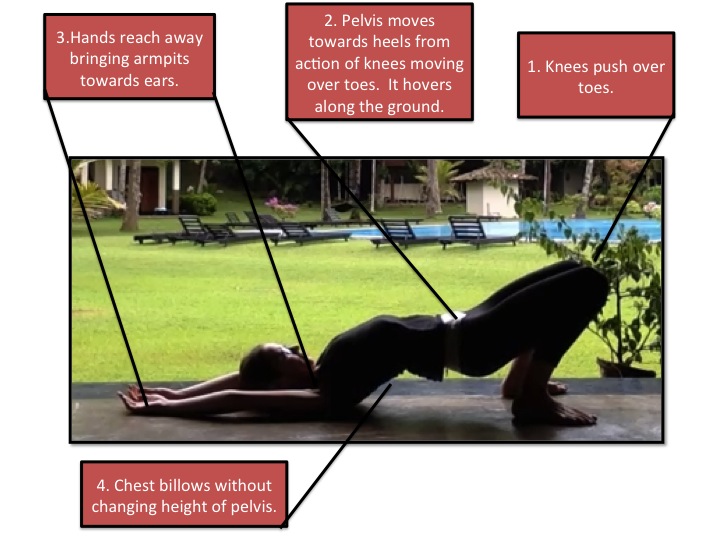
With this in mind, I made a poster that shows what you could pay attention to if you decide not to push your hands into the floor. There is still plenty you can do and, in fact, I do these things each time I come up into a fuller posture, as you can see in the video at the end (it's just that I only need to spend about a second getting there whereas some people will need more time).
Please bear in mind this post is intended primarily for my students who can experience what I am teaching in a class situation. Learning this type of thing from the internet is not suitable.
Read the poster from the right starting with what to do with the knees.
If you lie on your back and just press your feet into the floor you will feel your pelvis get light without necessarily lifting. Then press your knees over your toes.
The pelvis will lift and be carried towards the heels. I am not trying to push my pelvis up here. There are many styles that teach this and it is possible and there are benefits to that as well but it is not what I am doing here.
I then reach my arms as far away from my pelvis as possible. I try to basically get as long as I can through my body--pelvis moving one way and armpits the other.
Then I try to billow up my chest as though a gust of wind has blown through my feet and hits me in the middle of my upper back causing it to lift.
This is where I like to get people to stop and think for a while. Moving this part of the spine is really tough. It is the stiff part of most people's spines.
Many people cannot get movement in this part of their spine at all unless I provide a tactile cue (touching the area). Often people shove their pelvis up and down and their chest moves as a consequence but there is little to no independent movement in the upper spine.
What I am trying to do for myself when I practice this way is get some independent movement of the chest so that my spine does not move as one chunk.
It is delightful just to try to raise and lower the chest here without moving the pelvis and just continue reaching the arms in one direction while moving the knees in the other.
But you decide.
Don't do anything that hurts or strains.
Most people will need to do a lot of 'warming up' before they can do the full version of the pose but you can do this modified variation any time.
Having said that, my teacher Paddy always taught me that they should feel so free you can do the full posture first thing in the morning when you get out of bed. I do that myself every now and then. I am not saying I don't feel a bit stiff in the morning but in my experience she is right, when you are able to move freely then this is possible. Being able to move freely takes a lot of practice though and I still have stiff mornings!
Also, when you practice this way there should have been no squashing so no need to do something to unsquash your back afterwards.
Below is a video of the full thing, taken on location in Sri Lanka at my last yoga retreat. I will be heading there, by the way, for my next yoga retreat from 1-4 October 2015. Get in touch if you'd like to join us!
This post is not intended to cover all of the aspects of back bending. I wanted to emphasise a pose you can try on the floor without raising to the full posture that helps you lengthen. There is, of course, much more you can do within that even (did I mention doing a sit up in your tummy?), but that is for class!
Happy and safe practicing.
Much metta,
Samantha
www.yogacafecanberra.blogspot.com
www.yogacafelk.blogspot.com
I won't be teaching in Bali this year and have shifted my retreats to Sri Lanka! The next one is 1-4 October at the beautiful Kahandamodara, also known as Back of Beyond (www.backofbeyond.lk).
Learn active movement in the Yoga Synergy
style in a safe, fun and beautiful environment from an experienced
teacher.
My talent is in
deconstructing posture and movement to help you find freedom, stability, and
joy in your yoga practice—on and off the mat.
I will combine clear instruction with hands-on-adjustment so that you can
find yourself in challenging postures with less effort and greater ease.
You will get expert instruction with two
active classes a day, meditation, delicious food, and great company in the
beautiful surrounds of Kahandamodara, about 2 hours from Colombo in Sri Lanka's deep south.
Rates are $690 single, $570 double, or $525 triple per person, including yoga, food and accommodation. (SL resident rates: Rs45k single, Rs35k double, Rs32k triple). Contact Tilak for more details: tilak@antsglobal.lk or +94 773 912 100.
Before I practice suriya namaskar I 'warm up' my spine, legs and wrists with an active spinal movement sequence that incorporates dynamic balance.
When people start my classes, this opening sequence appears, by far, to present the biggest challenges. It includes heel raises, one legged balancing, and active spinal movement--often all at once!
I took this 5 minute video at my last retreat in Talalla, Sri Lanka. You can hear the beautiful birds in the background and see the luscious coconut grove in which we have our twice daily practice!
The video is mainly intended for my students who want a visual refresher of what to do or for interested students who might come to class. I don't recommend learning from the internet.
After watching the video take a look at some of my practice tips.
Below I have jotted down a few thoughts for some of the movements/actions throughout the sequence. I say these commonly in class. They are not all of the instructions. I have tried to clarify a few points were I see students sometimes struggle.
Arms forward and up
When taking the arms overhead, push the armpits forward and up.
When practicing all of the heel raises, lean forward until the toes start to grip naturally, look at the floor to help with balance, then raise the heels. Keep gripping with the toes.
Knee bends
When bending the knees, I push my knees forward and hips forward. My hips don't really go anywhere and what you will see is that they lower straight down.
When knees are bending I try to keep firm behind my knees--as though you were trying to perhaps squeeze something behind them. But don't squeeze too hard! Remember, feel active but not tense.
I keep the toes gripping.
Shoulders roll in
When you roll the shoulders in, press armpits lightly down. I try to press wrists forwards and elbows back.
When you roll shoulders in it is easy to droop the top of the spine. Be careful it does not sag. Keep upper back lifted so you do not shorten the front of your body.
Shoulders roll out
When shoulders roll out there can be a tendency to press the ribs forward. Look carefully in the video and you see I try to lift but not push out in the upper back.
Side bending
When you bend sideways, try to lengthen the one side without squashing the opposite side. In the video you will see I initiate this movement by raising one elbow without dropping the other.
Twist
When you twist there is a tendency for the hip/pelvis you are turning towards to move backwards. Try to press that hip forward so the pelvis remains pointing to the front.
Standing balance leg forward
The raised thigh rolls out. That means your knee seems to roll away from the centre line of your body. Be careful not to hike your raise leg pelvis up, which commonly happens when people focus on getting their leg high. It is not how high it is that counts.
Leg to side
Again, thigh rolls out. It is difficult to get the leg this high so keep it closer to the floor if necessary. The leg is to the side and slightly to the front. People who focus on getting their leg too high often have the leg too far to the front but it needs to be more to the side than the front.
Leg behind fold forward
In this posture I push my shin into my hand and pull with my hand. The raised thigh is rolling in. That means the knee feels like it is looking more down to the floor.
Leg straight forward fold
Here I am careful not to be too archy in my lower back. I don't want to feel tension in my lower back. My raised thigh is rolling in.
Balancing twist
The raised thigh is rolling out.
Additional thoughts
As always, stretch less, tense less, think less, and breathe less. Try your best without being attached to an outcome. The outcome people often become attached to in these postures (from my observations) is taking their legs too high.
Better the legs are straight rather than high. This might mean that you keep toe tip on the floor. That is an important modification I did not show in this video. That is, you do not need to raise the toe off the floor at all. You can keep toe tip down, do the arm and spinal movements, and then just straighten the leg when that time comes.
Relax your tongue and breathe naturally. This will help you feel calm in these challenging movements.
This is the opening sequence in my current outdoor Canberra yoga classes. Join us and have some fun if you like!
If you clicked on this post you probably are interested in doing the splits.
Great! In this post I share two places where some splits or splits-like postures sneak into the current sequence I am teaching.
But as you watch the videos (there are two), look at the photos and read through just remind your self that when you practice anything, try your best but do not be attached to an outcome.
If the splits come they come. If they don't they don't. Accept that. Do not force. Do not strain. Move slowly.
This is not an instructional post about how to do the splits. It is a post to show where you can slip them (or like postures) into parts of your practice.
The first of these postures does not come until at least a good 15-20 minutes of the sequence. That means we have moved and warmed ourselves.
Watch the first video, below, which is an interesting variation on a side bending upside down splits that starts with parsvakonasana. I deconstruct the posture afterwards with step by step photos and instructions.
Then, in the middle of our sequence, take a look at how we move from gadjastan (elephant stance) to the more traditional seated splits.
Upside down side bending splits
The video shows the transition from parsvakonasana to upside down side bending splits.
Deconstructed
1. Come to parsvakonasana. Watch previous posts on parsvakonasna if you are not sure how.
2. Pelvis remains in place, turn navel, ribs, chest and bring shoulders to the inside of thigh or knee if possible. Press inner thigh and outer arm into one another. Be mindful that your butt does not swing out to the side here.
3. Bring inside hand to back of calf from the inside. Keep nuzzling knee and shoulder into one another. Press that hand into the calf and calf into hand. Again, mindful your butt is not off out to the side.
4. Other hand comes to ground.
5. Lean forward and begin to bring that back foot in. Be on toe tip so there is as little weight on that back foot as possible.
6. Keep leaning forward, nuzzling arm and leg, pressing calf and hand, and lift off if safe and comfortable. Look towards your back foot.
Fun on the floor!
Below is a video that shows how we transition from standing to splits on the floor.
I show two variations--the first is for people more familiar and comfortable with full splits.
The second is for those less familiar and less comfortable with the splits. Remember, try your best without being attached to an outcome.
To come into this posture we start here.
Make our way mindfully to the ground. Pause and get that tummy firm in a way you can still feel the movement of the breath there!
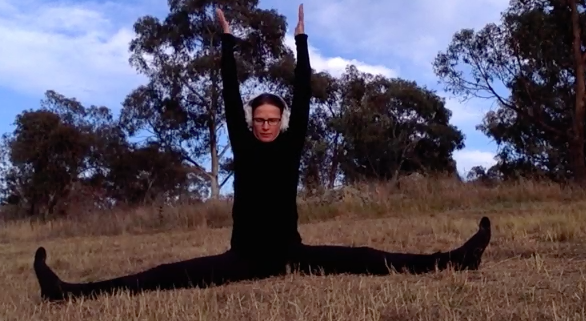
Go for a upavista konasana--a sort of wide legged side split type posture. I have my arms reaching up to lengthen my spine and I am working with sitting bones down and top of pelvis back so I am not being too archy in my lower back.
Then, either turn spine and lift and make my way to a split like this....
...or, bend both knees then lift and turn to a long lunge.
Smile and have fun.
Only do what feels comfortable. Try to practice to your own body and how it is at that moment and not to what you think you should to be doing.
This is a pose in our current sequence as we work our way through outdoor yoga in chilly Canberra (the ear muffs might be a give away!). The posts are intended for students who work with me and know my teachings. Overseas we can work on these in my upcoming retreats in Sri Lanka (July 2015) and Bali (September/October) 2015 (see www.artofliferetreats.com).
Trikonasana is one of the basic standing postures in yoga.
Cultivating good activation in the muscles around the hip of the front thigh will help you move gracefully into some other fun poses that have their foundations in the triangle posture.
In this post I show a fun transition out of trikonasana that will help develop some balance and focus skills.
Watch the video then take a look at the individual positions in the photographs below.
Lifting not sinking
It is hard to tell from watching (which is why I do a lot of demonstration and adjustment in class) but I work strongly in these transitions to cultivate a 'lifting' not sinking feeling out of the standing (front) hip/leg.
There is a strong action of external rotation of the thigh in the front leg.
External rotation of the front thigh in trikonasana is when you sense the inner thigh rolling up towards the sky/ceiling so the kneecap looks more like it is pointing more straight up or even slightly more towards the outer front foot (rather than dropping in over the inner foot).
You should feel a corresponding activation around your side/outer hip/butt area.
This can be easier to sense for many people if you bend the knee slightly, generate the action, then slowly start to straighten the knee.
If you can make sure you cultivate this external rotation in trikonasana then the transition to the balance will be easier.
If you move slowly you will notice there is a slight tendency for the standing leg thigh to want to roll in and the side of your hip move out slightly. This leads to a feeling of 'dip' in the hip.
As you transition, counter this by bringing your awareness to the outer/side hip and try to either:
roll the front thigh out
move the front hip more to the centreline of the body
push down strongly through the heel of the standing foot (while lengthening and gripping the toes)
The back thigh, throughout, is rolling in.
Trikonasana
Start in trikonasana.
Ardha Badha Trikonasana
Go for an arm bind if comfortable. Mine easily wraps around my back to catch my thigh but yours might just be behind your back. Don't worry where it goes, it is more important there is no discomfort.
Niralamba Ardha Chandrasana (with arm bind)
Niralamba means unsupported. In this case it means you do not have hands on ground.
I try to maintain the external rotation in the standing hip as I lean forward. I press strongly through my heel. I keep leaning forward until my toes naturally start to grip--a good sign that the balance is coming! My back leg comes up easily due to the shift of balance. To get it higher I have to use active movement.
Raise elbow
I bring fingertips to shoulder. Stay steady!
Raise body
Ok, starting to get tough here! Raise the body! This is the trickiest transition in my opinion. You have to keep absolutely stable in that standing hip.
Release bind and straighten arm
Once you are here it is now relatively easy just to release the arm from the bind and extend it out.
You did it!
As Dora (the explorer) would say: You did it!
Of course, you can always keep that back toe tip down as lightly as possible and do the spinal/arm actions with toe tip just touching. You still need to maintain that lift out of the hip though.
Have fun practicing. Try your best but without an attachment to the outcome. Without strain. Without stress.
Oh, probably you will feel something deep in your butt after this sequence. Yeah! It's working.
I don't recommend learning from the internet. Come to class if you can!
This is a mini-sequence we will be working with in our current 9 week sequence. It is such a good training tool I will likely be teaching it in our retreat in Sri Lanka and in Bali as well (www.artofliferetreats.com).
This sequence is part of a Yoga Synergy style sequence taught by Simon Borg Olivier and Bianca Machliss.
Kurmasana is an intense spinal forward bend and I recommend should only be practiced with a teacher and not by learning from the internet.
This post is mainly to show how long my spine is when I practice this posture rather than as a 'how to'. I have pictures and a video at the end.
Many people can do a version of this where they straighten their legs but their spine remains very humped up--like a tortoise shell I suppose.
It will indeed remain a little 'humpy' but my effort here is in trying to lengthen.
I do active variations first to firm the tummy (in a way I can breathe and move the spine). A more active variation would be to lie down and do what I show here.
First, a sort of navasana where knees bend and I make efforts to draw them into my chest.
Then, I try to keep my legs as close to my chest as possible and straighten them. This will be beyond a lot of people. Don't let your legs come out too far from your chest.
Next I take my heels and help myself into the posture assisting with the hands. I try to push my heels into my hands and make efforts to bend my elbows. I keep chest and thighs close. I try to keep shoulders and knees together with firm tummy. The danger when you use your hands here is that your tummy goes soft so make sure tummy stays firm.
Lengthen the legs as much as possible while maintaining previous actions. In the video you can see me wriggling to lengthen my spine further--while trying to keep my balance. It's a bit tricky.
I keep tummy firm and legs come down. Knees are bent, spine is long. I recommend you keep spine long and legs bent rather than go for straight legs. Far better to stay here than strain or force.
Tummy firm, spine long and shoulders go under knees.
Arms straighten out beside me, shoulders under knees, tummy firm, spine long. I can breathe comfortably.
Slowly I go, keeping tummy firm and spine long.
The video below shows the posture in action. I make particular efforts to also ensure my neck is in a comfortable position and you can see me moving it around.
Following an intense forward bend like this I do a less intense forward bend like paschimottansasana and then a strong tummy firming posture like bakasana or a high plank. If you do postures well counterpose is not necessary but I have just made it a practice.
Using active movements and doing the posture 'mid-air' without hands as much as possible ensures I combine strength and flexibility.
I teach something like the 'wowee active hip opening' sequence I just posted prior to this before I do a posture like kurmasana.
This is the approach I take in my classes, workshops and retreats. Join me if you like--in Canberra, Bali (for our yoga and raw food retreat September 2015) or in Sri Lanka (yoga retreat). Details of my class and retreat schedule are on the home page of my blog.
Forearm balancing, when done well, is a great way to release tension in the spine, which includes the neck since it is part of the spine. It also includes the shoulders. That means you are in the wrong pose if you practice this posture and have a sense of tension or strain anywhere but especially around the neck or shoulders.
This is the pose I recommend you be able to complete before making efforts to do a headstand.
In this posture, which we call horn stand (your hands are clasped except for your baby finger which is sticking out to form a horn) there is no weight on the head at all.
To do it you must have adequate strength and mobility around the shoulder joint complex while your feet are both on and off the ground.
As in many postures, the preparation is more difficult than the final posture.
In this post I share a few tips about preparing to come into this balance. This includes my thoughts on the use of the wall and how I use it in a limited fashion, along with common errors and how to use a block to help you prepare.
First, here is a video of me free balancing so you get an idea of the final posture.
I practiced on the grass today since I was matless and sleeveless and the concrete was too scratchy on my elbows.
Now, to get there I recommend a few stages of specific preparation (as distinguished from the non-specific just general stability and strengthening and movement you do through my classes).
Base preparation
Number one is to get the horn. See the picture below.
The 2-4 digits are interlaced. The palms are pressed together. The thumb and baby finger are free. The baby fingers point out like a horn. The horn is going to help you balance in the final posture, with the weight shifting between horn and elbows.
The elbows are about shoulder width apart but I prefer to try a bit narrower since the tendency is for them to splay out on tight shouldered people.
Then get the lower ribs high up away from the ground and get your head and neck so you are looking to your navel. The upper and middle back will feel rounded. The lower back is lengthened, not arched.
When you get your lower ribs far away from the ground your head will come away from the ground. You cannot see it in the photos because there is so much hair tumbling down. In the first video I kept my head forward so you could see it is not on the ground.
In the wall video I kept it looking to navel and then moved it back and forth a bit so you can see it there as well.
I am firming my tummy in a way that I can still breathe. If you don't know how to do this you need to look back at previous posts or come to class. It is important.
I push my horn and wrist downward and feel as though I am pushing my elbows forward. I can't show a picture of those things. They are 'secret' internal actions.
Beware the sinking shoulders
Sinking the chest and into the shoulders is one of the common errors in this posture. See the example of sinking shoulders from the side and front views, below.
Compare this with the lower ribs lifted into lower back in the next picture. You can see that the wrinkles in my t-shirt have ironed themselves out.
And sinking with the knees raised...
Versus lifting with the knees raised...
Again, you see how many wrinkles in the shirt appear around the lower back in the sinking version.
Get strong!
With the base set, I start some strengthening and mobility practice.
I take my knees just a tad from the floor. Enough so an ant or grasshopper could go underneath without being squished.
Move slowly and do not sink into your shoulders or drop the ribs.
This should create postural firmness in the tummy in a way you can breathe if it was not there already (and if you had not sucked it all in).
You can go a bit higher so a little puppy could run under your knees.
I go slowly up and down. I make sure I do not drop in my shoulders. I keep horn pushing down, elbows pushing forward, neck free, tummy can breathe (but firm).
I can come higher and perch on the very tips of my toes. I try to get off the balls of my feet. If you have weight going through the balls of your feet you won't get enough weight through the arms.
You just stay there and breathe. Make a few jokes to passersby. Be firm but relaxed and calm.
If you can, you take a knee into chest, heel to bottom. But you go slowly and make sure you do not collapse into one shoulder or drop the chest.
Take note. If this feels tough it is because THIS IS REALLY HARD!
It is really hard to go through these stages without sinking into your shoulders and feel comfortable.
Stay here and keep practicing at this level until you can at least feel comfortable for more than 30 seconds I say. That's not science but hopefully you get the picture.
Block practice
The video below shows my block practice.
I go to the blocks in class sometimes to help people get an idea of what it can feel like to be upside down.
You don't need to kick up to do this so as long as you have some good strength around shoulders and core it should be accessible.
If you are not strong enough you will find it difficult to get a leg off the ground so go back to the first (ground) practice.
I push the ball of one foot into the block and then the other foot starts to come up. Alas, most of the important parts to see are in shadow in the photo below!
You can just hover a little away from the ground or start to bring knee to chest.
And finally take the leg directly up.
The head is down and looking towards the navel. It feels really great if you are in the correct position.
A word of caution about block practice is that it can feel so good you might like to take both feet off. I don't advise trying. Mainly because if you crash down you are going to smash your feet into the block. Ouch.
Wall practice
Ok, so I really don't use the wall for any of the inversions. All of my students will know how I sort of begrudgingly take us over there only on very rare occasions! The video below shows how I use the wall if I use it.
You can see I missed the first two times because I was trying to lightly kick up.
One of the reasons I have developed a no wall practice is because I think people go to it too early. They try to build strength at the wall when you need to build strength on the ground. It is actually much harder to do the first position that I described (ground version) than it is to do either the block or wall variation. Perhaps that is why people go to the wall!!
Anyway, if you are going to a wall, psychologically you will know it is there. Most people will therefore just over-kick or not worry about refining their kick because we know the wall is there to catch us. People who spend too much time at the wall seem to take longer to learn to free balance.
Thus, if you use it do so sparingly I say! And, if you must, then perhaps try this way.
I show using the wall with just a toe tip touching. I try and take one leg straight up and be on the other toe tip. I then figure out where that up leg needs to be to help me find my centre of gravity. I can also learn to 'play' with the weight between horn and elbows. You should find that if you are on a toe tip and you press through the horn that the toe tip starts to float away from the wall.
So for me the lesson of the wall is to learn about how to play with and find your centre of gravity upside down. But this is a refining technique to try once you have built the strength!
Summary
Look for lifting not sinking. Firmness but calmness. Lightness not heaviness. This is a great way to practice all postures, but especially for these inversions.
This is the same approach I take to handstand so you can apply these ideas on ground, block and wall but just with the arms straight!
Happy and safe practicing! Remember, these videos and posts are intended for students who come to my classes and who can ask questions and interact with a real person about their own bodies. Learning from the internet is not recommended.
This is the type of thing I teach in my classes and which we regularly workshop in retreats. Join us if you like!