Showing posts with label canberra. Show all posts

Thursday, 29 December 2016

Trikonasana 3 Ways


It has been a long time between postings.  We have still been out there practicing our yoga together and here is something we are thinking about in our current sequence.

The video below shows our practice of trikonasana in three variations.


Fundamentally the major actions are the same in all three variations.  It is just that as I progress to 'closer to the ground' options I make sure I bring my back leg pelvis around.

Bringing the back leg pelvis around means I am progressively bringing the pelvis more towards the front leg.
Hand on back leg pelvis to show I have turned it more

If you practice this way you will feel how bringing your pelvis around helps to 'free up' the front hip joint and you can move your torso more freely.

In each of the variations I am doing many key things, ones I will mention here are:

  • I start this one from gadjastan (elephant stance).  This puts my hips in external rotation (they are rolling out).
  • I turn the 'front leg' foot out some more to match the rolling out of the front thigh.
  • I turn the whole back thigh in, allowing my pelvis to come with me as it needs so that I don't feel strain on my inner thighs and so my front thigh is not struggling to roll out.
  • I 'stretch the ground' with my feet.
  • I lift up and out over my front leg with my torso in a way that my spine is not drooping to the floor and my side waists stay long.
  • I let me bottom hand go down wherever it goes to without drooping the spine to the floor.
  • I keep my pelvis where it is and turn my navel, ribs, and chest towards the sky.
  • I reach up with my top hand if that feels comfortable.
  • I put my head and neck in a comfortable position.
  • I do a gentle backbend along my spine.

As I progress from one posture to the next my legs stay in place but I start to allow my pelvis to turn even more, which allows me to place my bottom hand further down my leg as it pleases.  


Hand on sternum to show I am thinking about lengthening the spine

In the final variation I do a 'wrap'.  Most people will not be able to do this wrap.  Often they will try to take their bottom hand underneath the front leg by bringing their whole spine forward and so end up losing the alignment of the spine in this position.  If you watch the video you can see that when I wrap and bind I do not go into a forward bend of the spine.  In the video I touch my sternum so you can see that I am emphasising lengthening rather than shortening of the front of the body.  

Happy and safe practicing.   It is better to practice with a teacher present.  


Merry christmas and a happy new year to all!

Friday, 30 October 2015

Sculpture Balance


Yikes this one is tricky but fun.  

I have a vision of a group of us learning this posture and standing in a garden somewhere as human sculptures.

Not sure how long we could remain standing as it is one of our most challenging static balances.

I chose to stand on this podium to take these photos.  Which was both a good idea and a not so good one.

I wanted to get up there because I knew it would be challenging.  I can do this fairly easily on solid ground where there is not a lake to fall into.  

So I thought I'd step it up a little. Goodness fear makes it hard to do anything!

My balance was fairly disturbed up there on the podium and there was no way I could hold this for very long.  Fear can really take so much away from us, mentally and physically.  

There are a few basics to coming into this posture.  

Remember:
  • when two body parts come into contact try to press them into one another.  That means pressing thigh into foot and foot into thigh, then thigh into elbow and elbow into thigh, then hand into elbow and elbow into hand, and, if you get to the top, pressing hand into chin and chin into hand.  
  • try to get a feeling that you are drawing your hips towards one another.
  • activate inner thighs.
  • find a point to focus on, grip with the toes, and relax your face and breath--these things help with the balance.
  • I create firmness in my tummy by lengthening my lower back and pressing my hips forward (though they may not go anywhere).
  • have fun.
  • don't hurt yourself.
  • try not to fall off anything.
  • it is best to learn from a physical teacher rather than the internet.
  • if it feels bad it is bad so stop.
  • natural breathing.


Toe forward, hips forward, hips together, inner thighs together
Lengthen lower back and move hips forward, toe forward.  Be on toe tip if you can.  If that is too difficult be on the ball of your foot.

To help with your balance throughout, try to press your outer hips towards one another.  Then, try to press your inner thighs towards one another.  You should feel that this creates some firmness on the inner and outer hips and helps to stabilise the balance.

My toes of standing foot are gripping.  For the first part I am looking with a soft gaze to the ground.  These also help with the balance.

Relaxing your face and breathing naturally will also help your balance.

Knee move forward, heel to thigh
 Move the standing knee forward so it bends.

If comfortable raise front foot and place heel above knee, on the top surface of thigh.  Press those body parts into one another.

Opposite elbow to top of thigh
 If comfortable take opposite elbow onto thigh.  It is hard to tell that I am doing that in this photo.

Press the elbow and thigh into one another.  Keep pressing hips forward and together.

Other elbow to hand
 If you have made it this far, congratulations.  It is much trickier than it looks!

Opposite elbow can come to palm.  Press them into one another.

Take the hand towards the forehead between the eyebrows and lightly press the skin up.

Head up
This is really challenging for your balance.

One of the things that helps with balance is to pick a point on the floor or somewhere in front of you and gaze softly at it.

Here we challenge that by trying to move the head up!

If you can, slowly move the head up so the chin comes onto the palm of other hand.  Press them into one another.

Enjoy!

Now, who wants to get together with me and be part of a human sculpture garden?!

Happy and safe practicing.  We will be doing this posture for the next 9 weeks in our sequence.  Lots of fun.

Much metta,
Samantha
www.yogacafecanberra.blogspot.com
www.yogacafelk.blogspot.com

Monday, 3 August 2015

Baby Backbend Without Squashing Lower Back


I have never had a problem with urdhva dhanurasana.

But I have had lots of students who have or do have difficulty with it.  

One thing I always emphasise is the spine should not feel squashed at any part or at any point from ground to lift and down again.  

People can tend to squash in their lower backs. 

I have even had people tell me they thought it was supposed to squash their lower back.

I tell people they are practicing something else but not the pose I am trying to teach if they feel squashing.  

If you are in my class I want you to remember a few things when it comes to this part of the sequence.

Practice without squashing.

Don't be attached to the outcome.

Move slowly.

With this in mind, a part of not being attached to the outcome is realising you don't need to do anything at all if it does not feel right.  

You certainly don't need to come all the way up.

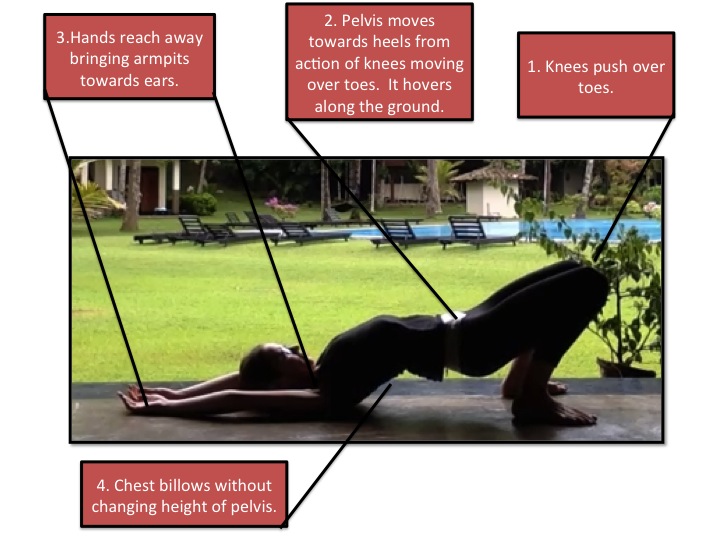
With this in mind, I made a  poster that shows what you could pay attention to if you decide not to push your hands into the floor.  There is still plenty you can do and, in fact, I do these things each time I come up into a fuller posture, as you can see in the video at the end (it's just that I only need to spend about a second getting there whereas some people will need more time).

Please bear in mind this post is intended primarily for my students who can experience what I am teaching in a class situation.  Learning this type of thing from the internet is not suitable. 

Read the poster from the right starting with what to do with the knees.


If you lie on your back and just press your feet into the floor you will feel your pelvis get light without necessarily lifting.  Then press your knees over your toes.  

The pelvis will lift and be carried towards the heels.  I am not trying to push my pelvis up here.  There are many styles that teach this and it is possible and there are benefits to that as well but it is not what I am doing here.  

I then reach my arms as far away from my pelvis as possible.  I try to basically get as long as I can through my body--pelvis moving one way and armpits the other.

Then I try to billow up my chest as though a gust of wind has blown through my feet and hits me in the middle of my upper back causing it to lift.  

This is where I like to get people to stop and think for a while.  Moving this part of the spine is really tough.  It is the stiff part of most people's spines.  

Many people cannot get movement in this part of their spine at all unless I provide a tactile cue (touching the area).  Often people shove their pelvis up and down and their chest moves as a consequence but there is little to no independent movement in the upper spine.  

What I am trying to do for myself when I practice this way is get some independent movement of the chest so that my spine does not move as one chunk.  

It is delightful just to try to raise and lower the chest here without moving the pelvis and just continue reaching the arms in one direction while moving the knees in the other.  

But you decide.  

Don't do anything that hurts or strains.  

Most people will need to do a lot of 'warming up' before they can do the full version of the pose but you can do this modified variation any time.  

Having said that, my teacher Paddy always taught me that they should feel so free you can do the full posture first thing in the morning when you get out of bed.  I do that myself every now and then.  I am not saying I don't feel a bit stiff in the morning but in my experience she is right, when you are able to move freely then this is possible.  Being able to move freely takes a lot of practice though and I still have stiff mornings!

Also, when you practice this way there should have been no squashing so no need to do something to unsquash your back afterwards.  

Below is a video of the full thing, taken on location in Sri Lanka at my last yoga retreat.  I will be heading there, by the way, for my next yoga retreat from 1-4 October 2015.  Get in touch if you'd like to join us!


This post is not intended to cover all of the aspects of back bending.  I wanted to emphasise a pose you can try on the floor without raising to the full posture that helps you lengthen.  There is, of course, much more you can do within that even (did I mention doing a sit up in your tummy?), but that is for class!

Happy and safe practicing.

Much metta,
Samantha
www.yogacafecanberra.blogspot.com
www.yogacafelk.blogspot.com

Friday, 24 July 2015

5 Minute Spinal Movement Sequence


Before I practice suriya namaskar I 'warm up' my spine, legs and wrists with an active spinal movement sequence that incorporates dynamic balance.

When people start my classes, this opening sequence appears, by far, to present the biggest challenges.  It includes heel raises, one legged balancing, and active spinal movement--often all at once!

I took this 5 minute video at my last retreat in Talalla, Sri Lanka.  You can hear the beautiful birds in the background and see the luscious coconut grove in which we have our twice daily practice!

The video is mainly intended for my students who want a visual refresher of what to do or for interested students who might come to class.  I don't recommend learning from the internet.

After watching the video take a look at some of my practice tips.


Below I have jotted down a few thoughts for some of the movements/actions throughout the sequence.  I say these commonly in class. They are not all of the instructions.  I have tried to clarify a few points were I see students sometimes struggle.

Arms forward and up

When taking the arms overhead, push the armpits forward and up.

When practicing all of the heel raises, lean forward until the toes start to grip naturally, look at the floor to help with balance, then raise the heels.  Keep gripping with the toes.

Knee bends

When bending the knees, I push my knees forward and hips forward.  My hips don't really go anywhere and what you will see is that they lower straight down.

When knees are bending I try to keep firm behind my knees--as though you were trying to perhaps squeeze something behind them.  But don't squeeze too hard!  Remember, feel active but not tense. 

I keep the toes gripping.

Shoulders roll in


When you roll the shoulders in, press armpits lightly down.  I try to press wrists forwards and elbows back.

When you roll shoulders in it is easy to droop the top of the spine.  Be careful it does not sag.   Keep upper back lifted so you do not shorten the front of your body.

Shoulders roll out


When shoulders roll out there can be a tendency to press the ribs forward.  Look carefully in the video and you see I try to lift but not push out in the upper back.

Side bending

When you bend sideways, try to lengthen the one side without squashing the opposite side.  In the video you will see I initiate this movement by raising one elbow without dropping the other.

Twist
When you twist there is a tendency for the hip/pelvis you are turning towards to move backwards.  Try to press that hip forward so the pelvis remains pointing to the front.

Standing balance leg forward

The raised thigh rolls out.  That means your knee seems to roll away from the centre line of your body.  Be careful not to hike your raise leg pelvis up, which commonly happens when people focus on getting their leg high.  It is not how high it is that counts.

Leg to side

Again, thigh rolls out.  It is difficult to get the leg this high so keep it closer to the floor if necessary.  The leg is to the side and slightly to the front.  People who focus on getting their leg too high often have the leg too far to the front but it needs to be more to the side than the front.

Leg behind fold forward
In this posture I push my shin into my hand and pull with my hand.  The raised thigh is rolling in.  That means the knee feels like it is looking more down to the floor.

Leg straight forward fold
Here I am careful not to be too archy in my lower back.  I don't want to feel tension in my lower back.  My raised thigh is rolling in.

Balancing twist
The raised thigh is rolling out.


Additional thoughts
As always, stretch less, tense less, think less, and breathe less.  Try your best without being attached to an outcome.  The outcome people often become attached to in these postures (from my observations) is taking their legs too high.

Better the legs are straight rather than high.  This might mean that you keep toe tip on the floor.  That is an important modification I did not show in this video.  That is, you do not need to raise the toe off the floor at all.  You can keep toe tip down, do the arm and spinal movements, and then just straighten the leg when that time comes.

Relax your tongue and breathe naturally.  This will help you feel calm in these challenging movements.

This is the opening sequence in my current outdoor Canberra yoga classes.  Join us and have some fun if you like!

Much metta,
Samantha

www.yogacafecanberra.blogspot.com
www.yogacafelk.blogspot.com


Sunday, 5 July 2015

Fun With Splits!


If you clicked on this post you probably are interested in doing the splits.

Great!  In this post I share two places where some splits or splits-like postures sneak into the current sequence I am teaching.

But as you watch the videos (there are two), look at the photos and read through just remind your self that when you practice anything, try your best but do not be attached to an outcome.

If the splits come they come.  If they don't they don't.  Accept that.  Do not force.  Do not strain.  Move slowly.

This is not an instructional post about how to do the splits.  It is a post to show where you can slip them (or like postures) into parts of your practice.

The first of these postures does not come until at least a good 15-20 minutes of the sequence. That means we have moved and warmed ourselves.

Watch the first video, below, which is an interesting variation on a side bending upside down splits that starts with parsvakonasana.  I deconstruct the posture afterwards with step by step photos and instructions.

Then, in the middle of our sequence, take a look at how we move from gadjastan (elephant stance) to the more traditional seated splits.

Upside down side bending splits
The video shows the transition from parsvakonasana to upside down side bending splits.


Deconstructed
1. Come to parsvakonasana.  Watch previous posts on parsvakonasna if you are not sure how.


2. Pelvis remains in place, turn navel, ribs, chest and bring shoulders to the inside of thigh or knee if possible.  Press inner thigh and outer arm into one another.  Be mindful that your butt does not swing out to the side here.

3. Bring inside hand to back of calf from the inside.  Keep nuzzling knee and shoulder into one another.  Press that hand into the calf and calf into hand.  Again, mindful your butt is not off out to the side. 


4.  Other hand comes to ground.

5.  Lean forward and begin to bring that back foot in.  Be on toe tip so there is as little weight on that back foot as possible. 

6. Keep leaning forward, nuzzling arm and leg, pressing calf and hand, and lift off if safe and comfortable.  Look towards your back foot.


Fun on the floor!
Below is a video that shows how we transition from standing to splits on the floor.  

I show two variations--the first is for people more familiar and comfortable with full splits.  

The second is for those less familiar and less comfortable with the splits.  Remember, try your best without being attached to an outcome. 


To come into this posture we start here.

Make our way mindfully to the ground.  Pause and get that tummy firm in a way you can still feel the movement of the breath there!


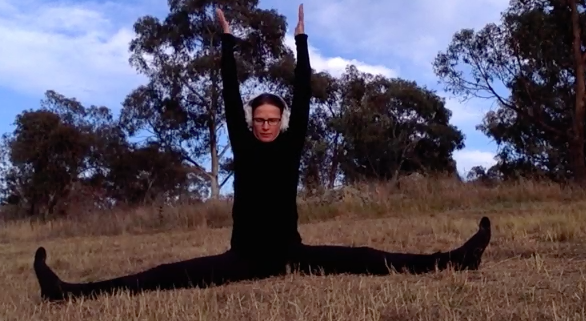
Go for a upavista konasana--a sort of wide legged side split type posture.  I have my arms reaching up to lengthen my spine and I am working with sitting bones down and top of pelvis back so I am not being too archy in my lower back.


Then, either turn spine and lift and make my way to a split like this....


...or, bend both knees then lift and turn to a long lunge.


Smile and have fun.


Only do what feels comfortable.  Try to practice to your own body and how it is at that moment and not to what you think you should to be doing.  


This is a pose in our current sequence as we work our way through outdoor yoga in chilly Canberra (the ear muffs might be a give away!).  The posts are intended for students who work with me and know my teachings.  Overseas we can work on these in my upcoming retreats in Sri Lanka (July 2015) and Bali (September/October) 2015 (see www.artofliferetreats.com).

Happy and safe practicing!

Much metta,
Samantha

www.yogacafecanberra.blogspot.com
www.artofliferetreats.com
www.yogacafelk.blogspot.com


Friday, 3 July 2015

Winter Post Class Chai Catch Ups


If you are in Canberra you know is it winter.

And it has only taken me until half way through winter to bring along a thermos of hot chai for us to sip on after class!

So bring along a cup and avail ye of a post class warming beverage if you like.

Ingredients: various chai spices, organic coconut milk (pure harvest brand).  No black tea--not that there is anything wrong with it but there just isn't any.

Probably made in a little bit of a rush but in a loving rush that is sure to give a little zip to your day.

From time to time I might add raw cacao powder for a chocolatey chai!

Ideally I would love to have a little flask the general passerby could have as a little bit of community cheer but given it has taken me this long to organise just one flask for our class I will have to keep this idea simmering and hopefully action it next year!


Sunday, 28 June 2015

How I Learned Mayurasana Without Practicing

It has taken me a long time to get to a full mayurasana like this one.  Scroll down to the end of the post to see a cool video of how to transition out of gomukhasana via mayurasana, which we practice in my current sequence.

The funny thing is less than six months ago I was trying this pose in the park and I could not extend my legs fully.

The only way I could do the pose was to have bent knees or put them into a bind like padmasana.  Below is a photo taken of me earlier in the year that shows my best effort.


On that day in February it seemed to me unlikely, perhaps even impossible, that I would manage a fuller variation of the posture.

So what changed?

Did I start practicing mayruasana every day?

Actually, no.  I don't remember doing mayurasana very much or at all since then.

The main difference, and what I perceive has made the most difference, is in my last sequence (just finished) I mixed up my surya namaskar slightly.

I like to introduce a little change each sequence--not so much in the poses themselves but the transitions between them or how long we hold them for.

The last sequence I worked with holding my high planks for longer, then incorporated a double push-up with good technique (on my knees most of the time) before lowering to the ground for a shalabhasana variation (prone extension with hands by side).

There were no mayurasanas in my last sequence so there is no doubt that my improved mayruasana was not due to practicing mayurasana.

I am reminded of the time I stopped practicing padmasana because I could not come into it without using my hands.

Instead I worked with good technique in standing postures and one day I decided to try padmasana without hands again and to my surprise I was able to do it.

So it happened today that I tried mayurasana and realised, hey, my legs are straight here!

Mayruasana is a challenge for a lot of women, who tend to be bottom heavy.

In my understanding that is why it is easier for women (but not easy) to come into the pose with knees wide and bent.

The variation I show in my video might work for those who can come into gomukhasana and then perhaps transition to the other side using a gomukhu-mayurasana pose.


This posture is strong on the wrists and you need to have developed a good ability to hold your body weight on your hands without straining the wrists before you try.

I will run through this in class and at my upcoming retreats in Sri Lanka and Bali (www.artofliferetreats.com), but, for now, watch the video and note the placement of elbows somewhere just below the navel, the distance of the knees from the hands, that I am pressing strongly with my fingertips, and that I am maintaining a sense of ease and comfort within a challenging posture.

Look forward to seeing you somewhere soon!

Happy and safe practicing.

Much metta,
Samantha

www.yogacafecanberra.blogspot.com
www.yogacafelk.blogspot.com
www.artofliferetreats.com

Sunday, 14 June 2015

Practicing Calm


Practicing Calm: Four Benefits of The Silent Yoga Class

Every 9 weeks I teach a silent (physical) class.  My retreats always finish with a silent practice.  And in workshops I will usually have a ‘silent’ break somewhere in the middle.

Verbal silence that is for, as those who have ever tried some sort of silent practice will know, just because you stop talking does not mean things go quiet. 

In fact, the opposite can be true.  You start to hear other sounds more intently.  Other voices, the water trickling, the wind swishing, the sound of clothes rustling. 

It is why many teachers discourage people from leaving a class while others are meditating or relaxing; you might think you are being quiet but when the teacher stops talking all other sounds can be amplified.  

And even if we could be alone in a room, we still would not be in silence.  You start to hear the sounds of your breath, the sounds of the inner workings of your body—stomach gurgling, pulse throbbing.  And, unless you are a seasoned meditator, you will likely find your internal voice can take on a noise all of its own!

That said, a silent (physical) yoga class can help you in many ways.  Since I teach one every 9 weeks you will get to one eventually.  Below are some of the benefits you can expect. 

Letting go
First, it is a practice of letting go.  Without a teacher’s verbal instructions you need to ‘be’ where you are at that present moment in time.  Indeed, you cannot ‘be’ anywhere else.  When no one is telling you how to do bakasana or a handstand (or even something less complex), if you cannot figure it out, you need to let that pose go. 

That means you also get a snapshot of where you ‘are’ at that moment in time and what your level of readiness for particular postures is.  It gives you some insight into what you might need to cultivate further.

Going inside
Second, you gain an appreciation of just how much mental energy it takes to listen. 

Listening is a great skill.  It helps you to be a kinder, more socially able person. 

But language processing, even when people are saying helpful or kind things, takes up a lot of your brain’s capacity.

When you do not need to listen anymore you are free to follow your own internal voice and intuition.  Again, you become more in tune with what is going on with you at that moment in time. 

Many religious orders and spiritual retreats harness the insightful power of this type of silence.

Greater connection
But being in silence does mean being alone.  A third benefit is the amazing capacity of the verbal silence to enhance a feeling of connectedness. 

In a silent class you are not just doing your own thing entirely.  You are still following the basic movements and timing of the class.

And the silence combined with shared movement, helps you feel more connected to others in the group.  You sort of become a bit like a school of fish who move collectively—communicating via something other than spoken language.

The connection is not just to the group, however, because the silence of the group also helps you become more in tune with the environment.  You attain a keener sense of the ground beneath you, breeze and sun on your skin, wildlife around you, and the people passing by. 

Thinking less
A fourth benefit is that this type of practice can help you out of ‘over-thinking’. 

With no verbal instructions you have less to question—what does that mean?  What is she talking about? Am I doing it right? 

Over-thinking is one of things that can block movement of energy through our body and, as such, block feelings of overall wellbeing.  It can make us stiff, rigid, anxious, and prevent us from seeing clearly.

When we cannot ‘see clearly’ we do not feel at our best.  We tend not to make the best decisions. 

Practicing calm
These four things—letting go, going inside, a sense of greater connection to the group and environment, and thinking less—all help you to practice bringing about a sense of calm. 

Most people, at the end of the silent practice, find it easier to meditate and find the quality of their meditation much enhanced. 


We will be sharing some beautiful silent practices with you at our retreats and in the classes we teach around the world.  Looking forward to seeing you somewhere soon!

The silent practice is something I learned from Simon Borg Olivier and Bianca Machliss, from Yoga Synergy.  Please get to one of their classes if you can: www.yogasynergy.com

Sunday, 7 June 2015

Active Kurmasana


Kurmasana is an intense spinal forward bend and I recommend should only be practiced with a teacher and not by learning from the internet.

This post is mainly to show how long my spine is when I practice this posture rather than as a 'how to'.  I have pictures and a video at the end.

Many people can do a version of this where they straighten their legs but their spine remains very humped up--like a tortoise shell I suppose.

It will indeed remain a little 'humpy' but my effort here is in trying to lengthen.

I do active variations first to firm the tummy (in a way I can breathe and move the spine).  A more active variation would be to lie down and do what I show here.

First, a sort of navasana where knees bend and I make efforts to draw them into my chest.


Then, I try to keep my legs as close to my chest as possible and straighten them.  This will be beyond a lot of people.  Don't let your legs come out too far from your chest.
Next I take my heels and help myself into the posture assisting with the hands.  I try to push my heels into my hands and make efforts to bend my elbows.  I keep chest and thighs close.  I try to keep shoulders and knees together with firm tummy.  The danger when you use your hands here is that your tummy goes soft so make sure tummy stays firm.
Lengthen the legs as much as possible while maintaining previous actions.  In the video you can see me wriggling to lengthen my spine further--while trying to keep my balance. It's a bit tricky.
I keep tummy firm and legs come down.  Knees are bent, spine is long. I recommend you keep spine long and legs bent rather than go for straight legs.  Far better to stay here than strain or force.
Tummy firm, spine long and shoulders go under knees.
Arms straighten out beside me, shoulders under knees, tummy firm, spine long.  I can breathe comfortably.
Slowly I go, keeping tummy firm and spine long.
The video below shows the posture in action. I make particular efforts to also ensure my neck is in a comfortable position and you can see me moving it around. 
Following an intense forward bend like this I do a less intense forward bend like paschimottansasana and then a strong tummy firming posture like bakasana or a high plank.  If you do postures well counterpose is not necessary but I have just made it a practice.

Using active movements and doing the posture 'mid-air' without hands as much as possible ensures I combine strength and flexibility.

I teach something like the 'wowee active hip opening' sequence I just posted prior to this before I do a posture like kurmasana.

This is the approach I take in my classes, workshops and retreats.  Join me if you like--in Canberra, Bali (for our yoga and raw food retreat September 2015) or in Sri Lanka (yoga retreat).  Details of my class and retreat schedule are on the home page of my blog.

Happy and safe practicing.

www.yogacafecanberra.blogspot.com
www.artofliferetreats.com
www.yogacafelk.blogspot.com