Showing posts with label free spine. Show all posts

Saturday, 19 March 2016

Knees Away Groins Emerging


This week I will be running a workshop delightfully titled 'Groins Emerging'.  Here is a little taster of Harry and I doing a little bit of synchronous work along that theme!


One of the key things we will be working on is the idea of softening and lengthening around the front of groin area as one of the 'tricks' to free the spine in back bending positions. I call this position knees away, groins emerging.  They don't get pushed or forced up.  They 'emerge' and soften as the knees move away.

This is slightly different to how many people are used to initiating a backbend.  To people newer to my class what I see are lots of pelvic curls and groins thrusting going on.  I don't want to suggest that this is a wrong movement.  But for my spine freeing purposes it can tend to jam you in the lower back.

So we will be working on figuring out some ways to first get length in your lower back.  

Then we will move to some arms away and chest emerging, as shown below.


From there we might work towards combining those two elements (knees away, groins emerging and arms away, chest emerging) to see how it can support a possible spine lengthening back bend.


From there some people will possibly work on a bit more arms away and chest emerging to go deeper. But that is pretty tricky.  It is not for everyone.  


Harry and I went back up to our backbend to take a foot up.  But you could also do this (and we can try in the workshop) with the elbows on the ground like in the start position.  Maybe not.  I will be there to see what type of position will be helpful for you and it might be something different.  


We ended up where we started.  In our case this was on the road in front of what turned out to be the rubbish tip.  No wonder it smelled so bad.  Still, through it all we smiled and kept in touch with the core theme of knees away, groins emerging.  
Finishing up with a bit of eye contact, some shared laughter at our antics.  This felt beautiful to do together, almost like we were synchronised swimming yogis on the road.  

So join us for an extra special workshop on Good Friday if you are round, 9-11am (probably a bit later).  This is not for 'advanced' or 'extreme' back bending but for people who want to learn to move more freely in their spines, stop over arching their lower back and feeling all scrunched, and who want to hang out and share a few laughs.  


Happy and safe practicing. 

Much metta,
Samantha

www.yogacafecanberra.blogspot.com
www.yogacafelk.blogspot.com

Friday, 26 February 2016

Key actions for a great plank to down dog

This shape of spine is key throughout the sequence

Here I give you some key instructions that can support a beautiful transition from kneeling plank to down dog to bakasana.

Watch the video first.  You can see the a side view and the front view in the same video.  I have sped this video up so this whole sequence actually took 2 minutes in real life.  I am really trying to emphasis some good slow mindful movement. 

The instructions below should help firm the tummy and armpits while giving a sense of length in the spine (neither stretching nor tightening).  

The key instructions here are to push front of groins to armpits and armpits to front of groins.  Then, if you can add something else, press your hands forward and your knees back.  You should start with feeling relaxed in your tummy.  You should be able to breathe naturally into your belly throughout although it will become firm through the instructions (but not by sucking it in). 


Kneeling plank
 In this kneeling plank make sure knees are behind hips, shoulders over wrists.

Sitting bones move down towards backs of knees, front of pelvis lifts to the lower back to lengthen the lower back.

Lift lower ribs towards the back of chest to lengthen around the middle and upper back.

Press front of groins towards the armpits and armpits towards the front of groins without moving the body forward.  This should bring a postural firmness to your tummy.

If you can manage, press hands forward and knees back while you maintain groins and armpits moving towards one another.

Half child pose
Quite honestly I did not know what to call this position.  It is halfway between kneeling plank and balasna (child's pose).

I move very slowly back into this position.  I am not trying to get my bottom onto my heels.  I am thinking about maintaining the key actions I established in the previous position.  As I move back my challenge is to keep feeling as though I am moving my groins forwards.

See the spine stays the same shape.


Partial lift
Here I focus on keeping the groin-armpit connection then go back again to pressing hands forward but toes and heels backwards.  This combined effort causes my knees to become light.  They start to lift of their own accord.

Downward dog
I keep with those four actions:
  • armpits to groins
  • groins to armpits
  • hands pressing forward
  • feet pressing backward


Walk forward
Maintaining those actions (you might need to let up on pushing feet back because they start to be less on the ground), bend your knees and walk your feet forward.  I tip-toe forwards trying to stay as light on my feet as possible. 

Bakasana
If I keep pressing armpits to groins and vice versa, press hands forwards, lift knees up to chest, rest them lightly on the back of my arms, press elbows back and towards one another and just keep breathing and leaning forward then you might find yourself floating.  Maybe you stay on tip toes.  Wherever you are be happy wherever that is.  Keep working on being where you are and staying for a little bit longer until you feel comfortable moving to the next stage.  


Remember, nothing should hurt.  If you have not developed the correct strength and actions around the wrists then you need to work on clawing with your fingertips and pressing the wrists into one another and just have less weight on the wrists until you are ready to shift more weight there.

Have fun.

Remember, these videos are primarily intended for my own students so I can give adjustments and comments and personal feedback.  It is always best to go to an actual teacher rather than learn off the internet.


Oh, and don't forget about my retreat in Sri Lanka this April 2016.  Come along if you can!

Much metta,
Samantha

www.yogacafecanberra.blogspot.com
www.yogacafelk.blogspot.com

Monday, 3 August 2015

Baby Backbend Without Squashing Lower Back


I have never had a problem with urdhva dhanurasana.

But I have had lots of students who have or do have difficulty with it.  

One thing I always emphasise is the spine should not feel squashed at any part or at any point from ground to lift and down again.  

People can tend to squash in their lower backs. 

I have even had people tell me they thought it was supposed to squash their lower back.

I tell people they are practicing something else but not the pose I am trying to teach if they feel squashing.  

If you are in my class I want you to remember a few things when it comes to this part of the sequence.

Practice without squashing.

Don't be attached to the outcome.

Move slowly.

With this in mind, a part of not being attached to the outcome is realising you don't need to do anything at all if it does not feel right.  

You certainly don't need to come all the way up.

With this in mind, I made a  poster that shows what you could pay attention to if you decide not to push your hands into the floor.  There is still plenty you can do and, in fact, I do these things each time I come up into a fuller posture, as you can see in the video at the end (it's just that I only need to spend about a second getting there whereas some people will need more time).

Please bear in mind this post is intended primarily for my students who can experience what I am teaching in a class situation.  Learning this type of thing from the internet is not suitable. 

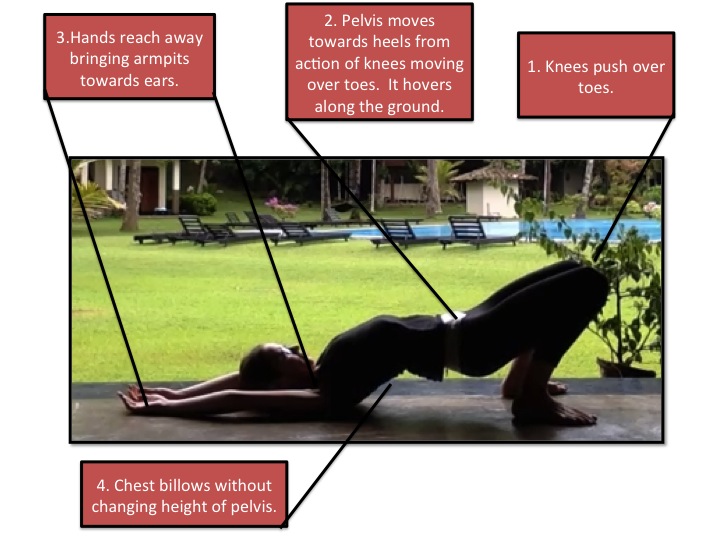
Read the poster from the right starting with what to do with the knees.


If you lie on your back and just press your feet into the floor you will feel your pelvis get light without necessarily lifting.  Then press your knees over your toes.  

The pelvis will lift and be carried towards the heels.  I am not trying to push my pelvis up here.  There are many styles that teach this and it is possible and there are benefits to that as well but it is not what I am doing here.  

I then reach my arms as far away from my pelvis as possible.  I try to basically get as long as I can through my body--pelvis moving one way and armpits the other.

Then I try to billow up my chest as though a gust of wind has blown through my feet and hits me in the middle of my upper back causing it to lift.  

This is where I like to get people to stop and think for a while.  Moving this part of the spine is really tough.  It is the stiff part of most people's spines.  

Many people cannot get movement in this part of their spine at all unless I provide a tactile cue (touching the area).  Often people shove their pelvis up and down and their chest moves as a consequence but there is little to no independent movement in the upper spine.  

What I am trying to do for myself when I practice this way is get some independent movement of the chest so that my spine does not move as one chunk.  

It is delightful just to try to raise and lower the chest here without moving the pelvis and just continue reaching the arms in one direction while moving the knees in the other.  

But you decide.  

Don't do anything that hurts or strains.  

Most people will need to do a lot of 'warming up' before they can do the full version of the pose but you can do this modified variation any time.  

Having said that, my teacher Paddy always taught me that they should feel so free you can do the full posture first thing in the morning when you get out of bed.  I do that myself every now and then.  I am not saying I don't feel a bit stiff in the morning but in my experience she is right, when you are able to move freely then this is possible.  Being able to move freely takes a lot of practice though and I still have stiff mornings!

Also, when you practice this way there should have been no squashing so no need to do something to unsquash your back afterwards.  

Below is a video of the full thing, taken on location in Sri Lanka at my last yoga retreat.  I will be heading there, by the way, for my next yoga retreat from 1-4 October 2015.  Get in touch if you'd like to join us!


This post is not intended to cover all of the aspects of back bending.  I wanted to emphasise a pose you can try on the floor without raising to the full posture that helps you lengthen.  There is, of course, much more you can do within that even (did I mention doing a sit up in your tummy?), but that is for class!

Happy and safe practicing.

Much metta,
Samantha
www.yogacafecanberra.blogspot.com
www.yogacafelk.blogspot.com

Saturday, 11 October 2014

Actions of Yoga: Week 1 Wrap Up (ankles, knees, and hips)


What a fabulous morning we had out on the lawn by Lake Burley Griffin learning some of the key actions of yoga.

The main emphasis this week was to figure out the types of movements we can generate in our feet, the basic movements of the hips, to understand some 'positioning basics' of feet and hips, and then to find ways to create action throughout our legs in standing postures.

From my perspective, it looked like everyone could feel the difference between a dull and sinking pose and was able to transform it into an active and lifting pose that generated warmth in the hips especially and lightness in the spine.  Excellent work!

This post is mainly a recap for those who attended the class but some of the tips might help your thinking about your yoga practice even if you did not attend.  I'd recommend practicing and studying with a teacher though.

Some of the main points covered this week:

  1. Gripping the toes to help with balance.  
  2. Lifting outer edge of outer foot towards outer ankle in standing and balancing poses to help activate outer ankle joint (which tends to be weak and overstretched in many).  This was especially helpful (but hard) in the heel raising postures of the opening sequence, helped with balance in pasrvottanasana and reverse triangle, and helped with preventing over stretching when applied in positions on the ground.  
  3. When a leg is in front of us, turn the thigh out.
  4. When a leg is behind us, turn the thigh in.
  5. When positioning the front foot in standing postures, move the heel out slightly so that the outside edge of your foot is either parallel to the edge of your mat or you look slightly pigeon toed.  Then, grip with the toes and try to 'screw' the heel inwards.  You should feel activation up the leg to the outer hip.  This will help turn the front thigh out.
  6. In standing postures where a leg is behind and the foot is flat on the ground, the thigh turns in and you can enhance this by trying to 'screw' the heel outwards and toes inwards.  You should feel activation again up the back of the leg and inner thigh, also helping turn the thigh in.  
  7. In standing postures with one leg forward and one leg backward you can generally try to 'stretch the floor with your feet'.  This means press front foot forwards and back foot backwards.  There are other options at times but we can stick to this for now.  You should feel the front of the front thigh activates and the back of the back thigh and butt activates.  
  8. The combined screwing of the feet and stretching of the mat with the feet will help activate front and back of both hips.  With this activation, you should find lightness in the spine so that it can 'billow around'.
  9. In sitting forward bend (pascimottanasana) we tried moving heels towards sit bones and pushing sit bones towards heels, which helped to create action in the legs and lift in the spine.
  10. In gomukhasana we tried pressing the knees together.  

The video on this blog is me, having returned home, putting some of those actions together.  Yes, there is my niece's rocking horse peeking in from the side. And Humpty Dumpty and Ragedy Doll too.

Next week we continue our work on the lower limbs, with particular attention to actions to relieve tight hips flexors, bending forward, and some more focus on forward bending.

I highly recommend online courses from Yoga Synergy and classes with Paddy McGrath and Simon and Biance (Yoga Synergy).  You can link to their online courses on my home page.

Hope to see some of you next week again!

Tuesday, 6 August 2013

A Way To Downward Dog To Free Your Spine


Do I start every post with the phrase "there are many ways to do the same pose"?  Well, it might be boring but it is true.

Remember that I offer suggestions on a particular way to try poses because I believe they offer a way to bring freedom but they are not the only way to practice.

This week I want to offer a way to think about downward dog that I suggest you explore in my classes.  Rather than go into fine details about the entire pose,  I am going to focus on a specific part of the pose--what you are doing around the ribs, chest and armpit area.

I will also show you a variation that you can practice at the wall to create more freedom around the upper back and armpit area.

This variation will especially help those of you who feel your arms are 'too short' to come into pincha mayurasana or whose arms are too weak to help you into urdhva dhanurasana.

In my experience, it is not limb length or strength that makes those poses difficult but tightness around the outer armpits that prevents you from taking the arms overhead with a free spine; which is precisely what you want to practice in a pose like downward facing dog.


Background
If you just want the technical stuff then skip this bit.  You might have guessed that I am one of those people who LOVE reading the author's footnotes and endnotes, often more than the main text.  So, I'd like to meander a bit here to share with you how the idea for this post emerged.

A few weeks ago an inquiring student asked me why she another yoga teacher came and pushed her chest to the ground in downward dog when I was suggesting in my class that she gently soften the ribs towards the spine.  Obviously that was confusing since we seemed to be suggesting the opposite movements!

My first advice to her was to ask why the other teacher might be doing that, as teachers always have a reason and will be able to tell you their reasons.

My second words were that while I might be suggesting something else it does not mean one way is wrong or right, but that they are different and she needed to explore for herself what felt better at a particular point in time (bearing in mind our bodies are always changing).

These are really important messages.  Ask why and then explore what feels right.  Seeing this attitude in students always makes me happy.  You don't come to yoga to make me happy, obviously, but I am altruistically happy in this regard because I know that with an inquiring, exploring attitude you will eventually find your own way to freedom.

While I was chatting to her about this it also reminded me of another student who, many years ago,  asked me to teach the class exactly how to do downward dog because he had read somewhere that if you can master downward dog then you have mastered yoga.  As a relatively novice teacher  I mistakenly believed there was only one downward dog (of course it was the one I had learned!).  I wouldn't say I am wiser but I now know better.

Having said that my downward dog is still pretty much the same as it was then, mainly because I had the same genius teacher back then that I have now (Paddy McGrath if you haven't googled her yet then please do).

Purpose
You don't have to get all theoretical about yoga but it can help your practice if you have an idea about what you might be doing in a pose.

My purpose is always to look for freedom in the spine.  I have invented a new adjective to describe this way of freeing your spine--'spongify'.

In all of my poses I try to feel like my spine is a sponge so that at any time I could squeeze it in any place and it would be soft and spongey.  And if I came up to you while practicing and tried to 'grab' a piece of your spine (which my students will have experienced) it would feel spongey and not hard.

It is a beautiful experience to have this spongey spine and you will not get it if you stretch too much or tense too hard, so bear this in mind.

Physiologically, when you can let your spine be free you will enhance the flow of energy and information through it.

Aside from cultivating freedom in your free spine, you can also try to create length in your outer armpit muscles by practicing the way I suggest.  This will help you take your arms overhead without projecting your ribs forward so that the spine stays long rather than compressing in poses like urdhva dhanurasana and pincha mayurasana (or any pose where you need to take your elbows near your ears).

The Ribs
What to do with the chest in downward facing dog?

Because a lot of people think yoga is about stretching, and perhaps because many yoga journals and articles tend to print pictures of very flexible people, you might think that pushing the chest through towards the ground is what you should do with it in downward facing dog.

It is not wrong to push the chest through, sometimes I do this briefly myself and it usually gets a crack or two out of the thoracic vertebrae.  But, for me, if I hold myself in the pose like that it just feels like squashing the back of my spine and jamming up my shoulders.

What feels better is if I gently soften my ribs towards my spine--as though they are floating towards the ceiling.

The key is not to push the ribs back or you will go too far the other way--instead of shoving the chest through you end up shoving them back.

As in most things the middle way often bears the most delicious fruit.

What I suggest you look for is a place where you can wave the spine around.  You will see me doing a lot of that in the video.

The Armpits
With a free and spongey spine see if you can think about pressing the armpits downwards and inwards as though they are trying to move towards your inner thighs.

This firms the armpits in a lengthened position and will help cultivate strength and flexibility that will help you in other postures where you need to take your arms overhead.

Some Adjustments
To get a free and spongey spine you might need to make a few adjustments to your downward facing dog.  Some of the most common ones you can try are:

  • bend the knees a little and worry less about getting the legs straight.  This is especially if the back of your legs are really tight.  
  • take your arms a bit wider than shoulder width.  Sometimes this can help if you are already really tight in the armpit or across the upper back.


Summary
Downward dog is a pose that gets repeated a lot in yoga classes.  For me each downward dog is a great opportunity to to give my spine a good wiggle.  Actually, I wiggle my spine in each and every pose but this is a semi-inverted pose that helps it wiggle in a different way.

To get your spine waving, see if you can find a way to soften your ribs towards your spine.  Then, to help create strength and flexibility in the armpits to better backbends and inversions (by better I mean spine-freeing) practice pressing the armpits down.

Remember, if it doesn't feel good then it probably isn't.  And don't be afraid to ask your teacher to give you a hand.

May your practice be peaceful, safe, and joyous!


Monday, 22 July 2013

A Way To Free Your Neck When Turning It


There are many ways to move and I tend to encourage finding ways to move that help you find freedom.

If your neck is squashing when you turn it then you are not in freedom.  In this post I want to offer a way to turn the head and neck so it is free rather than squashed.


I learned these tips from courses and classes with Simon Borg Olivier and Bianca Machliss of Yoga Synergy.  It is always good to go direct to the source so please take a class or log onto their website for lots of interesting stuff.


I previously posted on a way to move your shoulders to free your neck.  In that post it was suggested you can move your armpits down towards your waist so the upper shoulders and neck can move more easily.

I am one of those people with neck issues, which is perhaps why I like to post about freeing it.

I like to think my neck issues started courtesy of a man who did not give way to me riding on my bicycle and smashed into me.  This resulted in my head spearing through the windscreen of his car.  I thank the bike police (who'd caught me riding without a helmet a few weeks previously and who put the fear of spinal injury into me with their caution) for saving my life.

The man was also nice about it and, after staying around to peel me off the road (where it appeared that I  had only experienced a few seconds of unconsciousness and a few scratches), he drove me to uni and fixed my bike.

Anyway, since then I have experienced 'weirdness' in the upper spine.  I don't know what it is, and am not inclined to have scans, so I just call it weird since it is not normal and go about helping myself with yoga.

I do know that if I don't turn my head mindfully, to the left in particular, sometimes it jams up and I have had weird (that word again!) sorts of spasms occasionally.

Even if you have never head-butted a windscreen, chances are your neck is an area that can feel stiff and problematic due to the way most of us tend to move and work.

That said, I was really glad to discover the way of turning the head to the side that I describe below.  It creates space on both sides of the neck, lengthening the side you turn to rather than jamming it.

The Short of It
If you just turn your head to the side the side of the neck in the direction you are facing shortens or squashes.

To prevent this squashing bring your chin towards the middle of the throat before your turn.  Then, once your head has turned towards the shoulder, move the ear away from the shoulder you are looking towards.

It's pretty much that simple.

The Long of It (Applied To Postures)
There are lots of postures where you turn your head to the side, although you might not think of them that way.

The basic twisting postures are obvious ones--usually the torso turns and then the head turns to look over one shoulder.  It is often the back shoulder but can be the front.

You don't actually have to turn the head--you can keep it in line with the centre of the chest (which is in line with the spine)--but most of us will turn it and often turn it excessively.

Excessive turning of the neck is because the neck is much more mobile in turning (rotation) than the rest of the spine so you will feel like you are twisting more if you turn your head more.

And while it might be good for the ego remember it is not our ego you are practicing for.  

A spinal twist should be a twist from the whole spine from the base up rather than a big twist at the neck.

Aside from the more traditional and obvious twists, there are other postures that we turn our head in.

Trikonasana and parsvakonasana are two of them.

These are two postures where students typically feel discomfort in their neck if they do not hold it right.

I believe this is because many of us turn the head to look up in those postures without thinking about what it is doing to the neck.

You must remember that when you look up in these postures you are actually turning the neck so the basic principles I outline here are relevant.

So what to do about this pain in the side of the neck when turning it to the side?

Look for freedom rather than squashing
The main thing to remember in any posture is you are looking for a feeling of comfort.  In the neck you don't want to feel squashed or restricted in any direction.  Being mindful of this is the first thing you can do for yourself: if you notice squashing then do something about it.

Move slowly and smoothly
You can also make sure that you move slowly and smoothly.  Moving slowly and smoothly is part of mindful movement and you will be able to stop before any discomfort arises.

Initiate movement from the base up
To help reinforce mindful movement you can try initiating your movements from the base of the spine first and moving the neck and head last.  That is, in a twist you could try initiating movement from the navel, lower ribs, chest, collarbones first and then mindfully position the head.

Position the neck and head: Chin in, ear away from the shoulder you are looking towards
With mindful, slow, smooth movement that is initiated from the base up you can then make sure that when you turn your head to the side you move the chin towards the shoulder you are looking towards and the ear away from it.


Summary
Whenever you turn your head to the side you are likely to squash the side you are turning towards.

A basic principle in yoga is to lengthen without squashing.

To avoid squashing the neck when you turn it to the side, keep the chin in and move the ear away from the shoulder you are turning towards.

It helps to be mindful that you might be squashing, and to move slowly, smoothly, and from the bottom of the spine to the top.

I hope this trick helps you find freedom.  Please do not do anything that causes discomfort and talk to your yoga teacher if you need help.

Happy and safe practicing!


Tuesday, 28 May 2013

A Way to Parsvakonasana With Strong Legs & Free Spine

There are many ways into postures.  This is one way into parsvakonasana that helps promote a strong and stable base and free spine.

In this posture it is important that you find a place of freedom in the neck.  It will like jam if you do not push the armpit forward and down and if you do not move the ear away from the shoulder.

I come into this pose from a low lunge.  You can try other ways.  The basic ideas are to:


  • set the feet
  • set the pelvis so that sitting bones move forward and under top of the pelvis back
  • ensure the front leg sitting bone does not swing out to the side, encourage it to scoop under
  • press front foot forward, back foot backward.  The legs will feel strong and the spine will feel light. 
  • grip front and back heels in
  • roll back thigh in
  • back leg armpit moves forward and presses down to the floor
  • front leg armpit moves towards the hip
  • turn from the navel first, then the ribs, then the chest
  • relax the throat and neck
  • breathe
  • relax
  • smile
Instructions
I start from a low lunge.  I line the front foot up with the outside edge of the mat and grip the heel in without moving it. 

I move the sitting bones down and forward, top of the pelvis back.  Lower back lengthens.

I scoop the front leg (right) sitting bone over the left.

I keep the pelvis as it is and lower the back heel without swinging my butt out.   I actively roll the back thigh to roll in. 

I press the front foot forward and back foot backward.  I push the heels inwards.

I feel the spine float up. 

I take my left armpit forward and press lightly down, right armpit moves to the waist.

I straighten my left arm, armpit stays pressing down.  I take my right hand towards the floor.

I keep my arms as they are, my pelvis as it is.  I push my navel forwards and then turn first from the navel, then the ribs, then the chest.  My spine turning towards the ceiling.  My left armpit stays pressing down and forward.  

I lengthen the front without shortening the back by pushing the navel forward again then letting the chest float up. 

I place my neck in a comfortable position. 

I feel that I could move and if I wanted to but I stay still.  I don't feel stuck.  I tense less, I stretch less, I think less.  

I relax.

I breathe.  

I smile. 

May your practice be happy and free!