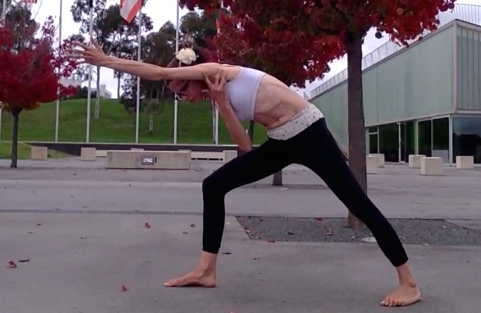
I had the privilege of being in a lovely garden in the hill country in Sri Lanka. Thanks to all of the people who looked after us there at Kelburne Cottages, Haputale.
It is a 6 hour trip by car along winding roads and it feels nice to move your spine in different ways when you have been sitting for so long.
I felt like doing some sidebends in particular.
Spinal side bending is when the spine actually lengthens on one side relative to the other rather than just tipping your body sideways with both sides equal length.
I emphasised the side bending of the spine with some shoulder/arm movements and it is those that are deconstructed a little more in this video.
I lift the shoulder, then the elbow, then I roll the upper arm out (that is where you see the elbow start to point down), then I reach out my forearm and fingers from there.
In the video I move my head last. I move it in a way that keeps the sides of the neck feeling long. Only move your head and neck in ways that feel comfortable. For many people that might mean you stay looking down.
I had this lovely grass to practice on with birds singing and a beautiful garden behind me. In the video that looks amazing. Yet when I practice my focus is inward and directed more towards noticing how it feels to move.
This practice is repetitive and the movements start to flow nicely and I could have stayed repeating them for much longer. The video lasts for 8 minutes and I finished more because I was conscious of how long it would take to upload the video rather than because I was ready to finish.
When you practice you could go for longer or shorter. You could try the upper body and arm movements from sitting if you are too tired to stand. You could even lie down and imagine yourself doing them.
Do not do anything that hurts. It is always better to find an actual person and learn from them. Happy and safe practicing.
Much metta,
Samantha
PS Canberra yogis, we are back for our outdoor practice from Sunday 6 May 2018.
I love sidebends. While out and about today I found some nice spots to practice a few.
These sidebends are spinal sidebends. My spine curves to the side.
Key to this type of side bending is that I make an effort to lengthen one side without squashing the other side. You can sort of just droop yourself and look like you are side bending but that just makes you feel squishy and sometimes squashy.
When I teach side bending I often say imagine the arc of water coming from a firefighter's hose as it tries to go up to a high window on a tall building. It does not mean you have to be upright but rather you get an internal feeling that you are reaching up and over rather than just leaning out to the side. As always, lift rather than sink.
The video below shows some standing sidebends, including some balancing variations.
These sidebends should feel active. There are a few key elements to each of them that I will mention here.
In general I am pushing my front of groins forwards.
In particular I am pushing the front groin forward and up on the side that I sidebend to
I press the same side armpit down to that same front groin
On the lengthening side I am reaching up and over
On the lengthening side I am pushing my armpit forward and up and over as though I am bringing my armpit towards my face/nose
Once I have my sidebend I turn my navel, ribs, and chest towards the lengthening side
Then I do a little backbend through my whole spine
If you do not know what these things mean or feel like it is best to come to class.
In the first standing variation I start with a sidebend and balance on tip toe. Then I deepen it by transferring the weight to that ball of foot (rather than being on tip toe).
In this posture I keep leaning more weight onto the ball of foot.
I am not leaning or sinking down into the leg with the lower arm. Rather, I am actively pushing that armpit down.The arm remains straight and I do not dump the weight into it. While it is on the knee I am using it to press and help me lift more.
In this posture I am side bending, then I do a twist, then I do a little backbend. You can find your own comfortable position for your neck.
Do keep pressing front of groins forward in this posture so you do not end up with your butt hanging behind you.
In the second variation I take this to a more challenging balance with the leg raised.
I hug that knee to the chest and then go for a sidebend there.
In the third variation I straighten the bent knee and take my top hand over to the foot if possible.
I make sure to maintain sidebend, twist, and then a little backbend.
This third variation is obviously quite tricky.
Catching the foot means you need to be long in the legs and long in the side body and be able to maintain a turn.
Sometimes people try to grab the foot without regard to the rest of the posture and so they lose the twist and some of the sidebend.
This is because when you lean your body forward and turn your torso towards the ground it makes it 'easier' to get the foot. Alas, you will have left half of the posture behind!
So, bear in mind the point of this position is to sidebend and turn. It is not to get the foot. Do not sacrifice the posture for the foot.
In the video you can sort of see that my foot and hand come to meet one another without me losing the positions I had established beforehand.
The first two of these balance variations somewhat resemble parsvakonasana. They are, indeed, a sort of balance version of that posture.
Parsvakonasana is a pose where you can sidebend, then twist, then do a little backbend. It feels delicious.
Whether or not you reach the ground is irrelevant. Most people will not be able to do that and it is ok. If you make sure you maintain the key actions you should find that you are doing a lot of work in this posture without ever needing to reach for the ground.
I found this lovely arch to do parsvakonasana beneath. It inspired me because the arch shape reminded me of the arch of my sidebend.
I found out that this gate was a gift to Canberra by the Hungarian government made by a Hungarian artist. It is quite beautiful.
Happy and safe practicing. Look forward to seeing you outdoors soon!
Parsvakonasna: A forward bending, side bending, twisting, backbend
If I could only give one instruction in class it would be something like, find lift in your postures. Find lightness.
Okay, that's two, but that's what guides me through my self-practice reflection whenever I encounter and practice moving and postures.
That said, I encourage students to be mindful that they are not collapsing in their postures.
People who are very flexible often collapse out of habit, especially if they have not developed strength to balance their flexibility.
People who are stiffer might do it to try and get deeper into an image of a pose they think they should be in, often with some strain.
I have little slips and sinks and collapses that I still need to think of myself! It is an ongoing work.
In standing poses there is always the possibility of sinking into the hips. In arm balancing poses there is the possibility of sinking into the shoulders. In backbends it tends to be sinking into the lower back.
In this post I look at a way to try parsvakonasana without sinking into the front hip.
I describe the key actions that give strength and stability to this pose and which help develop mobility.
I pay particular attention to some key spinal actions that will help you develop a strong and mobile core.
I have included two videos. One has more slow and detailed visual instructions. The other highlights the difference between lifting and sinking in the front hip.
I have also included step-by-step visual and written instructions, breaking down the pose into key leg, spinal, and upper body actions.
As with all my posts, I really write these for my students to practice outside of class. If you are not a student of mine I encourage you to come to class or find a suitably qualified teacher who can help you better understand the feeling of these actions in your body!
Perhaps watch the key actions video first. Then review the step-by-step instructions. Then watch the difference between sinking and lifting.
Key actions video
This video shows me using my mime skills to show you how to come into the posture.
Perhaps the highlight of this video comes around 1 minute 50 seconds when a little boy (not in the screen shot) says 'I need to do a poo'. A conversation ensues between the family members and the boy, discussing where he can do a poo, and culminates with dad's joking comment, 'well, you can't do a poo in the lake'. As you can see, that brought a big smile to my face!
Key actions step-by-step instructions
Parsvakonasana, spinally speaking, is essentially a forward bending, side bending, twisting, backbend. Is that what you are doing when you practice? I deconstruct it below.
1. Sitting bones down, top of pelvis back, lengthens lower back and unsquashes front of groin.
2. Spinal forward bend. This means firming the tummy in a way you can still breathe into it. I do this by keeping top of pelvis back, leaning forward, and trying to move my hips forward without them actually moving. I lean forward without letting my butt stick up and start to take my leg back.
3. Toe down then heel down.
4. Check sitting bones down and top of pelvis back.
5. Check front thigh is rolling out. You could do this by thinking of how to roll it out. You could do it by turning your front heel out slightly so outer foot points straight ahead then try gripping the heel back in without moving it.
6. Check back thigh is rolling in. You can allow your back pelvis to also come in if that helps. In fact, these actions should help unsquash your lower back. I have outer back foot lifting towards outer ankle.
7. Stretch the ground with your feet. That means pushing the front foot down and forward and the back foot down and backward.
8. Lower ribs move back to middle back to help bring softness to your middle and upper back.
9. Spinal side bending. That means you try and move the front of bottom pelvis forward and up towards bottom side front rib. In the picture you see me drawing those two points together. Make sure the lower ribs stay back and don't pop out.
10. Take top arm overhead. Push armpits forward and up as though trying to bring your underarms towards your nose. Outer armpit is rolling towards your face. This enhances the side bend.
11. Turn from your navel level of spine towards the top pelvis. Try not to move your top pelvis or move anything else. This is just a spinal twist. Many people move the whole pelvis here but you want to make this a spinal movement.
12. Keep turning your spine progressively towards the sky. In the photo I show turning the chest. Again, try to keep this a spinal movement. Also, watch that the lower ribs do not jut out.
13. You can put your bottom arm wherever it goes without changing the preceding actions. Here is the point where many people might just collapse in their front hip in an effort to reach the ground. But in this photo you can see that I have kept the front hip exactly as it was in the preceding photo. I come to the ground with my arm because I enhance the spinal side bend. Wherever that bottom arm ends up, you don't sink into it either. I am just lightly pressing my hand into the ground and mainly doing an action of moving that armpit towards the hips to enhance the spinal side bend.
14. From there I add the last action. This is a lengthening of the front of the spine. I touched my upper chest in the photo (although the action comes from the navel). I get a little lift which sort of feels like a little back bend in my upper back. From there my head comes into place. Many people will not feel comfortable with their head in this position. It is better that you find your own comfortable position for your head and neck. My head position is throat forward, chin up, combined with a little twist where move the top ear away from the top shoulder slightly. I cannot show or explain this well here so I just suggest you move your head and neck gently and find your own comfortable spot.
15. Here I stay firm but calm. My tummy is firm but I can feel the movement of the breath there. I am content and at peace. I feel like I am doing something and I am getting warm from this posture. It is about 10 degrees celcius in this photo yet I don't feel cold even in this crop top because I had been practicing for a little while and using active movements in such a way that I tensed less, stretched less and just enjoyed moving. This is self-evident when you can see me laugh and smile as I hear the jokes of the people around me.
Difference between sinking and lifting
In this video you can see me first coming into the posture so that I do not sink into the front hip. In the second version I just sink into the front hip.
In the second way I do not do spinal side bending. It is more just hip flexion. Because of this I feel very passive. I am not getting warmth and I am not moving energy through my spine effectively.
Ultimately how you come into postures is your choice.
Be happy and content. Practice safely, mindfully, and peacefully. When you practice like this people want to be around you. You inspire movement in others. As I was filming these sequences today I had at least 4 strangers come up to me, including two children who just wanted to do tricks with me (handstands and arm balances), all wanting to talk about what I was doing and how it just made them feel good. I am certainly not the most elegant, strongest, most flexible person. But I really enjoy doing what I do. Happy with where I am. When that happens I do believe you can have a powerful influence on helping others towards finding their own inner happiness too.
This is the type of thing I teach in classes, workshops, and retreats in Canberra, Sri Lanka, and Bali. Hope to see you somewhere soon!
Two key ideas in side bending are to lengthen the side you want to lengthen and firm the opposite side. If you can learn to move from the navel upwards your posture will more effectively move blood and energy through the spine.
You can see the influence of the Yoga Synergy team of Simon and Bianca here so please also go straight to the source and see what they have to say.
What I wanted to show in this video is how to do a side-bend first in a standing balance posture and then apply it to a more traditional side bending posture like parsvakonasana.
Apologies upfront for the annoying autofocus on the camera, which leaves me in soft-focus a few times. Must get that sorted.
What you will find is that a side bending posture can lengthen and traction one side of the body/spine, while firming the opposite side. The firmness does not come by itself and you need to move the body in particular ways to achieve this.
Start from standing, feet comfortably apart, weight forward in the toes, knees slightly bent, sitting bones moving down and forward, top of the pelvis back. Relax and breathe.
LENGTHEN ONE SIDE
From the standing position above, move right toe tip forward. Move sitting bones forward. Then, to lengthen one side--let's say the left--initiate the movement from the base of the spine up. So move the navel to the left, then the ribs, then the chest, then the collar bones. If you can move the individual vertebra between each of those points then do!
Then enhance the lengthening by using the shoulder/arm--taking the left arm forward, up, and to the right. Do not worry about taking the arm too high--this can tend to squash the neck. Try to go for more forward and across movement. Play with it a little and see what gives you length without squashing.
FIRM THE OPPOSITE SIDE
With left side long, now firm the right side. To do this move the right armpit down towards the right hip. Then push the right hip forward and up. The forward and then the up are important. You need to do both. You should find this firms the right side without squashing it.
Relax and breathe into the abdomen which is firm on the right side but soft on the left. Put your neck in a comfortable position so that it is not squashed on any side.
SUMMARY
The basis for side bending is to move from the navel up. Lengthen one side of the body and firm the other side without squashing. If you let the sitting bones move back you will end up squashing the lower back so watch for that.
You can use these basic principles for any of the side-bending postures. I demonstrate this in parsvakonasana in the video. But trikonasana would be another example of this. There are many floor sitting side bending postures where you apply the same principles of lengthen then firm as well.
Remember, don't do anything that doesn't feel good. Look for a feeling of freedom and ease rather than stretch and tension.