Showing posts with label backbend. Show all posts

Sunday, 1 January 2017

Savouring Sidebends


I love sidebends.  While out and about today I found some nice spots to practice a few.

These sidebends are spinal sidebends.  My spine curves to the side.

Key to this type of side bending is that I make an effort to lengthen one side without squashing the other side.  You can sort of just droop yourself and look like you are side bending but that just makes you feel squishy and sometimes squashy.

When I teach side bending I often say imagine the arc of water coming from a firefighter's hose as it tries to go up to a high window on a tall building.  It does not mean you have to be upright but rather you get an internal feeling that you are reaching up and over rather than just leaning out to the side.  As always, lift rather than sink.

The video below shows some standing sidebends, including some balancing variations.


These sidebends should feel active.  There are a few key elements to each of them that I will mention here.

  • In general I am pushing my front of groins forwards.
  • In particular I am pushing the front groin forward and up on the side that I sidebend to
  • I press the same side armpit down to that same front groin
  • On the lengthening side I am reaching up and over
  • On the lengthening side I am pushing my armpit forward and up and over as though I am bringing my armpit towards my face/nose
  • Once I have my sidebend I turn my navel, ribs, and chest towards the lengthening side
  • Then I do a little backbend through my whole spine  

If you do not know what these things mean or feel like it is best to come to class.

In the first standing variation I start with a sidebend and balance on tip toe.  Then I deepen it by transferring the weight to that ball of foot (rather than being on tip toe).

In this posture I keep leaning more weight onto the ball of foot.

I am not leaning or sinking down into the leg with the lower arm.  Rather, I am actively pushing that armpit down.The arm remains straight and I do not dump the weight into it.  While it is on the knee I am using it to press and help me lift more.

In this posture I am side bending, then I do a twist, then I do a little backbend.  You can find your own comfortable position for your neck.

Do keep pressing front of groins forward in this posture so you do not end up with your butt hanging behind you.


In the second variation I take this to a more challenging balance with the leg raised.

I hug that knee to the chest and then go for a sidebend there.


In the third variation I straighten the bent knee and take my top hand over to the foot if possible.

I make sure to maintain sidebend, twist, and then a little backbend.

This third variation is obviously quite tricky.

Catching the foot means you need to be long in the legs and long in the side body and be able to maintain a turn.

Sometimes people try to grab the foot without regard to the rest of the posture and so they lose the twist and some of the sidebend.

This is because when you lean your body forward and turn your torso towards the ground it makes it 'easier' to get the foot.  Alas, you will have left half of the posture behind!

So, bear in mind the point of this position is to sidebend and turn. It is not to get the foot.  Do not sacrifice the posture for the foot.

In the video you can sort of see that my foot and hand come to meet one another without me losing the positions I had established beforehand.

The first two of these balance variations somewhat resemble parsvakonasana.  They are, indeed, a sort of balance version of that posture.

Parsvakonasana is a pose where you can sidebend, then twist, then do a little backbend.  It feels delicious.

Whether or not you reach the ground is irrelevant.  Most people will not be able to do that and it is ok.  If you make sure you maintain the key actions you should find that you are doing a lot of work in this posture without ever needing to reach for the ground.

I found this lovely arch to do parsvakonasana beneath.  It inspired me because the arch shape reminded me of the arch of my sidebend.

I found out that this gate was a gift to Canberra by the Hungarian government made by a Hungarian artist.  It is quite beautiful.


Happy and safe practicing.  Look forward to seeing you outdoors soon!

Much metta,
Samantha

Saturday, 2 April 2016

Shoulder Variations For Dhanurasana


We introduced these tummy lying backbends in class recently.  There are a whole lot of things you can do with your arms in them.

This post is just for watching and not really for practicing until you come to class and I can talk to you and we can consider what is going on with your knees, spine, and shoulders and figure out what might be safe and comfortable for you.

Always remember you do not need to take your foot at all.  If you have troubles with your knees, spine, or shoulders you should talk to your teacher before you even consider it.  You can just bend the knee and reach towards your foot without actually taking it, as shown below.  For some people this will be enough.


Some other things to consider in the variations I show in the video is the shoulder is rolling out when you take it back.  It rolls in again in some variations and stays there or rolls back out again while possibly doing a variety of other things around the shoulder, shoulder blade and elbow joint complexes.

The point is, there is a lot going on around the shoulder joints and you really need to take extreme care before embarking on any of these variations.

For that reason I am just showing them here so you can maybe take a look in slow motion and have a visual memory of the movement patterns for when you come to class and we can discuss more in person.


The three shoulder variations I show in the video are shown below.  In all of these positions I am basically doing the same thing with my leg, which is to press my shin or foot away and then up. 

In these variations the hand can have a pulling action but I counter it with the pulling action of the shin and foot so that it is not just an arm pulling and tugging at the leg.  
I am mindful of how the knee is feeling and I don't feel squashing in the knee joint.  

I am mindful of how the shoulder is feeling and I don't feel over-stretching at the shoulder joint.

I am mindful of how my spine is feeling so I take action to ensure I am not bending through one part of my spine only.  In fact, I keep my pubic bone and lower ribs on the table, do a sit up in my tummy, and try to lengthen and wriggle my spine forward and up so that there is never squishing in my lower back and this pose ends up feeling great in my spine for all variations. 


I make sure I can breathe naturally (although the breath tends to quicken here).  I relax and soften my face.

These variations are tough.  They are not for everyone.  But remember the first option is also a good one (where you do not hold your foot) so you stay there as necessary.


Just for fun I also made this video of natarajasana on a table, which shows the same arm variations.  It is more tricky because you have to balance as well.

Learning on the table beforehand helps you sort out the feeling in your spine.


We might try a few of these at my retreat in April but will definitely be working on them in class when I come back.

Canberra students, keep an eye on my timetable for April as I am away for a few weeks but here for a few classes!  Hope to see you somewhere soon.

Happy and safe practicing.

Much metta,
Samantha

www.yogacafecanberra.blogspot.com
www.yogacafelk.blogspot.com


Saturday, 19 March 2016

Knees Away Groins Emerging


This week I will be running a workshop delightfully titled 'Groins Emerging'.  Here is a little taster of Harry and I doing a little bit of synchronous work along that theme!


One of the key things we will be working on is the idea of softening and lengthening around the front of groin area as one of the 'tricks' to free the spine in back bending positions. I call this position knees away, groins emerging.  They don't get pushed or forced up.  They 'emerge' and soften as the knees move away.

This is slightly different to how many people are used to initiating a backbend.  To people newer to my class what I see are lots of pelvic curls and groins thrusting going on.  I don't want to suggest that this is a wrong movement.  But for my spine freeing purposes it can tend to jam you in the lower back.

So we will be working on figuring out some ways to first get length in your lower back.  

Then we will move to some arms away and chest emerging, as shown below.


From there we might work towards combining those two elements (knees away, groins emerging and arms away, chest emerging) to see how it can support a possible spine lengthening back bend.


From there some people will possibly work on a bit more arms away and chest emerging to go deeper. But that is pretty tricky.  It is not for everyone.  


Harry and I went back up to our backbend to take a foot up.  But you could also do this (and we can try in the workshop) with the elbows on the ground like in the start position.  Maybe not.  I will be there to see what type of position will be helpful for you and it might be something different.  


We ended up where we started.  In our case this was on the road in front of what turned out to be the rubbish tip.  No wonder it smelled so bad.  Still, through it all we smiled and kept in touch with the core theme of knees away, groins emerging.  
Finishing up with a bit of eye contact, some shared laughter at our antics.  This felt beautiful to do together, almost like we were synchronised swimming yogis on the road.  

So join us for an extra special workshop on Good Friday if you are round, 9-11am (probably a bit later).  This is not for 'advanced' or 'extreme' back bending but for people who want to learn to move more freely in their spines, stop over arching their lower back and feeling all scrunched, and who want to hang out and share a few laughs.  


Happy and safe practicing. 

Much metta,
Samantha

www.yogacafecanberra.blogspot.com
www.yogacafelk.blogspot.com

Sunday, 13 December 2015

Forward bend, handstand prep, and backbend


Here I show the transition between forward bend, handstand prep, and backbend that we are practicing in our current sequence.  

Watch the video first then I highlight some key points.  In the video I do a lot of wriggling around.  It took me several takes to complete this video.  I have several rotated vertebrae along my spine which makes arm balances difficult as I tend to lean into one shoulder and it is not comfortable.  A part of my wriggling is me squirming around trying to get length wherever I sense a sense of 'dis-ease'. 


Key points

Bend knees and push them forward.  Push hips down and forward.  Push shoulder blades forward and up.  

Continue to come down by bending knees and pressing hips down and forward.  Who cares about straight legs?  It is not important here. 
Hands to the ground, knees can be bent.  

If possible and comfortable then...
..straighten the legs. 

One hand forward, other hand pressing into back of calf.  Toe tip back (same side as the hand that is forward).  Press the armpits in the direction they are facing (firm them).  Lean forward so the forward leg toes start to grip.  Press the sitting bone of the forward leg down and forward towards the front toes. Knee can stay bent.  

Keeping previous actions, bring knee to chest.  

Keeping previous actions, take knee towards the sky.  Be mindful not to let the sitting bones go up.  I keep an effort in pressing them down and forward.  Even though my knee is going up to the sky I still feel as though I am making an effort to bring it towards my chest. 

Straighten the raised leg.  The raised leg thigh turns in.  The grounded leg thigh is rolling out. 

Bring both hands to ground in front.  Firm the armpits. Keep lower ribs lifted into middle back.

Lean forward so hands come flat on the ground.  Bring knee towards chest.  You can keep more weight on grounded foot if needed and stay here. 

Or, keep leaning forward so more weight comes to the finger tips and the back heel raises.  Keep drawing knee to chest.  Look forward.  Try to bring the grounded leg knee towards your chest.  It probably won't go anywhere but get the feeling.  Stay here.  It is pretty intense.  Or...

Maybe there is a handstand.  Maybe not.  It is all good. 


Back down.  Knees bent.  

Press hips forward to stand.  Armpits forward. 

Keep pressing knees and hips forward.  Armpits forward and up as you raise the body. 


Arms straighten as you continue to press armpits forward and up. 

Begin to lengthen the front of the body without squashing the back. 

Keep lifting and lengthening the spine, hips moving forward.  Find your position.  It may not be the same as mine.  

We have been practicing this for the past 8 weeks.  It is pretty intense.  Next week we will work on it as part of our silent practice.  Until then, happy and safe practicing.  Do not do anything that hurts.  Ask questions as needed!

Much metta,
Samantha
www.yogacafecanberra.blogspot.com
www.yogacafelk.blogspot.com

Tuesday, 1 December 2015

Wriggling Spine

Here I show a wriggling spine that lifts and lengthens as it comes into a backdrop.  It's fun.

But it is not important to do a backdrop.  Only if you feel it is there.

This wriggling spine can be applied to all poses where you need to lengthen.

Music optional!


Monday, 3 August 2015

Baby Backbend Without Squashing Lower Back


I have never had a problem with urdhva dhanurasana.

But I have had lots of students who have or do have difficulty with it.  

One thing I always emphasise is the spine should not feel squashed at any part or at any point from ground to lift and down again.  

People can tend to squash in their lower backs. 

I have even had people tell me they thought it was supposed to squash their lower back.

I tell people they are practicing something else but not the pose I am trying to teach if they feel squashing.  

If you are in my class I want you to remember a few things when it comes to this part of the sequence.

Practice without squashing.

Don't be attached to the outcome.

Move slowly.

With this in mind, a part of not being attached to the outcome is realising you don't need to do anything at all if it does not feel right.  

You certainly don't need to come all the way up.

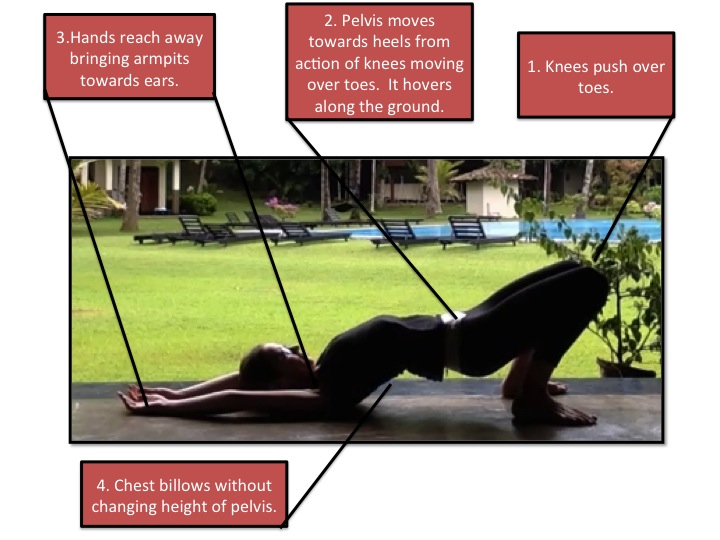
With this in mind, I made a  poster that shows what you could pay attention to if you decide not to push your hands into the floor.  There is still plenty you can do and, in fact, I do these things each time I come up into a fuller posture, as you can see in the video at the end (it's just that I only need to spend about a second getting there whereas some people will need more time).

Please bear in mind this post is intended primarily for my students who can experience what I am teaching in a class situation.  Learning this type of thing from the internet is not suitable. 

Read the poster from the right starting with what to do with the knees.


If you lie on your back and just press your feet into the floor you will feel your pelvis get light without necessarily lifting.  Then press your knees over your toes.  

The pelvis will lift and be carried towards the heels.  I am not trying to push my pelvis up here.  There are many styles that teach this and it is possible and there are benefits to that as well but it is not what I am doing here.  

I then reach my arms as far away from my pelvis as possible.  I try to basically get as long as I can through my body--pelvis moving one way and armpits the other.

Then I try to billow up my chest as though a gust of wind has blown through my feet and hits me in the middle of my upper back causing it to lift.  

This is where I like to get people to stop and think for a while.  Moving this part of the spine is really tough.  It is the stiff part of most people's spines.  

Many people cannot get movement in this part of their spine at all unless I provide a tactile cue (touching the area).  Often people shove their pelvis up and down and their chest moves as a consequence but there is little to no independent movement in the upper spine.  

What I am trying to do for myself when I practice this way is get some independent movement of the chest so that my spine does not move as one chunk.  

It is delightful just to try to raise and lower the chest here without moving the pelvis and just continue reaching the arms in one direction while moving the knees in the other.  

But you decide.  

Don't do anything that hurts or strains.  

Most people will need to do a lot of 'warming up' before they can do the full version of the pose but you can do this modified variation any time.  

Having said that, my teacher Paddy always taught me that they should feel so free you can do the full posture first thing in the morning when you get out of bed.  I do that myself every now and then.  I am not saying I don't feel a bit stiff in the morning but in my experience she is right, when you are able to move freely then this is possible.  Being able to move freely takes a lot of practice though and I still have stiff mornings!

Also, when you practice this way there should have been no squashing so no need to do something to unsquash your back afterwards.  

Below is a video of the full thing, taken on location in Sri Lanka at my last yoga retreat.  I will be heading there, by the way, for my next yoga retreat from 1-4 October 2015.  Get in touch if you'd like to join us!


This post is not intended to cover all of the aspects of back bending.  I wanted to emphasise a pose you can try on the floor without raising to the full posture that helps you lengthen.  There is, of course, much more you can do within that even (did I mention doing a sit up in your tummy?), but that is for class!

Happy and safe practicing.

Much metta,
Samantha
www.yogacafecanberra.blogspot.com
www.yogacafelk.blogspot.com

Saturday, 21 March 2015

Backbends Without Squashing


I have written about armpits many times before.  There are more things to talk about with regards to actions at the shoulder joints but the armpits are so key and I have focussed on them in our course.

One of the key things to appreciate is that how you use your armpits, depending on shoulder position, can impact on the spine.  If you take your arms overhead, I take armpits forward and up and NOT down and back.

In an overhead position armpits forward and up will help create length in the spine.

If you take them down and back while arms are overhead, or even down, you get a shortening feeling around your sides and back.

To come into more difficult postures where the arms are overhead you need to free up your armpits so the spine can move freely.

Some backbends happen with the arms below shoulder height, like ustrasana or bhujangasana for instance.  In those types of positions, because arms are not overhead, I take armpits down and back.  The video below shows how I can do backbends with armpits down and back, as I would in backbends like bhujangasana, or forward and up, such as I would in urdhva dhanurasana.

In the video I also show how you can actually come into a pose like urdhva dhanurasana with armpits either towards ears or with armpits towards hips.  I do this to illustrate a point that it can be done, not necessarily that it should be done.


As I show, because I have a fairly fluid spine it does not create difficulty for me to come into an overhead backbend like urdhva dhanurasana with armpits down.  But it does not feel as good as it could either.

The thing is most people (either coming to yoga or not) tend to be stiff in their spine in general, and move most from their lower back.

Doing urdhva dhanurasana with the armpits to the hips (downs and back) can reinforce the shortening many people already experience.

So, in my classes I encourage armpits to ears to generate the length in the spine.

Again, because I am fairly mobile around my armpit area, especially when I take them overhead, I can easily come up into a full backbend with armpits to ears.

People who are tighter around the armpits will find that they cannot come up so easily and I suggest you only come up to the point where you feel at ease in your spine.  This might mean the shoulders barely come off the floor and you just lift a little, as I also show in the video.

These are not things to practice without the guidance of an experienced practitioner so I encourage you to go to one.  I would encourage you to feel in your own body what is going on and if you come out of a backbend with a sore lower back to question what has gone on to create that as it should not be squashing.

In our classes this week we also looked at some of the basic movements at the shoulder joint--shoulders rolling in and shoulders rolling out.  We looked at how these movements can cause associated movements in the upper back (thoracic spine).  We looked at how these associated movements can be over-ridden if we call attention to them.

For instance, rolling the shoulders in tends to cause the upper spine to round as though bending forward.  We can try to lift the chest softly to help bring the spine back to upright.

When rolling the shoulders out it tends to cause the upper spine to arch as though back bending but that we can also over-ride this if we are conscious of it by softly drawing the lower ribs in.

Understanding these associated movements will help you learn to move your spine independently of shoulders for better and more active spinal movement.  I will post more about this later.  The armpits are a lot to think about already!

I had to laugh at myself when I re-watched the video.  I am not sure how my voice turned into a David Attenbourough-esque commentary.  Perhaps it is because I feel so wonderfully passionate and when that happens and you try to explain something it does something funny to your voice.  Well, to mine anyway,  Also to my eyebrows!

We will practice these actions in my classes, workshops, and retreats in Canberra, Colombo, and Bali.   I'd love to have you along.

Great work all.  Happy and safe practicing.

Much metta,
Samantha

Saturday, 31 January 2015

Working Towards Hanumanasana/Splits (James Brown Version—Gotta Go Up To Go Down)


Working Towards Hanumanasana/Splits (James Brown Version—Gotta Go Up To Go Down)

Hanumanasana (henceforth to be called the splits in this post) is a pose to work towards with caution. 

It looks so impressive most people’s egos get the better of them.

Or, perhaps it was just my ego?  As I tell my students, when I first started yoga I injured myself with over-zealous practice of the posture.

Actually, the practice was not over-zealous.  This was a case of pure ego.  I actually practiced mindfully and diligently.  The day I made it into the pose after many months of practice I was so pleased with myself that later on (several hours after my practice and we could almost call it the next day) I met a friend and said ‘Look, I can do the splits!’

I proceeded to do the splits right there and then, with no preparation.

Well, let’s say I managed the position but did something to my butt that had me limping for a month!

These days I can do the pose almost first thing in the morning as I have been practicing for many years.  However, most people will need quite a bit of preparation. 

Hopefully my previous posts should have lead you towards an understanding that the splits should not feel like too much stretching. 

It is not about splitting apart. 

Using active movements means the pose is actually about coming together again. 

If you are working towards this posture I recommend you work with an experienced yoga teacher to guide you.  Do not confuse flexible with experienced and also, I think it is better to make sure your teacher can do any pose they are trying to instruct you in. 


In the photos below I have shown one progression.  Watch the video above to see the movement in action.  The video at the end of the post shows advanced variations of the posture (intended for demonstration not for practice).

You remain at whatever stage you feel comfortable in (feel like lengthening and relaxing, not stretching and tugging).

There are two key things I am doing in each stage.   The first thing also has a little subplot. 

First, my front thigh is rolling out and my back thigh is rolling in. 

This means the thigh bone of the front leg feels as though the side butt (near the crease) is firming slightly.  What you see is that the knee might roll away from the centre line of your body.
The back thigh is rolling in, which means you might feel the inner thigh firming a little.  If you could turn around and see your knee is trying to move so it is more towards the centre line of your body. 

The subplot here is that I am also trying to move the side of front hip back and draw side of back hip forward. 

If you are not mindful the opposite tends to happen.  That is, when you roll the front thigh out it can often bring the side of front hip forward and when rolling the back thigh in it can often send the side of back hip backward. So you need to watch out for this.

The second key thing I am doing is to try to suck my legs or feet together. 

Yes.  I am not actually trying to split them apart. 

Sucking them together could be likened to someone at foot trying to push your legs back together (what I am doing). 

Whereas most beginners just try to let their legs come apart, almost as though there is a person at either foot pulling them in a tug-o-war.  Actually, they do not even do that so much as let the weight of their entire pelvis and torso just hang and sag in the middle. 

Ouch!  It is obvious when put that way that it would not be a pleasant feeling.

Sucking it up is key. 

This is where I put in the James Brown analogy in class.  He was a guy who sort of did a type of a split while on-stage singing but leapt straight back up again.  It looked really cool as a dance move.

In our yoga practice of this pose we need to be thinking of trying to draw our feet back together again (while they move apart). 

This makes the posture active rather than passive.

It will help make you stronger and more mobile.

Step 1

A standing lunge.  Stay here.  I am trying to pull my feet together.  No need to go further unless comfortable.
Step 2

Kneeling lunge.  Be soft on the back knee by being active in the legs and feet.  I am drawing front heel back and back knee forward.  You can stay here.  No need to go further.
Step 3

I start to move the front foot further away.  I go slowly so I don't elicit a stretch reflex.  You can see the back knee slightly raised.  I try and draw my feet together as though trying to stand up.  I am not sinking into my shoulders or hands at all.
Step 4

That front foot just keeps moving slowly forward.  
Step 5
I have come all the way forward.  I have moved my torso back while trying not to arch my lower back (tummy firm but calm).  I am reaching forward and up through my armpits to lengthen my spine.  

Of course, there is really no reason you need to do this pose.  It is fairly extreme. 

One of the benefits (which is not going to make you a happier or healthier person by any means) is that if you are coming into some other inverted postures like pincha mayurasana you can tap into the pose with greater ease. 

 Below is a video of me coming into active hanumanasana with a variation.


Some additional points you might notice from the videos:

  • I am not sinking into my hands or shoulders at any point.  I am trying to cultivate lift and length and freedom in the spine through the actions of my legs.  This is clearly shown in my fuller versions of the posture where I take my hands off the ground, arms overhead, and reach for the sky.
  • I am using my back foot strongly.  You can do a  top of foot down version if you like.  I just prefer this one.
  • Most people think of this posture as something to do with hamstrings.  As soon as you practice you should get an appreciation that the front of the thigh of the back leg needs to be lengthened.  If it is not you can squash your lower back.
  • You can see that in my versions I begin to move the whole spine back over the pelvis, trying to lengthen my spine while coming into an upright position.  This is actually a pretty tough back bend and you need to monitor that the spine is not squashing.  I am firm in my tummy in a way that I can still breathe into it, which helps.
  • I am reminding myself periodically to relax my face, my tongue, my lips.
  • I am breathing naturally. 
  • I am enjoying the sun on my face, the chirps of the birds, the call of loud children in the background playing with their dog.  I am feeling radiantly alive! Firm but calm.  Delighted with where I am and what I am doing, whatever that is. I am connected to my body but not so inward looking that I cannot sense others and I smile and nod as they pass by.
This is the type of thing we workshop in classes, and in our retreats in Bali and Sri Lanka.  Hope to see you there.  (www.artofliferetreats.com).

Happy and safe practicing!

Samantha
www.artofliferetreats.com
www.yogacafecanberra.blogspot.com
www.yogacafelk.blogspot.com