This shape of spine is key throughout the sequence
Here I give you some key instructions that can support a beautiful transition from kneeling plank to down dog to bakasana.
Watch the video first. You can see the a side view and the front view in the same video. I have sped this video up so this whole sequence actually took 2 minutes in real life. I am really trying to emphasis some good slow mindful movement.
The instructions below should help firm the tummy and armpits while giving a sense of length in the spine (neither stretching nor tightening).
The key instructions here are to push front of groins to armpits and armpits to front of groins. Then, if you can add something else, press your hands forward and your knees back. You should start with feeling relaxed in your tummy. You should be able to breathe naturally into your belly throughout although it will become firm through the instructions (but not by sucking it in).
Kneeling plank
In this kneeling plank make sure knees are behind hips, shoulders over wrists.
Sitting bones move down towards backs of knees, front of pelvis lifts to the lower back to lengthen the lower back.
Lift lower ribs towards the back of chest to lengthen around the middle and upper back.
Press front of groins towards the armpits and armpits towards the front of groins without moving the body forward. This should bring a postural firmness to your tummy.
If you can manage, press hands forward and knees back while you maintain groins and armpits moving towards one another.
Half child pose Quite honestly I did not know what to call this position. It is halfway between kneeling plank and balasna (child's pose).
I move very slowly back into this position. I am not trying to get my bottom onto my heels. I am thinking about maintaining the key actions I established in the previous position. As I move back my challenge is to keep feeling as though I am moving my groins forwards.
See the spine stays the same shape.
Partial lift Here I focus on keeping the groin-armpit connection then go back again to pressing hands forward but toes and heels backwards. This combined effort causes my knees to become light. They start to lift of their own accord.
Downward dog
I keep with those four actions:
armpits to groins
groins to armpits
hands pressing forward
feet pressing backward
Walk forward
Maintaining those actions (you might need to let up on pushing feet back because they start to be less on the ground), bend your knees and walk your feet forward. I tip-toe forwards trying to stay as light on my feet as possible.
Bakasana
If I keep pressing armpits to groins and vice versa, press hands forwards, lift knees up to chest, rest them lightly on the back of my arms, press elbows back and towards one another and just keep breathing and leaning forward then you might find yourself floating. Maybe you stay on tip toes. Wherever you are be happy wherever that is. Keep working on being where you are and staying for a little bit longer until you feel comfortable moving to the next stage.
Remember, nothing should hurt. If you have not developed the correct strength and actions around the wrists then you need to work on clawing with your fingertips and pressing the wrists into one another and just have less weight on the wrists until you are ready to shift more weight there.
Have fun.
Remember, these videos are primarily intended for my own students so I can give adjustments and comments and personal feedback. It is always best to go to an actual teacher rather than learn off the internet.
Oh, and don't forget about my retreat in Sri Lanka this April 2016. Come along if you can!
I have never had a problem with urdhva dhanurasana.
But I have had lots of students who have or do have difficulty with it.
One thing I always emphasise is the spine should not feel squashed at any part or at any point from ground to lift and down again.
People can tend to squash in their lower backs.
I have even had people tell me they thought it was supposed to squash their lower back.
I tell people they are practicing something else but not the pose I am trying to teach if they feel squashing.
If you are in my class I want you to remember a few things when it comes to this part of the sequence.
Practice without squashing.
Don't be attached to the outcome.
Move slowly.
With this in mind, a part of not being attached to the outcome is realising you don't need to do anything at all if it does not feel right.
You certainly don't need to come all the way up.
With this in mind, I made a poster that shows what you could pay attention to if you decide not to push your hands into the floor. There is still plenty you can do and, in fact, I do these things each time I come up into a fuller posture, as you can see in the video at the end (it's just that I only need to spend about a second getting there whereas some people will need more time).
Please bear in mind this post is intended primarily for my students who can experience what I am teaching in a class situation. Learning this type of thing from the internet is not suitable.
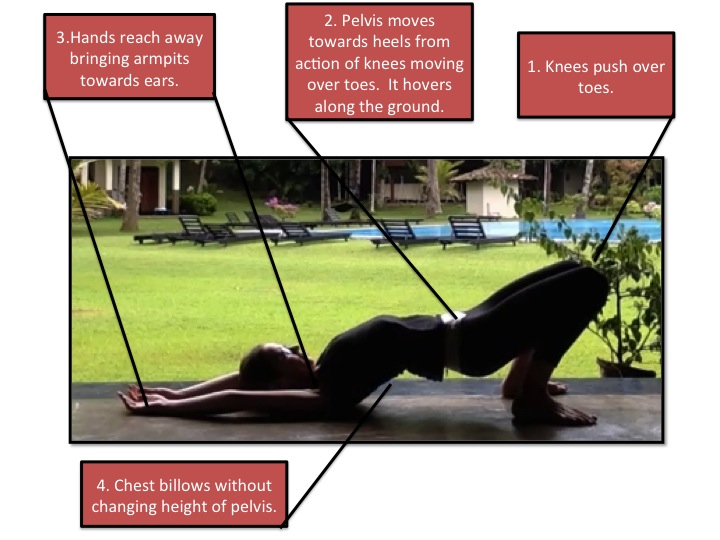
Read the poster from the right starting with what to do with the knees.
If you lie on your back and just press your feet into the floor you will feel your pelvis get light without necessarily lifting. Then press your knees over your toes.
The pelvis will lift and be carried towards the heels. I am not trying to push my pelvis up here. There are many styles that teach this and it is possible and there are benefits to that as well but it is not what I am doing here.
I then reach my arms as far away from my pelvis as possible. I try to basically get as long as I can through my body--pelvis moving one way and armpits the other.
Then I try to billow up my chest as though a gust of wind has blown through my feet and hits me in the middle of my upper back causing it to lift.
This is where I like to get people to stop and think for a while. Moving this part of the spine is really tough. It is the stiff part of most people's spines.
Many people cannot get movement in this part of their spine at all unless I provide a tactile cue (touching the area). Often people shove their pelvis up and down and their chest moves as a consequence but there is little to no independent movement in the upper spine.
What I am trying to do for myself when I practice this way is get some independent movement of the chest so that my spine does not move as one chunk.
It is delightful just to try to raise and lower the chest here without moving the pelvis and just continue reaching the arms in one direction while moving the knees in the other.
But you decide.
Don't do anything that hurts or strains.
Most people will need to do a lot of 'warming up' before they can do the full version of the pose but you can do this modified variation any time.
Having said that, my teacher Paddy always taught me that they should feel so free you can do the full posture first thing in the morning when you get out of bed. I do that myself every now and then. I am not saying I don't feel a bit stiff in the morning but in my experience she is right, when you are able to move freely then this is possible. Being able to move freely takes a lot of practice though and I still have stiff mornings!
Also, when you practice this way there should have been no squashing so no need to do something to unsquash your back afterwards.
Below is a video of the full thing, taken on location in Sri Lanka at my last yoga retreat. I will be heading there, by the way, for my next yoga retreat from 1-4 October 2015. Get in touch if you'd like to join us!
This post is not intended to cover all of the aspects of back bending. I wanted to emphasise a pose you can try on the floor without raising to the full posture that helps you lengthen. There is, of course, much more you can do within that even (did I mention doing a sit up in your tummy?), but that is for class!
Happy and safe practicing.
Much metta,
Samantha
www.yogacafecanberra.blogspot.com
www.yogacafelk.blogspot.com
Even though handstands and arm balances feature in most of my sequences, not all of us can do a handstand. Sometimes, for whatever reason, we might not be able to put our hands on the ground either.
But all of us can learn some of the key actions of a handstand without putting our hands on the ground.
In this post I share a video and some instructions about some of the key actions that you can cultivate so you are still working towards similar 'anatomic' actions.
You could take this option when it gets to an arm balance section of the class and still be doing amazing energy moving work.
Have a look at the video to see the movement in action, then take a look at how I have tried to deconstruct the steps.
Soft Tummy
One of the keys here is to be able to have a soft tummy. If you cannot relax your tummy then you very likely may not create the correct firmness in the tummy when the time comes to do so.
Digging fingers into soft tummy to show it is soft
This is trickier than you might think. Most people find it really difficult to relax tummy muscles. It can be for many reasons. One of the key ones I have come across is the perception that we should be sucking our tummy in and walking around with sucked in tummies as much as we can.
Be aware that if you cannot relax your tummy muscles, you are putting fairly constant pressure on the contents of your abdomen, including your bowels and reproductive organs. This can impact on the functioning of the digestive and reproductive systems.
Anyway, just a thought.
So, step one is to relax your tummy completely. In the photo and video I try to show this by digging my fingers deep into my tummy so you can see it is not hard.
Lengthen lower back
In general I start many postures by moving my sitting bones down, top of pelvis back in order to lengthen my lower back.
I took my arms overhead in the photo/video so you could see what I am doing. It is also a nice thing to do to enhance the length of the back of spine.
I am not doing this action by tensing my tummy. There is a little lower abdominal internal activation but generally the tummy is very soft still. In the video I dig my fingers back in my tummy to show this.
Push hips/sitting bones forward without moving legs forward
This is tricky. You try to push your hips/sitting bones forward without moving the legs forward.
If the legs go forward you don't get the firmness in your tummy.
If the legs remain as much as possible where they are then the tummy goes firm.
In the video you can see that I push my fingers into my tummy after this and they cannot go in. It is firm. I try to show this below as well.
My tummy is firm in a way that I can still breathe freely and feel as though the movement of the breath could go there.
If you watch my arm balance videos where my abdomen is exposed you can sort of see that my breath is still going into my abdomen area (looks like I have gills!).
This is not sucking in tummy. If you slow the video down where I push hips forward you can see that I am not sucking up.
Push armpits down and forward
Push the armpits down and forward.
In the video I show how this firms the front and back of the armpits.
My tummy is still firm.
The movements I do in the video are really exaggerated and jerky. I was trying to emphasise what I was doing. If I did my own practice these actions would be much more subtle.
Alternate firming of armpits and tummy
Because I have been practicing these activations for a while, I can do them as shown. I showed this way more for the video so you could see what I am doing.
If you are learning this, most people will find getting armpits and tummy firm easier if they try putting the arms on the thighs as shown in the picture below.
If I was in a class, I would be encouraging people to use this method as pushing the hands against the thighs helps prevent them from coming forward when you push the hips forward. Also, it is easier to get some armpit activation for many people if the hands have something to press down against.
In class I usually do the demonstration as shown in this photo and get people to feel what is going on.
Stay or take these activations to the ground
These two activations are key components (but not the only ones) of many postures (?most) where you are weight bearing through the arms.
If you don't want to or cannot put weight through your arms for some reason then you could be doing this and really feel like you are doing something. You could do it from kneeling if you want as well.
If you can, you could try to take these activations to the ground for plank, kneeling plank, bakasana, or even a handstand.
But remember, your life will not be any better just because you can do a handstand!
It will probably be better if you can learn to relax your tummy completely then learn to activate it when you need however!
Don't do anything that hurts. Be alert to over practicing and how you feel the next few days whenever you introduce new practices. Have fun. Laugh. Smile.
We had a great time in week 3 and 4 thinking about what our armpits and shoulders were doing! I hope that now everyone realises how kneeling plank is a difficult pose when you do it well and activate your armpits.
I have written about armpits many times before. There are more things to talk about with regards to actions at the shoulder joints but the armpits are so key and I have focussed on them in our course.
One of the key things to appreciate is that how you use your armpits, depending on shoulder position, can impact on the spine. If you take your arms overhead, I take armpits forward and up and NOT down and back.
In an overhead position armpits forward and up will help create length in the spine.
If you take them down and back while arms are overhead, or even down, you get a shortening feeling around your sides and back.
To come into more difficult postures where the arms are overhead you need to free up your armpits so the spine can move freely.
Some backbends happen with the arms below shoulder height, like ustrasana or bhujangasana for instance. In those types of positions, because arms are not overhead, I take armpits down and back. The video below shows how I can do backbends with armpits down and back, as I would in backbends like bhujangasana, or forward and up, such as I would in urdhva dhanurasana.
In the video I also show how you can actually come into a pose like urdhva dhanurasana with armpits either towards ears or with armpits towards hips. I do this to illustrate a point that it can be done, not necessarily that it should be done.
As I show, because I have a fairly fluid spine it does not create difficulty for me to come into an overhead backbend like urdhva dhanurasana with armpits down. But it does not feel as good as it could either.
The thing is most people (either coming to yoga or not) tend to be stiff in their spine in general, and move most from their lower back.
Doing urdhva dhanurasana with the armpits to the hips (downs and back) can reinforce the shortening many people already experience.
So, in my classes I encourage armpits to ears to generate the length in the spine.
Again, because I am fairly mobile around my armpit area, especially when I take them overhead, I can easily come up into a full backbend with armpits to ears.
People who are tighter around the armpits will find that they cannot come up so easily and I suggest you only come up to the point where you feel at ease in your spine. This might mean the shoulders barely come off the floor and you just lift a little, as I also show in the video.
These are not things to practice without the guidance of an experienced practitioner so I encourage you to go to one. I would encourage you to feel in your own body what is going on and if you come out of a backbend with a sore lower back to question what has gone on to create that as it should not be squashing.
In our classes this week we also looked at some of the basic movements at the shoulder joint--shoulders rolling in and shoulders rolling out. We looked at how these movements can cause associated movements in the upper back (thoracic spine). We looked at how these associated movements can be over-ridden if we call attention to them.
For instance, rolling the shoulders in tends to cause the upper spine to round as though bending forward. We can try to lift the chest softly to help bring the spine back to upright.
When rolling the shoulders out it tends to cause the upper spine to arch as though back bending but that we can also over-ride this if we are conscious of it by softly drawing the lower ribs in.
Understanding these associated movements will help you learn to move your spine independently of shoulders for better and more active spinal movement. I will post more about this later. The armpits are a lot to think about already!
I had to laugh at myself when I re-watched the video. I am not sure how my voice turned into a David Attenbourough-esque commentary. Perhaps it is because I feel so wonderfully passionate and when that happens and you try to explain something it does something funny to your voice. Well, to mine anyway, Also to my eyebrows!
A photo of me pressing my armpits forwards and upwards, essential for this more advanced backbend. [Image from Canberra Yoga Space].
Is it wrong to take your shoulders upwards
as though to your ears?
Do you know you have muscles put on your
body to do precisely that?Has your body
been designed incorrectly?
It is not wrong to take your shoulders upwards
towards your ears.Ordinary life requires
it, especially when reaching overheard.
Go find a shelf that is beyond your reach
and try to reach for something that is on it.Barring any shoulder/neck issues you will no doubt automatically take
your shoulder forward and upward.If you
looked to the side you could probably smell your armpit it is so high.
If you have young kids then take them to a
playground and watch them swing and hang from bars.You will see that when they hang their
shoulders are right up beside their ears (and they will probably bring their
knees to their chest with ease, something that most adults cannot do!).
The movement of shoulders towards ears is a
natural movement that will happen in overhead reaching, often with a little
side bend if you are doing it one-armed.
So I have to ask myself why am I being told
in some yoga classes I attend to take my shoulders away from my ears when they
are overhead?
[And I have to ask myself why did I
sometimes say this to students when I was a new teacher?Certainly not because my senior teachers had
ever told me to.]
Here are some reasons I have come up with.
·People think that a lot of us
already have tension around the upper shoulders and next and hold our shoulders
in a little shrug so as a yoga teacher we should tell them to counter this by
keeping them down away from the ears.
·People think it squashes the
neck to take the shoulders to the ears in overhead movements.
·People want to strengthen
muscles around the shoulder blades, especially when they give the instruction
to pull the shoulder blades down and together.
There could be other reasons as well and it
would be great to hear from people about this.
Here is why I am not comfortable with those
three reasons as being sufficient explanation or justification for teachers to
give the instruction to move the shoulders away from the ears in overhead
reaching.
Overhead reaching includes poses like adho
mukha svanasana (downward dog), adho mukha vrksasana (handstand), urdhva hasta
tadasana (standing with arms overhead), utkatasana (fierce or chair pose),
urdhva dhanurasana (back arch from the floor), and virabadhrasana 1 (warrior
1).There are many more, including most
of the advanced backbends where you reach and catch a toe behind your head, as
well as inversions like pincha mayurasana and headstand.
First, it is true that many of us hold
subconscious tension around the upper shoulders and hold them in a little
shrug.But we generally hold them in a
little shrug, not a big one, and the shoulder never gets the chance to go all
the way up.It is important to encourage
people to take their joints through their full natural range of movement.
Also, sometimes people who hold persistent
slightly shrugged shoulders might not be aware they are doing so.Sometimes activating the muscles with
consciousness and taking them all the way up can alert them can help them
become aware of this and learn to notice when there is slight tension and then
learn to try to relax.
Importantly, as I discuss later, if they
are going to take their arms overhead for advanced postures they need to take
learn to move their shoulders towards their ears when it is required or they
will squash their spine.
Second, it is true that it can squash the
neck if you take your arms overhead and lift shoulders to ears.However, that is often because people are
trying to take their arms overhead and then behind their ears or level with
their ears.Most western people are way
too stiff to be able to do this correctly.
Instead, if you take the arms overhead and
push the armpits forward and up you should find any neck squashing tendencies
are countered.
Allow people to keep their arms in front of
their ears and encourage them to push their armpits in the direction they are
facing.
If anyone still feels any neck squashing
then you could instruct them to take the arms lower so they are in front of the
face (but still pushing armpits forward).
Third, I believe this is probably an
instruction that is not helpful in yoga with overhead reaching positions.The reason is I have seen it given mostly in
positions where the spine is upright and also extended (going towards a
backbend).
In a backbend you want to use your arms to
help you create length in the spine, not compression.
The instruction to move the shoulders down
and together will create compression in the spine.
The instruction to move the armpits and
shoulders up and forwards will create length in the spine.
To tell people to bring the shoulders down
in poses like utktasana or virabadhrasana 1, where the lower back is already
more likely to be squashed (though with careful practice it will not be), will
place most people at risk of further squashing their spines.
It is not until you start to move into more
advanced postures that you realize the real importance of being able to take
shoulders up and forwards.Drop-backs,
backbends from the floor and advanced backbends that involve reaching arms
overhead to hold onto a foot that is also circling behind and up (like a full
natarajasana or kapotasana) all require you to take the armpits towards the
ears.
Ask any practitioner who is in those poses
to do otherwise and they will instinctively tell you no way as it will shorten
the back body, which they are trying to lengthen.
My view is that we are trying to help
people free their spines, not squash them.So let’s give them instructions that will help them in that regard. While you may not be teaching your students
these advanced backbends, poses like vira 1 and utktasana are preparatory poses
for those positions and if you do not give appropriate instructions in those
poses they will never get to the more advanced versions.
If you want to help them build strength
around the shoulder blades through actions of drawing them back and down there
are other postures more suitable.
These include poses that require
interlacing behind the back, or the floor backbends that do not involve taking
the arms overhead such as up dog or the simple forms of dhanurasana where you
hold the ankles (but not the full dhanurasana which has you take the arm
forward and overhead to reach the toe), or simple bridge poses with arms
interlaced behind the back.
It might be a more useful cue for your students
to watch they do not flare their lower ribs forward as they take their arms
overhead. Stiff people will often use spinal extension to get their arms fully
overhead by pushing the ribs forward to compensate for lack of movement in the
shoulders.This can again squash the
lower back and it is perhaps more useful for them to not take the arms so high
so the spine is not masking the work.
I want to finish by being clear that I am
talking about taking shoulders to ears in overhead reaching positions.Also, I want to be clear that I do not think
it is wrong to take shoulders away from the ears (depression).That is also a natural movement of the
body.
However, I wanted to inspire some thought
about considering the consequences of what you instruct and whether your
instruction is contradicting another instruction you are giving, or whether you
really mean to be giving that instruction for that particular pose.I see this frequently when teachers tell me
to lengthen my spine in vira 1 and then come and tell me to pull my shoulders
down and back.
For me, the best instruction to give is to tell people to activate their armpits when taking the arms overhead so the armpits press in the direction they are facing. In an overhead position this is forward and upward. I learned this from Simon and Bianca at Yoga Synergy.
This simple instruction can be applied to positions where the arms are not overhead, such as plank, where again you can just instruct people to push the armpits in the direction they are facing (in that case down towards the floor and towards the hips). If I take my arms behind my back I can press my armpits down and towards one another. You can learn more about this and other tips to enhance your yoga practice via the Yoga Synergy online anatomy course.
While about to post this, I also found
another article that explains some of these ideas from an anatomical
perspective written by Dr Roger Cole.You can link to it here.
Also, last year I also wrote a post about taking the shoulders away from the ears! There, I focussed on addressing the tension that gives some of us chronic tension and causes that habitual half-shrug look about us in our day to day life (I rather, perhaps unthinkingly called it rugby neck, mainly based on the look of the shrugging shoulders not necessarily what is happening at the shoulders). My aim was to get people to use some tricks outside of yoga (e.g., at their desks) to catch that creep, or to provide them with a useful tool to counteract the tension. However, in that post I clearly stated there are occasions where you want or need to take them up--especially in overhead positions. I promised to write more on that but it has taken me time. This article is the article I should have written a while ago on that matter!
The Short Of It
Necks are delicate structures. If you are going to try anything I suggest, always move mindfully and slowly. If something hurts, don't do it. See your yoga teacher for guidance or get to my class where I can explain more fully!
One of the reasons we can take our arms up is to traction the spine, but, if done incorrectly or with too much vigour, you risk squashing your neck and/or your lower back.
Stand comfortably, moving the weight towards the toes, bending the knees slightly, and lengthening the lower back by pushing the sitting bones down and forward. This also firms the lower belly in a way that you can still breathe into it.
Start by remembering that you don't actually have to take your arms overhead. They can always stay by your side and you can just be there standing and breathing.
If it feels ok to take them up then try taking them up in a forwards direction rather than out to the side (although it is not wrong to do that).
Pull the armpits down towards your waist. Then, emphasise a forward movement of the armpits as you take the arms up. The shoulder blades will feel like they come around your ribcage and hug onto the ribs and the upper back will feel broad.
As the arms come up, roll the underside of the arms towards the face so the inner elbows start to point towards you. This will free the neck. If you move the arms so the inner elbows point away from you it is likely you will feel congestion in the neck.
Keep pushing forward with the armpits.
As you get to just after parallel to the floor, start pushing the armpits forward and up. Do not lose the forward in favour of the up. As you go higher the armpits will want to start to roll out to the side and move back so you will need to consciously keep moving them forward.
If, as you raise the arms, you feel the back start to arch then stop taking the arms up. Be content to stay where you are knowing this is a good place for your spine.
Reach out long through the elbows, wrists and fingers. They are firm but not tense.
As you keep moving the arms towards the head, keep pushing forward and up and keep rolling the inner arms to your face.
Relax, breathe, be content.
Once the arms are as high as they can be with comfort and freedom, drop the sitting bones lower without dropping the arms. The spine should lengthen.
The Long Of It
It can be hard writing about physical things. Sometimes words do not capture what you are trying to convey. So, as you read, do so with reflection and remember that nothing beats the guidance of an experienced senior teacher. I recommend getting to either Paddy McGrath or Simon Borg Olivier or Bianca Machliss if you can. If you come to me I will do my best to pass on their teachings with the respect and intelligence they deserve.
One thing I have always tried to look for in my practice is freedom. A feeling of freedom. A feeling that my body is moving as though through water.
So as you read my posts offering ideas on ways to move into, be in, and move out of postures please remember that I am always writing from a place to help you find freedom--particularly spinal freedom.
If something I say (or something you interpret me as saying) does not bring freedom or if it brings pain then stop.
I say this all because I want to talk about freeing the neck. The neck is a pretty delicate area of the body on most of us, and it is often injured or the source of some discomfort. When following any guidelines on how to move your neck and head remember to move slowly, mindfully, and search for freedom.
At Your Desk
One thing that you can do in your daily life to help free your neck as you sit at your desk (or anywhere else), and I have posted on this before, is to actively press your armpits down towards your waist.
This action activates muscles below the armpits, which can cause a relaxation response in the muscles that do the opposite action (that is, muscles that pull the shoulders up).
If the muscles that pull the shoulders up are really tight you might even feel them stretching when you press your armpits down. But, actively pressing them down for a few slow breaths should eventually help the tight muscles to relax a little.
At our desk our arms are generally by our side so the instruction to press armpits to waist is valid, if over-simplified.
In yoga our arms are in all sorts of positions--sometimes out to the side, sometimes overhead, sometimes behind us. This is significant because position of our arms has a huge bearing on what happens in our neck.
Here I want to focus on how arm position when the arms move overhead can be done in a way that frees the neck (good) or in a way that leads to compression and pain (not so good).
Physical Purpose Of The Posture
I believe there is a common misunderstanding amongst some students that the arms need to be taken so they are level with the ears to be doing poses (where the arms are up) correctly. Perhaps this is because they believe the purpose of the pose is to get the arms up and then take them as far back as possible.
However, this results in some people taking their arms too far back at the expense of their necks and, possibly, their lower backs.
Taking the arms too far back in these overhead positions, while not wrong, can be uncomfortable.
It is perfectly fine to have the arms up but in front of the face. In fact, it would be fine to not even take the arms up at all if it is uncomfortable.
It all comes down to understanding why you are doing a particular pose in the first place. In most cases the answer will never be that you are doing a pose so you can take your arms overhead! It is more likely that you are doing the pose (speaking from a physical or anatomical perspective) to traction or lengthen the spine and to create more mobility and stability in the shoulder joint.
So bear the purpose in mind.
If your aim is to bring length to the spine and mobility and stability to the shoulder joint complex then be mindful of these things as you move.
If taking the arms up starts to cause tension in the neck or lower back then reassess how you are moving them and try to correct the movement (I offer some tips below) and if that does not work, stop doing the movement until you get the chance to speak to your yoga teacher who can give you more personal attention.
If taking the arms up causes pain or discomfort in the shoulder joint then, again, reassess how you are moving and stop if pain persists. See a suitably qualified teacher who should be able to point you in the right direction.
Common Causes of Discomfort
From observation, there are a few common things that could be causing or contributing to tension in the neck and spine when moving the arms.
First is the misconception that you need to take the arms up at all when there is pain or discomfort. Unless a suitably qualified professional has directed you to do so (sometimes they do) then do not take your arms up if it is painful.
Second, there is a misconception that if the arms are up then they need to be taken back so they are level with your ears. This type of movement is not available to a lot of people and, if attempted, is likely to cause discomfort. So, don't try to take them back as far.
Third, there is a tendency for some people to roll their inner arms outwards so the inner elbows point away from the face as the arms come up higher. Rolling the arms that way can squash the neck. As the arms come up you need to be rolling the inner arms towards your face so that you can see the inner elbows. [Here I am starting from an understanding that you are taking the arms forward and up and not to the side and up].
Moving Towards Freedom
Here is an alternative way to bring the arms up that should bring freedom. It brings the focus to the armpits and shoulder blades, with an emphasis on pushing the armpits forward and up rather than taking the arms back as far as you can.
1. Bring your hands into namaste: palms together, thumbs at the nose. Check your neck is relaxed.
2. Set your base: feet comfortable, weight shifting forward into the toes, knees slightly bent, sitting bones moving down and forward (a little like a scared dog). This should bring a light firmness to the abdomen and lengthen the lower back. This is a foundation you want to keep. Try not to move the top of the pelvis forward. Keeping the lower back long will help you to traction the spine as the arms move overhead.
3. Lightly press the armpits down towards the waist.
4. With palms together start to push your armpits forward, push your elbows forward. You will feel this is an action of scapula protraction--the shoulder blades move around the side of the ribcage. As you do this keep the elbows moving towards one another rather than letting the move apart.
5. Start to straighten the elbows. As you do so let the hands come apart. They'll come to be about shoulder width apart.
6. Reach out through the elbows, wrists, and fingers so they are firm but not tense. The arms will be parallel to the floor. Keep pushing the armpits forwards like you are trying to reach out for something just beyond your reach. You might stay here. That is ok. Breathe and relax and be content.
7. If it feels ok, then go further. Start to push the armpits forward and up. As you do so keep rolling the inner elbows towards your face. Breathe and relax. Move slowly. Be mindful that as you take the arms up the spine might start to arch. Do not let the spine arch so stop if it starts. Remember to keep pushing the armpits forward and up. Don't lose the forward movement as this is what will help free the neck once the arms come up higher.
8. Keep checking that your neck is free as you move. Keep breathing and relaxing the face, throat, neck.
9. At a certain point--perhaps when the arms are about 45 degrees from being overhead--the upward movement will feel more predominant than the forward movement. That is ok. Just don't lose the forward movement. Reach up and reach forward. Move slowly and mindfully. Keep rolling the inner elbows in towards your face. If they start to roll out then stop and be happy where you are.
10. Keep stretching out through the elbows, wrists and fingers in a way that is firm but not tense.
11. Once your arms are as forward and up as they can comfortably be lengthen the spine more by letting the sitting bones drop down and forward. Imagine you are holding onto a tree branch and everything is lowering from there.
12. Relax, breathe, be content.
A Final Note
If you watch my video you might notice a few things. If you look really closely you will see I have an asymmetry in the movement of my arms. So you can see I am not perfect. What a relief. I bring to yoga my old injuries, one of which being a car accident many years ago. Do not worry about asymmetry. Be mindful that it is there.
I also had a point about 18 months ago where a lot of stress at work and some inappropriate work tasks contributed to a severe spasm that meant I could not even lift that arm. You know what I did? I kept up my practice. I even kept teaching. This was to the surprise of my students I think. But I knew that I could still practice yoga without arms. I just didn't take my arms overhead. I didn't do work on my hands. I did gentle movement with my shoulders to keep the blood and energy moving through the joints as best I could until I recovered, which I did and fairly quickly.
You might also notice that at times I do funny things with my jaw, I swallow, I wobble my head around, I lick my lips. You can't really see but I also sometimes do things with my eyes to relax them too. I am intentionally trying to free up the muscles around my neck, throat, and head that get tense when I am not mindful.
In this video you can also see that at times I have to keep reminding myself to stretch out through my fingers. I am concentrating on what I am doing with my shoulder blades and armpits so much that sometimes the fingers get slack. So, don't worry if you forget certain things! In my practice I am constantly forgetting things and then bringing them back to mindful awareness. That is part of the practice of yoga. Continually bringing yourself back in touch with your body.
Summary
Taking the arms overhead should be an action that brings freedom and length to your spine but which can cause squashing and tension if not done appropriately.
Remember to move the shoulder blades forward and up and keep rolling the inner elbows towards your face. Move slowly, check in with your neck, and don't allow the back to arch as you take the arms up.
Stop if there is any discomfort or unease. Relax. Breathe. Be content.


 Here I focus on keeping the groin-armpit connection then go back again to pressing hands forward but toes and heels backwards. This combined effort causes my knees to become light. They start to lift of their own accord.
 Maintaining those actions (you might need to let up on pushing feet back because they start to be less on the ground), bend your knees and walk your feet forward. I tip-toe forwards trying to stay as light on my feet as possible.
  If I keep pressing armpits to groins and vice versa, press hands forwards, lift knees up to chest, rest them lightly on the back of my arms, press elbows back and towards one another and just keep breathing and leaning forward then you might find yourself floating. Maybe you stay on tip toes. Wherever you are be happy wherever that is. Keep working on being where you are and staying for a little bit longer until you feel comfortable moving to the next stage.