Tuesday 26 February 2013

Wednesday Class Cancelled Due to Rain: Search For Cover Begins

Can't practice in the rain!

Sorry, this morning's class has had to be cancelled due to the annoying drizzle.  While it is not enough to keep me from going out for a run, it is enough to keep me from the yoga mat which becomes very slippery with even a drop of moisture.

In the back of my mind I am wondering if there are any covered venues in case of emergency but none spring to mind.

Hope you manage to do something good for yourself this morning if you got up early!

Mettha,
Samantha

Monday 25 February 2013

A Trick To Free Your Neck: Engage the Armpits


It's probably both safe and fair to say that most of us come to yoga looking to free our necks of the incremental tension that has built up in our bodies over the years.

Habitual hunching of slight shrugging of the shoulders affects many modern people, sometimes without our knowledge.  


But, if you draw your awareness to your neck and shoulders this very second you may think things feel normal.  However, try to pull the shoulders down and, if you are like most people, you will probably realise your were holding slight tension in them without even knowing it.  

Even the slightest bit of tension in the muscles that draw your ears and shoulders closer can restrict freedom of movement in the neck, especially when turning it to the side or looking up or down.  Over time this can either just become an annoying niggly sensation every now and then or it lead to more chronic pain. 

So here is a trick.  

Think about your armpits.  

Really think about them.  

The armpits are hollow depressions under the shoulder.  The hollow of the armpit area is bordered on either side by two chunky muscles.  This is a good thing.  Knowing this is part of the trick.  

The muscle to the front (grab it and feel) is the pectoralis major muscle.  The muscle to the back (grab it and feel) is the latissimus dorsi muscle.  

Pecs and Lats: Two important armpit muscles

There are more muscles around the armpit but we will stick with these because they are the most important for our purposes. 

Now that you know where these two big and important muscles are , the real trick is trying to activate them.  Here is the cue.  In sitting or standing try to actively draw your armpits down towards your waist.  Don't think about the shoulders--just the armpits.  Move the armpits down.  Relax and breathe naturally.  Natural breathing is breathing into a soft abdomen (like a baby).  Let everything else be soft. 

What you will notice is that moving the armpits down also drags the shoulders down, freeing up space for your neck.  

Now release and gently turn your head from side to side.  Slowly. Mindfully.  Notice anything different?

For most of us, pulling the armpits down will allow your head to turn more freely.  There is a new feeling of spaciousness as though the head is floating atop of the spine, which is how we want it to feel.  

Try this trick throughout the day.  You don't have to pull your armpits down very hard.  Try a gentle downward movement that isn't too taxing.  Perhaps about 20 percent of your capacity.  

Once you know this trick you can do it anytime, anywhere.  It helps to relax the muscles around our necks that we all like getting massaged so much and allows our neck and head to move in freedom.  

Thanks to Simon Borg Olivier and Bianca Machliss for teaching me this trick.  Link to their Yoga Synergy site on my home page. 

I want to finish by adding that while I used to believe that taking the shoulders up to the ears was a 'wrong movement' I now know better.  In my yoga practice I regularly take my shoulders up high around my ears as, with the arms extended, it can help traction the spine.  I will post on this later.

For now it is sufficient to say that while this trick is about taking the shoulders down and away from the head, there are times when it is appropriate to take them up towards the head.  The thing is, you probably don't want to live with them stuck half way and with your upper shoulders and neck chronically tense.  If you overdo this trick and just hold your shoulders down all of the time it wouldn't be good for you either.  Your body needs to move and our job is to learn to move safely in all ranges of motion that are available to us.

Happy and safe practicing!


Classes (current at time of posting.  See class schedule page for updated details):

Mon 1300-1530h @ Barton [private classes]

Wed 0615-0715h @ Hapkido Canberra, Colbee Court, Phillip, ACT, $12

Wed 1030-1130h @ Alive! Gym, Narrabundah

Wed 1245-1315h @ Menzies Library Lawn, ANU, $5

Sat 0900-1030h @ St Aidan's Uniting Church, Brockman St, Narrabundah, $15

Sun 0900-1030h @ Hapkido Canberra, Colbee Court, Phillip, ACT, $15


Friday 22 February 2013

Handy Work, Part 2: Protecting the Wrists in Hand Balances

Generate stability and lift with good hand technique


The Short of It
Bearing the weight of your body (either partially as in down dog or fully as in balances like handstand) requires you to use your hands in a particular way.  The best way I have found that brings stability and creates lift is as follows:


  • place the hands on the floor, middle finger roughly pointing straight ahead with fingers spread
  • hands are flat on the floor but make an action as though you are trying to make a fist with your hands or as though you are trying to pick up the floor.  The fingers might start to claw a bit (good) just make sure the fingertips stay pressing and the mounds of the fingers (beneath the knuckles)--especially at the base of the index finger--keep pressing down
  • attempt to squeeze the wrists inwards towards one another while also attempting to press the knuckles away from one another.  The action is like you are trying to screw the right palm clockwise into the floor and the left palm anti-clockwise into the floor

The Long of It
In my last post I discussed some of the basic movements at the wrists and fingers and how combining movements can bring stability and freedom to the wrist joint as well as either pull energy (blood, nutrients etc) towards the hand or push it away.

Based on the work of the yogis at Yoga Synergy I tried to show how you can create a bandha around the wrist joint complex to do this.

A bandha (around the wrist known as mani bandha) is basically co-activation of opposing muscles around a particular joint.  In this case, opposing muscles might mean activating muscles that flex the wrist (bring palm closer to forearm) while at the same time activating muscles that extend the wrist (back of hand moves closer to forearm).

While it might sound tricky to flex and extend the wrist at the same time it is made much more simple because many of the muscles that flex the fingers also flex the wrists, while many muscles that extend the fingers also extend the wrists.  This means that you can create this co-activation by either trying to flex the wrist and straighten (extend) the fingers or extend the wrist and flex (curl/bend) the fingers.

In the last post I focussed mainly on how to create these co-activations (bandhas) when the hand is not supporting the weight of our bodies.  However, creating mani bandha is vital to maintaining the integrity of your wrist joints when you place them on the floor and bear weight through them.

It is really important to learn how to bear weight through your hands as there are many simple yoga poses that have us on our hands.  Most new students will end up with sore wrists (and so will many of the oldies if they don't work mindfully) if you do not use the muscles of the hands and forearms properly.

In this post I will show you some tips for maintaining the integrity of the wrist when you place your hands on the floor.  For more experienced practitioners you might find that a few little tweaks using these tips will help you lift higher into some of your arm balances as well.

Alignment & Force Transmission Through the Wrist
You have two long bones on your forearm--the radius and ulna.  As these two bones get closer to your wrist the radius gets wider and the ulna gets thinner.

The bone on the thumb side of the forearm (radius) is thicker  towards the wrist, while the other bone (ulna) is narrower towards the wrist.  The opposite is true at the elbow.  
These two bones cross over one another when you pronate your forearm (turn the forearm so that the the underside faces down as it would be in typing or doing down dog or handstand).  They uncross when you supinate (turn the forearm so that the underside faces up as though to look at the palm of the hand).

The fact that one bone is thicker at the wrist end has important implications for bearing weight through your hands.  It means that force transmission from the forearm to the wrist happens mainly on the radius side (thumb side) of the wrist.

In fact, 80 percent of force transmission from the forearm to the wrist is through the radiocarpal joint, which means you should place most of the body weight on the thumb side of the palm while you co-activate the muscles of the forearm (Borg-Olivier and Machliss, 2011).

You also need to make sure you have aligned the wrist properly for the best force transmission.  The axis of movement of the hand runs in a line through one of the small bones of the wrist and out through the middle finger.  What this means is that when you place your hand on the ground you want an alignment of the middle finger pointing straight ahead.

Stretching or spreading the fingers will help give you a wider base of support as well as more actively engage the muscles of the hands.

What this all means: When placing your hand on the ground, align your hand with the fingers spread and the middle finger pointing roughly straight ahead.  More weight should be on the thumb side of the wrist than the baby finger side.

Ha-mani bandha
Now, just placing your hands in correct alignment is not going to save your wrists from feeling compressed (although it is a good start).  What you will need to do is simultaneously co-activate muscles around the wrist joint.

When the hand is outstretched on the floor about to bear weight the best type of co-activation is ha-mani bandha.  This is where you extend the wrist and flex the fingers as though you were trying to make a fist.

Think about this one carefully.  It is one of the yoga tricks of the trade.  While the fingers look like they are extended (they are), the action you are trying to create is the opposite--of flexion.  And when I say 'make a fist into the floor' you won't actually be able to do it.  The floor is stopping you.  But the action persists.

Different people have different instructions for creating a ha-mani bandha.  Instead of thinking about making a fist, you could try to imagine your hands are like suction cups, pressing down through the fingers, the outer edges of the palm, and through the base of the knuckles but sucking up at the same time.

Another visualisation I often come back to is to imagine you were trying to pick up the floor or imagine you were picking up a basketball one-handed from the floor.  Basically, whatever helps you to extend the wrist while at the same time activate wrist/finger flexors.

Imagine trying to pick up the floor or a basketball. You'll have to spread the fingers and press down through the fingertips while sucking up at the same time. 


What this means: When placing your hands on the ground for weight-bearing work, you need to try to 'flex' or bend the fingers to give the wrist stability.

Finishing touches
Having aligned your hand correctly and cultivated ha-mani bandha by trying to make a fist/pick up the floor/flex the fingers, you can bring stability to the elbow and shoulder and create a greater sense of lift by using another trick.

When the hands are on the ground try to squeeze or drag the wrists closer to one another.  They will not actually move because they are pressing down on the floor.  However, the attempt will trigger muscles around the elbow joint to become active, bringing more stability to that joint.

You can also imagine that you are trying to screw the right hand clockwise into the floor and the left hand anti-clockwise.  This has a similar effect but a different visualisation might help.

Summary
In summary, whenever you place your hands on the floor, do so mindfully.  Use the following tips to help you bring a greater sense of stability and to help generate lift.

  • place the hands on the floor, middle finger roughly pointing straight ahead with fingers spread
  • hands are flat on the floor but make an action as though you are trying to make a fist with your hands or as though you are trying to pick up the floor.  The fingers might start to claw a bit (good) just make sure the fingertips stay pressing and the mounds of the fingers (beneath the knuckles)--especially at the base of the index finger--keep pressing down
  • attempt to squeeze the wrists inwards towards one another while also attempting to press the knuckles away from one another.  The action is like you are trying to screw the right palm clockwise into the floor and the left palm anti-clockwise into the floor
Take a look at BKS Iyengar's hands in the following iconic images of him in poses like bakasana and it's one legged counterpart, as well as in handstand.


As always, don't just take my word for it (well, it's not really my word but the words passed to me by my teachers).  Try it out. Right now if you can.

Hopefully you found your whole arm became more stable. As always, if you feel compression or discomfort then back off or stop.  If you continue to experience wrist discomfort then talk to your yoga teacher for appropriate modifications.

Otherwise, try using these instructions in a variety of postures where the hands are on the floor.   Of course, the hands are not the whole picture in any posture when the weight is bearing through them.  Yoga is an integrated, whole body practice.  You'll need to be mindful with regard to the rest of your body, in particular the elbow and shoulder joint complexes.  Look out for more posts on these areas.

Happy and safe practicing.


Friday 15 February 2013

Handy Work, Part I: Cultivating strength, stability, and energy flow through the wrist joint

If you find your wrists aching during a yoga class, it is a sign you are not using your hands properly


So much attention is paid to the larger muscles of our bodies that it is easy to forget the small muscles around our wrists, forearms, and hands.   But neglecting these muscles will make it difficult, if not impossible, to practice most of the arm balancing or (hand) weight-bearing postures of yoga.

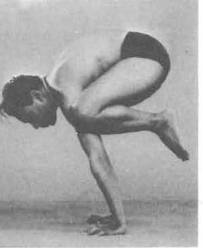
This includes your ability to maintain a relatively 'simple' pose like kneeling on all fours, along with more difficult ones like adho mukha svanasana (downward facing dog), bakasana (crow) and adho mukha vrksasana (handstand).

However, even if you are not bearing weight on your hands, you can still practice and energise the wrists and hands to prepare you for when you do.  

It is also important to remember that even if you never do any poses on your hands, the actions and movements you create in your wrists and hands in non-weight bearing postures can either enhance the flow of blood, nutrients, nerve impulses and other forms of energy through the body or constrain it.  

While many of us are focussed on building strength and flexibility, one of the purposes and benefits of yoga is that an intelligent practice should help the movement of energy through your body so that you move more freely, think more clearly, and reduce stress.  

In this first of a two-part post I want to describe ways to use your hands when you are not bearing weight through them. In the second post I will describe ways to use your hands when you are bearing weight through them.  

It's always a good idea to explore the movements of your body before bearing weight on them although you are likely to only truly understand the importance of consciously activating the hands when you are required to support your body weight--partially or entirely--with them.  

First, let's look at the basic movements of the hand.  For simplicity, and following from the work of Simon Borg Olivier and Bianca Machliss, we will look at the movements and muscles of the hand as the 'wrist joint complex'.  If you are really interested in what I am writing about and you want to learn more, go straight to the source (follow the link to Simon and Bianca above) or come along to class.

I also want to mention that while I am talking about anatomy here, be mindful that you don't get so caught up in technicalities and anatomical descriptions that you forget to feel what your body is doing.

For me the best yoga practice is always when I poke around from the inside, trying a bit of this and trying a bit of that so that I get a sense of what it feels like in my body to move (or be still).  My first and greatest yoga teacher, Paddy McGrath, is a master at getting you to walk around under the skin and her way of teaching inspires the same sense of freedom and stability without ever needing to mention the name of a muscle at all!

Ultimately, while it can be helpful to deconstruct a pose into its anatomical parts it is of little use to you at all if you are not continually sensing what is going on inside.  And I suspect for some of us who get too caught up in the 'thinking' about yoga, it might be more helpful to leave thinking mind behind and tune into feeling mind.  Some of the best backbends I have ever done have been when I stop thinking about them and just do them.

I guess is my way of saying look at the anatomy so you can understand component parts that will help you to practice safely and perhaps with greater ease while being mindful that you are more than muscles and joints and your body has an amazing intelligence all of its own if you let it be your guide.

Basic movements at the wrist joint complex
Without getting overly complicated, it is enough for most people's yoga practice to remember that your wrist can either flex (palm of the hand moves towards the forearm) or extend (back of the hand moves closer to the forearm).  It can also move sideways, i.e., the whole hand can move in the direction of the thumb (abduction or radial deviation) or the whole hand can move in the direction of the baby finger (adduction or ulnar deviation).  

It is also enough for your average yoga practitioner to think of your fingers as a unit that can either flex (bend in towards the palm as though making a fist) or extend (straighten).  You can also spread your fingers apart from one another and the thumb, in particular, is capable of making many more movements (one of the reasons humans can use so many tools).

Many of the muscles that flex the fingers also cross the wrist joint.  Likewise, many of the muscles that extend the fingers also extend the wrist. 

Having said this, it is important to note that the fingers can move independently of the wrist.  That is, you can flex the wrist while extending the fingers and vice versa.  Of course you can also flex the wrist and the fingers at the same time as well as simultaneously extend both the wrist and the fingers. 

Strength, stability, and energy movement at the wrist joint complex: Mani Bandha
One of the things we want to do before we start weight bearing through the wrists is to make sure we understand how to create strength and stability across the joint as well as how our movements can either enhance the flow of energy (blood, nutrients, nerve signals etc) or reduce it.  

Careful co-activation of opposing muscles across that joint (creating a bandha) is one way to create strength and stability.  This basically means activating muscles that both flex and extend (the wrist or fingers) at the same time.  

There are bandhas at all the major joint complexes.  Mani (meaning hand) bandha (co-activation of opposing muscle groups) is the co-activation of opposing muscles across the wrist joint complex.  I'll be talking a lot about this and other types of bandhas in other posts.  


Captain Shazam (red) with tha-mani bandha and Captain America (blue) with ha-mani bandha
There are two main types of mani banhda: an expansive one that can draw blood and energy towards the hand and a compressive one that will push blood and other energy away from it towards the body.  

Tha-mani bandha typically looks like an outstretched hand while ha-mani bandha typically looks like a closed fist.  

Open hand or opening hand: Tha-mani bandha
In most non(hand)-weight bearing postures the hand will be open.  This includes the numerous standing poses where the arms are out to the side or overhead.  

Uktatasana--chair pose with arms overhead and fingers outstretched

When the arms are overhead or around shoulder height it is usually best to cultivate a hand position that will help draw blood and other energy upwards towards the hands, which will help create a feeling of lightness in the hands and arms rather than heaviness.  

Now, don't just believe everything I write.  Experiment for yourself.  Take your arms overhead and hold a closed fist for a few seconds and notice how your arms and hands feel.  Then, open the hand and stretch the fingers and see if you can feel a difference.  

I call this the 'abracadabra' hand position as it reminds me of comics  I used to read as a kid where there was a wizard casting a spell.  I couldn't find any wizards but I did see a picture of Captain Shazam doing the same thing (superhero in red suit above).


In this type of hand position you try to slightly flex (bend) at the wrist while extending (straightening) the fingers.  It is important to remember that if your aim is to bring stability to the joint then you don't want a limp limp wrist and loose fingers!  However, you don't want to over-tense either.  So try to achieve this position with as minimal effort as possible so that the whole hand does not feel tense. 

The reason you stabilise the wrist joint complex in this position is because you are activating finger extensors (which also have an action in wrist extension) while you are activating wrist flexors.  Thus, there is both wrist extensor and wrist flexor activity across the joint, bringing stability and--because it is an expansive co-activation--pulling energy towards the hand. 

Closed or closing hand: Ha-mani bandha
There are certain positions were the hand is not open but not weight bearing either.  Gomukhasana is an    example of this.  In some versions of trikonasana (triangle) the bottom hand grasps the lower shin, as seen in the picture below.

Trikonasana with ha-mani bandha of the bottom hand


When the hand is grasping or making a closed fist you can bring stability to the wrist joint complex by extending the wrist slightly and flexing the fingers--as though you were trying to make a closed fist.  

This cultivates the compressive ha-mani bandha because the finger flexors are also wrist flexors.  The action of these flexor muscles, which cross both joints, opposes the action of the wrist extensors since the wrist is actively in slight extension.  

Perhaps more importantly than bringing stability in non-weight bearing postures, this type of mani bandha is probably more useful for its role in helping to push blood and energy towards the body.  

You can imagine this might be useful for the bottom arm in trikonasana given the effects of gravity are likely to pool energy (blood and lymph at least) in the hand.  Making a closed fist with the bottom hand in trikonasana will help push the energy upwards.  

Another way you could try ha-mani bandha is in postures where the hands come into 'namaste' for instance.  In this hand posture, although the fingers look extended you can try to actively cultivate ha-mani bandha by trying to flex them.  

Here the fingers will not flex because they are pressing together.  However, the action of trying to make a fist with them will help bring stability to the wrist joint, which is in significant extension.  It is always a good idea to create stronger bandhas at the more extreme ends of joint movement, which--in this position--creates almost maximal extension at the wrist joint. 

This is a very important concept to understand when you begin to bear weight through the hands.  That is, while the fingers look like they are extended (straightened) the internal effort is in trying to flex them (as though you were making a fist)

To increase stability across the joint when it is almost maximally extended, try to flex the fingers.  This can also help relax the finger/wrist flexors once the pose is released. 
Try it for yourself and see what happens.  I know that for me I feel more space around the joint, less strain, and far less compression when I co-activate the extensors and the flexors.  

Additionally, trying to actively flex the fingers while these muscles are stretched will help induce a relaxation reflex (called the reciprocal relaxation reflex) that should help the wrist/finger flexors to relax more once the pose is released.   

Summary 
  • Most finger flexors (benders) are also wrist flexors, while most finger extensors (straighteners) are also wrist extensors. 
  • Co-activation (simultaneous tensing) of opposing muscles (in this case extensors and flexors) helps bring stability to the joint.  
  • Activating muscles across the front (flexors) and back (extensors) of the wrist at the same time will help stabilise the joint (co-activation).
  • You can pull blood and energy towards the hands (tha-mani bandha) or push it away (ha-mani bandha) depending on how you position the wrists and fingers.
  • Slight wrist flexion combined with finger extension (tha-mani bandha) helps draw energy towards the hands and is useful when the hands are up in the air, out to the side, or out in front of the body without weight or pressure on the hands.
  • Slight wrist extension combined with finger flexion (ha-mani bandha) helps push energy towards the body (away from the hands) and is useful when the hand is below the level of the heart or grabbing something.  It is also the most useful position of the hand for weight-bearing postures (more on that in part II of this post)
  • In some poses it is possible that the fingers look like they are in extension but the action is as though you are trying to flex them.  Understanding this concept is essential when weight-bearing through the hands. 


Tuesday 5 February 2013

On Loving Kindness in Yoga


I wanted to post an assignment I recently wrote for a course I was taking on the topic of mettha/metta/maitri/lovingkindness.

Because I abide by the 'rule' that your blog post looks better on the page if you put a picture at the top, I googled 'metta'.

The monk with the tiger picture came up.  It reminded me too much of Life of Pi (ending spoiler alert) where the tiger leaves the boy (uneaten) at the end of the movie without looking back after the boy saved and loved him while they were lost at sea.  No thanks from the tiger!  Why couldn't he just look back?

So I went looking for another picture and found this.

It reminded me of Sri Lanka (lots of elephants) and so now I have two pictures.  Interesting how people  like to put up pictures of metta/mettha/maitri/lovingkindness showing human-animal bonding.  That's another discussion.

Here is my essay on the practice of mettha in yoga.  Heavily influenced by the poetic writer, human, monk Thich Nhat Hahn.  I hope you enjoy.


On the practice of mettha in yoga
In the springtime everything comes into bloom!  Nature has a big yawn, stretches it’s limbs, and it seems that all of a sudden there is life. 

But springtime beauty doesn’t just happen.  If we think of the flowers in our garden we know that before the flower there is the bud.  Before the bud there is the stem.  Before the stem there is the root.  Before the root there is the seed. 

But who is to say that just because there is a seed there will be a flower?  There are many things that can stop the flower from growing.  Conditions need to be right.  Care needs to be taken at every step of growth.  Some years there may be drought.  On others there may be infestation.  Sometimes there may be both.

Inside of us all there is a seed.  Buddhists call this mettha.  Yogis do too. In other cultures and languages we have a different word for the same thing.   We could call it a seed of loving kindness. 

It is a seed that exists always.  This is important to remember.  Sometimes it is in bloom and sometimes conditions affect the scent, vibrance, and blossom of the flower.  At certain times in our lives the flower seems to shrivel and we can forget there is even a seed.  But it is a seed that exists always.  This is important to remember.

The seed of loving kindness needs constant attention in order to flourish and remain in full flower.   Every time you practice yoga remind yourself you have an opportunity to attend to this seed, to help it thrive.   And, because your practice takes place in a social context, you not only have the chance to provide nourishment to your own seed but to those around you so that the whole garden—and perhaps the whole street, city, and country—will prosper.

Remind yourself of this before you come to class.  Before you enter the front door.  Perhaps while you are circling the car park searching for a space.  Instead of watering a seed of anger or frustration, remind yourself, it is only a car park.  If you know it will be hard to find one, leave early, find another way to come, or think about how you can resolve this tension so you don’t arrive to class already under pressure.  Importantly, don’t forget to breathe!

When you enter the room, take a moment to remind yourself of why you are here.  Some of us want bigger muscles; inner peace; more flexibility; a chance to relax.  These things are all ok.  But, whatever your reason, remind yourself that while you work towards your goal this class is also an opportunity for you to water your seed of mettha, of loving kindness, and to water the seeds of others. 

It is important to water the seeds of others.  Of what use is it to sprinkle our own seeds with water and the seeds of our neighbours with poison?   Inevitably, the decay will spread and we will all suffer.  Remind yourself that not only can our words and actions can be poison but the things we don’t say and the things we don’t do can be just as toxic.

As you practice, tune into your self-talk.  Is it loving?  Is it kind?  Are your thoughts caring or diminishing?  Are they helping you grow or are they causing you to wither?  In yoga we want to encourage ourselves, knowing that every time we practice we get stronger and healthier.  We remind ourselves it doesn’t matter if we can’t do everything now or ever.  What matters most is that we continue to water our seeds and grow.

As you practice, tune into your body.  What is it telling you?  Are you melting from the heat of a raging inferno or has your flame been stifled?  Is there strain or tension anywhere?  Listen carefully to your body, mindful that more is not always better and that less is ok—if that is what you want—but that it might not be what you need.    Be mindful that striving for a pose while losing form will stunt our overall growth and possibly do more harm than good. 

As you practice, tune into your breath.  What is happening? Are you breathing? Can you breathe comfortably?  An uncomfortable or absent breath is a clue that we might be overdoing or overstraining.  Always, always, always come back to your breath.  Let a steady, comfortable breath be your guide.

In yoga we focus on strengthening and stabilising our body.  We pay attention to minute detail so that we practice safely today and so we can continue to practice tomorrow.  We have the opportunity to move beyond this physical practice by nurturing the seed of loving kindness in ourselves and in others.  For most of us, we must make a conscious choice to engage in such a practice.  It is not always easy, especially when habits and personalities get in the way.  And we need to keep at it; it’s not easy to stay in bloom! But we can start by reminding ourselves each and every time we come to yoga.

In the words of a wonderful human being, Thich Nhat Hahn,

Words and thoughts concerning compassionate action that are not put into practice are like beautiful flowers that are colorful but have no fragrance.

Om Shanthi, Shanthi, Shanthi.  May there be peace, may there be peace, may there be peace.  In the hearts, minds, and souls of all beings. 


Classes (current at time of posting.  See class schedule page for updated details):

Mon 1300-1530h @ Barton [private classes]

Wed 0615-0715h @ Hapkido Canberra, Colbee Court, Phillip, ACT, $12

Wed 1030-1130h @ Alive! Gym, Narrabundah

Wed 1245-1315h @ Menzies Library Lawn, ANU, $5

Sat 0900-1030h @ St Aidan's Uniting Church, Brockman St, Narrabundah, $15

Sun 0900-1030h @ Hapkido Canberra, Colbee Court, Phillip, ACT, $15