In this video, one of my great teachers (Paddy McGrath, Dancing Spine Yoga) got a small group together so we could give a taste of what you might experience with her (for more of her genius go to www.dancingspineyoga.com).
We all met at the beach at 7 am. For some of us (me in particular) that meant waking up a bit beforehand and heading down.
We spent a few minutes trying to find a place to rest my computer so we could take the video--a handy park bench did the trick--then lay ourselves down on the ground (very bumpy as it turned out with the beautiful tree above us having shed a bucket load of marble sized seeds!).
And this is what we did.
We did a few more things like that, backbends different ways, some backdrops, a few squats, a standing balance. Then we closed up shop and went for a coffee/juice/tea down the road.
The point is we woke up and a few minutes later we met casually on the beach and did our flicking backbends then left. We did not spend hours or even minutes 'warming up' or 'cooling down'.
We did do a few 'rolling wall squats' (a type of moving from standing, squatting, standing where you try to keep your weight forward the whole time and prevent your butt sticking up and shifting back while pretending to slide your nose up and down an imaginary wall right in front of you).
Then it was "lights, camera, action" on our wiggling spines.
We all practiced our own variation of backbending. We all have different spines so that is normal. We are not going to look the same. But hopefully we all felt the same inside. That is, with a delicious free and moving spine.
These back bends were as normal as walking. Just another movement/action in our day.
Hopefully you do not need to warm up to go for a walk or take a swim in the ocean.
And so we practice with our back bends. As though they are just a normal movement and part of our day.
My backbend at 7am after waking is not the same shape as one a bit later. Indeed, none of my backbends are ever the same. But if I work mindfully then I can still feel lightness and ease of spine no matter when I practice.
We did not do warm-downs, counter-poses or anything to finish. We did do a short standing balance pose to 'give back' to our spines, which looked liked this.
And our spines felt delicious.
If your backbends in the middle of the day routinely feel squashed or jammed then you won't be able to do the same thing first thing in the morning and get a different result. You might need to adjust your technique.
Paddy gave us lots of different ways to free our spines, with specific feedback that was unique to our level of practice, our level of 'mental preparedness', and our level of movement. That is what makes practicing with her so special.
When you practice in a way that is not striving for a particular outcome, without over-stretching or tensing too much then you find a beautiful space to work in.
Thanks to you, Paddy, for helping us find that space, for freeing our spines, and supporting our realisation that dropping down first thing in the morning to wiggle freely into a backbend can be entirely normal.
To practice with Paddy go to www.dancingspineyoga.com
If you can't make it then you can meet us here in Canberra out by the lake doing our own bit of wriggling.
And finally, I am not suggesting you all wake up and do backbends--especially if you have not learned to do them without squishing. But perhaps be open to the possibility that it is possible and that there might be some teachers out there who can show you how!
Happy and safe dancing spines!
Much metta,
xosamantha
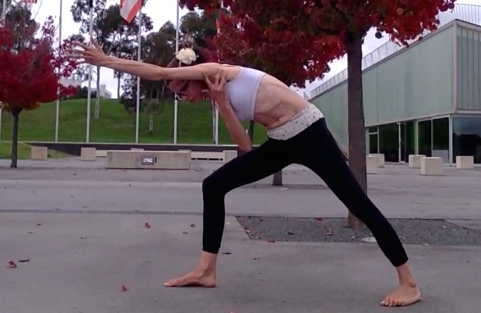
Parsvakonasna: A forward bending, side bending, twisting, backbend
If I could only give one instruction in class it would be something like, find lift in your postures. Find lightness.
Okay, that's two, but that's what guides me through my self-practice reflection whenever I encounter and practice moving and postures.
That said, I encourage students to be mindful that they are not collapsing in their postures.
People who are very flexible often collapse out of habit, especially if they have not developed strength to balance their flexibility.
People who are stiffer might do it to try and get deeper into an image of a pose they think they should be in, often with some strain.
I have little slips and sinks and collapses that I still need to think of myself! It is an ongoing work.
In standing poses there is always the possibility of sinking into the hips. In arm balancing poses there is the possibility of sinking into the shoulders. In backbends it tends to be sinking into the lower back.
In this post I look at a way to try parsvakonasana without sinking into the front hip.
I describe the key actions that give strength and stability to this pose and which help develop mobility.
I pay particular attention to some key spinal actions that will help you develop a strong and mobile core.
I have included two videos. One has more slow and detailed visual instructions. The other highlights the difference between lifting and sinking in the front hip.
I have also included step-by-step visual and written instructions, breaking down the pose into key leg, spinal, and upper body actions.
As with all my posts, I really write these for my students to practice outside of class. If you are not a student of mine I encourage you to come to class or find a suitably qualified teacher who can help you better understand the feeling of these actions in your body!
Perhaps watch the key actions video first. Then review the step-by-step instructions. Then watch the difference between sinking and lifting.
Key actions video
This video shows me using my mime skills to show you how to come into the posture.
Perhaps the highlight of this video comes around 1 minute 50 seconds when a little boy (not in the screen shot) says 'I need to do a poo'. A conversation ensues between the family members and the boy, discussing where he can do a poo, and culminates with dad's joking comment, 'well, you can't do a poo in the lake'. As you can see, that brought a big smile to my face!
Key actions step-by-step instructions
Parsvakonasana, spinally speaking, is essentially a forward bending, side bending, twisting, backbend. Is that what you are doing when you practice? I deconstruct it below.
1. Sitting bones down, top of pelvis back, lengthens lower back and unsquashes front of groin.
2. Spinal forward bend. This means firming the tummy in a way you can still breathe into it. I do this by keeping top of pelvis back, leaning forward, and trying to move my hips forward without them actually moving. I lean forward without letting my butt stick up and start to take my leg back.
3. Toe down then heel down.
4. Check sitting bones down and top of pelvis back.
5. Check front thigh is rolling out. You could do this by thinking of how to roll it out. You could do it by turning your front heel out slightly so outer foot points straight ahead then try gripping the heel back in without moving it.
6. Check back thigh is rolling in. You can allow your back pelvis to also come in if that helps. In fact, these actions should help unsquash your lower back. I have outer back foot lifting towards outer ankle.
7. Stretch the ground with your feet. That means pushing the front foot down and forward and the back foot down and backward.
8. Lower ribs move back to middle back to help bring softness to your middle and upper back.
9. Spinal side bending. That means you try and move the front of bottom pelvis forward and up towards bottom side front rib. In the picture you see me drawing those two points together. Make sure the lower ribs stay back and don't pop out.
10. Take top arm overhead. Push armpits forward and up as though trying to bring your underarms towards your nose. Outer armpit is rolling towards your face. This enhances the side bend.
11. Turn from your navel level of spine towards the top pelvis. Try not to move your top pelvis or move anything else. This is just a spinal twist. Many people move the whole pelvis here but you want to make this a spinal movement.
12. Keep turning your spine progressively towards the sky. In the photo I show turning the chest. Again, try to keep this a spinal movement. Also, watch that the lower ribs do not jut out.
13. You can put your bottom arm wherever it goes without changing the preceding actions. Here is the point where many people might just collapse in their front hip in an effort to reach the ground. But in this photo you can see that I have kept the front hip exactly as it was in the preceding photo. I come to the ground with my arm because I enhance the spinal side bend. Wherever that bottom arm ends up, you don't sink into it either. I am just lightly pressing my hand into the ground and mainly doing an action of moving that armpit towards the hips to enhance the spinal side bend.
14. From there I add the last action. This is a lengthening of the front of the spine. I touched my upper chest in the photo (although the action comes from the navel). I get a little lift which sort of feels like a little back bend in my upper back. From there my head comes into place. Many people will not feel comfortable with their head in this position. It is better that you find your own comfortable position for your head and neck. My head position is throat forward, chin up, combined with a little twist where move the top ear away from the top shoulder slightly. I cannot show or explain this well here so I just suggest you move your head and neck gently and find your own comfortable spot.
15. Here I stay firm but calm. My tummy is firm but I can feel the movement of the breath there. I am content and at peace. I feel like I am doing something and I am getting warm from this posture. It is about 10 degrees celcius in this photo yet I don't feel cold even in this crop top because I had been practicing for a little while and using active movements in such a way that I tensed less, stretched less and just enjoyed moving. This is self-evident when you can see me laugh and smile as I hear the jokes of the people around me.
Difference between sinking and lifting
In this video you can see me first coming into the posture so that I do not sink into the front hip. In the second version I just sink into the front hip.
In the second way I do not do spinal side bending. It is more just hip flexion. Because of this I feel very passive. I am not getting warmth and I am not moving energy through my spine effectively.
Ultimately how you come into postures is your choice.
Be happy and content. Practice safely, mindfully, and peacefully. When you practice like this people want to be around you. You inspire movement in others. As I was filming these sequences today I had at least 4 strangers come up to me, including two children who just wanted to do tricks with me (handstands and arm balances), all wanting to talk about what I was doing and how it just made them feel good. I am certainly not the most elegant, strongest, most flexible person. But I really enjoy doing what I do. Happy with where I am. When that happens I do believe you can have a powerful influence on helping others towards finding their own inner happiness too.
This is the type of thing I teach in classes, workshops, and retreats in Canberra, Sri Lanka, and Bali. Hope to see you somewhere soon!
Eek. I had to jump on and quickly write briefly about this today after I heard students tell me they thought it was normal for their back to be tense or hurt when doing backbends.
No. Never. Please.
The students were new to my class so probably have not had the benefit of hearing me say a million times that your spine should feel free in a backbend. Not tense and stressed.
They will not have heard me say a million times that if your back hurts after coming out of a backbend then you were not in the pose correctly. That it is a sign of improper technique or pushing too far.
When practiced correctly you should be able to get up straight after a backbend as if nothing happened. There should be no need for counterposes.
Don't mistake me, I am not saying counterposes don't have a place. But there should be no desperate need to do them in the way they are often used, to counter the effects of a poorly executed posture.
I am not sure where it might have slipped into people's minds that it is ok for their back to feel tense in a backbend. And that this is ok and all they need to do is hug their knees to their chest or do a forward bend after to make things better.
No. Never.
I suspect it comes from the way people often move into poses like urdhva dhanurasana, which is to thrust their hips up as high as they can and then put their arms in place and push like crazy.
To demonstrate this concept in class today I had students place their hands on my lower back as I came up into urdhva dhanurasana. Soft. Soft. Soft. And my spine felt free and easy. My tummy muscles were firm but my spine was long and free.
I contrasted this by doing what a lot of students do, which is push their pelvis up as high as possible and asked them to feel the difference in my lower back. Hard. Tense. It felt scrunched and uncomfortable in my lower back.
Please watch the video by my first and great teacher, Paddy McGrath, who taught me (I am still learning) about the importance of spinal freedom. I am so lucky to have had such a wonderful person in my life. She saved my spine from years of scrunching and crunching.
A photo of me pressing my armpits forwards and upwards, essential for this more advanced backbend. [Image from Canberra Yoga Space].
Is it wrong to take your shoulders upwards
as though to your ears?
Do you know you have muscles put on your
body to do precisely that?Has your body
been designed incorrectly?
It is not wrong to take your shoulders upwards
towards your ears.Ordinary life requires
it, especially when reaching overheard.
Go find a shelf that is beyond your reach
and try to reach for something that is on it.Barring any shoulder/neck issues you will no doubt automatically take
your shoulder forward and upward.If you
looked to the side you could probably smell your armpit it is so high.
If you have young kids then take them to a
playground and watch them swing and hang from bars.You will see that when they hang their
shoulders are right up beside their ears (and they will probably bring their
knees to their chest with ease, something that most adults cannot do!).
The movement of shoulders towards ears is a
natural movement that will happen in overhead reaching, often with a little
side bend if you are doing it one-armed.
So I have to ask myself why am I being told
in some yoga classes I attend to take my shoulders away from my ears when they
are overhead?
[And I have to ask myself why did I
sometimes say this to students when I was a new teacher?Certainly not because my senior teachers had
ever told me to.]
Here are some reasons I have come up with.
·People think that a lot of us
already have tension around the upper shoulders and next and hold our shoulders
in a little shrug so as a yoga teacher we should tell them to counter this by
keeping them down away from the ears.
·People think it squashes the
neck to take the shoulders to the ears in overhead movements.
·People want to strengthen
muscles around the shoulder blades, especially when they give the instruction
to pull the shoulder blades down and together.
There could be other reasons as well and it
would be great to hear from people about this.
Here is why I am not comfortable with those
three reasons as being sufficient explanation or justification for teachers to
give the instruction to move the shoulders away from the ears in overhead
reaching.
Overhead reaching includes poses like adho
mukha svanasana (downward dog), adho mukha vrksasana (handstand), urdhva hasta
tadasana (standing with arms overhead), utkatasana (fierce or chair pose),
urdhva dhanurasana (back arch from the floor), and virabadhrasana 1 (warrior
1).There are many more, including most
of the advanced backbends where you reach and catch a toe behind your head, as
well as inversions like pincha mayurasana and headstand.
First, it is true that many of us hold
subconscious tension around the upper shoulders and hold them in a little
shrug.But we generally hold them in a
little shrug, not a big one, and the shoulder never gets the chance to go all
the way up.It is important to encourage
people to take their joints through their full natural range of movement.
Also, sometimes people who hold persistent
slightly shrugged shoulders might not be aware they are doing so.Sometimes activating the muscles with
consciousness and taking them all the way up can alert them can help them
become aware of this and learn to notice when there is slight tension and then
learn to try to relax.
Importantly, as I discuss later, if they
are going to take their arms overhead for advanced postures they need to take
learn to move their shoulders towards their ears when it is required or they
will squash their spine.
Second, it is true that it can squash the
neck if you take your arms overhead and lift shoulders to ears.However, that is often because people are
trying to take their arms overhead and then behind their ears or level with
their ears.Most western people are way
too stiff to be able to do this correctly.
Instead, if you take the arms overhead and
push the armpits forward and up you should find any neck squashing tendencies
are countered.
Allow people to keep their arms in front of
their ears and encourage them to push their armpits in the direction they are
facing.
If anyone still feels any neck squashing
then you could instruct them to take the arms lower so they are in front of the
face (but still pushing armpits forward).
Third, I believe this is probably an
instruction that is not helpful in yoga with overhead reaching positions.The reason is I have seen it given mostly in
positions where the spine is upright and also extended (going towards a
backbend).
In a backbend you want to use your arms to
help you create length in the spine, not compression.
The instruction to move the shoulders down
and together will create compression in the spine.
The instruction to move the armpits and
shoulders up and forwards will create length in the spine.
To tell people to bring the shoulders down
in poses like utktasana or virabadhrasana 1, where the lower back is already
more likely to be squashed (though with careful practice it will not be), will
place most people at risk of further squashing their spines.
It is not until you start to move into more
advanced postures that you realize the real importance of being able to take
shoulders up and forwards.Drop-backs,
backbends from the floor and advanced backbends that involve reaching arms
overhead to hold onto a foot that is also circling behind and up (like a full
natarajasana or kapotasana) all require you to take the armpits towards the
ears.
Ask any practitioner who is in those poses
to do otherwise and they will instinctively tell you no way as it will shorten
the back body, which they are trying to lengthen.
My view is that we are trying to help
people free their spines, not squash them.So let’s give them instructions that will help them in that regard. While you may not be teaching your students
these advanced backbends, poses like vira 1 and utktasana are preparatory poses
for those positions and if you do not give appropriate instructions in those
poses they will never get to the more advanced versions.
If you want to help them build strength
around the shoulder blades through actions of drawing them back and down there
are other postures more suitable.
These include poses that require
interlacing behind the back, or the floor backbends that do not involve taking
the arms overhead such as up dog or the simple forms of dhanurasana where you
hold the ankles (but not the full dhanurasana which has you take the arm
forward and overhead to reach the toe), or simple bridge poses with arms
interlaced behind the back.
It might be a more useful cue for your students
to watch they do not flare their lower ribs forward as they take their arms
overhead. Stiff people will often use spinal extension to get their arms fully
overhead by pushing the ribs forward to compensate for lack of movement in the
shoulders.This can again squash the
lower back and it is perhaps more useful for them to not take the arms so high
so the spine is not masking the work.
I want to finish by being clear that I am
talking about taking shoulders to ears in overhead reaching positions.Also, I want to be clear that I do not think
it is wrong to take shoulders away from the ears (depression).That is also a natural movement of the
body.
However, I wanted to inspire some thought
about considering the consequences of what you instruct and whether your
instruction is contradicting another instruction you are giving, or whether you
really mean to be giving that instruction for that particular pose.I see this frequently when teachers tell me
to lengthen my spine in vira 1 and then come and tell me to pull my shoulders
down and back.
For me, the best instruction to give is to tell people to activate their armpits when taking the arms overhead so the armpits press in the direction they are facing. In an overhead position this is forward and upward. I learned this from Simon and Bianca at Yoga Synergy.
This simple instruction can be applied to positions where the arms are not overhead, such as plank, where again you can just instruct people to push the armpits in the direction they are facing (in that case down towards the floor and towards the hips). If I take my arms behind my back I can press my armpits down and towards one another. You can learn more about this and other tips to enhance your yoga practice via the Yoga Synergy online anatomy course.
While about to post this, I also found
another article that explains some of these ideas from an anatomical
perspective written by Dr Roger Cole.You can link to it here.
Also, last year I also wrote a post about taking the shoulders away from the ears! There, I focussed on addressing the tension that gives some of us chronic tension and causes that habitual half-shrug look about us in our day to day life (I rather, perhaps unthinkingly called it rugby neck, mainly based on the look of the shrugging shoulders not necessarily what is happening at the shoulders). My aim was to get people to use some tricks outside of yoga (e.g., at their desks) to catch that creep, or to provide them with a useful tool to counteract the tension. However, in that post I clearly stated there are occasions where you want or need to take them up--especially in overhead positions. I promised to write more on that but it has taken me time. This article is the article I should have written a while ago on that matter!
Use a trick from kneeling plank to help you get here
I have just had the pleasure of spending a week taking daily (sometimes twice daily) classes at Yoga Synergy in Sydney and will be heading to Townsville next week to spend time with my own teacher, Paddy McGrath. I am so excited.
The teaching styles of these great yogis are very different but I was recently struck by how some of the cues in two very different looking postures were almost the same.
Bianca Machliss from Yoga Synergy in kneeling plank
I love the Yoga Synergy high plank (above is the kneeling version) for many reasons. One of the least obvious is that it can help teach you a trick to free your spine for serious back bending as used by my teacher, Paddy (below).
Paddy (Dancing Spine Yoga) in an extreme backbend
Outwardly, what Bianca is doing seems to have little to do with what Paddy is doing. But they are more alike than you might think. The trick is what you feel inside.
Here's the trick
Come into kneeling plank like Bianca. Notice this is a high kneeling plank. By that I mean the chest is pushed back between the shoulder blades (or the shoulder blades are wrapped around the chest in protraction). This action is important in other arm balance poses but that is a discussion for another post. For now, let's focus on what is going on in the lower body.
Also notice Bianca's knees are behind her hips--make sure your knees are also slightly behind your hips. This is also important for the actions we want to create next.
Notice the footwork. The toes are pressing firmly down into the floor. The firmer you can press your toes, the lighter the pressure on your knees. You can press the toes down and try to push the heels back.
From this position lightly hug your armpits towards your waist.
Now, and this is the trick, try to drag your knees towards your hands. The knees will not actually move because you are pressing with your feet. What you should feel instead is activation of muscles low in your belly without you having to pull your navel to your spine. Stop trying to pull the knees and you should feel them relax.
Then you can also try a more subtle move. Try to move your sitting bones forward as well--as though they are moving towards your navel (don't pull that navel in though!).
What you should feel with these combined actions is that you have created firmness in your abdomen without having to tense the belly or pull the navel to the spine. You should still be able to breathe freely although you will feel the breath higher up in the torso (since the belly has become firm you it won't move out as you breathe).
From there you can try to keep pulling your knees towards your hands and your sitting bones in the same direction (without pulling your navel to your spine) but at the same time push your heels further backwards so the knees come off the floor and the legs are straight. You will now be in the high plank.
With your legs straight, keep trying to pull your knees towards your hands and your sitting bones towards your chest just like you did in kneeling plank. It is harder because the legs are straight and your hips might want to bend (don't let them) so if you can't get it then go back to practicing in kneeling plank to recapture the feeling.
For those of you who lower to the floor from plank or kneeling plank (I really recommend just lowering from kneeling plank until you are really sure you know what you are doing with your shoulders, torso, and legs or you might just set up bad habits that will later lead to injury) you can now try to keep these actions as you come down. It should feel very supportive of your lower back and make lowering much easier.
So what?
Ok, so what does this have to do with Paddy's extreme backbend (don't worry if you can't do it--I am still working to get there!)? A lot actually.
This is because, in her backbend, Paddy is trying to do exactly the same thing with her knee and her sitting bones! That is, she will be trying to move her back knee forwards along the mat and her sitting bones towards her navel.
By attempting to drag the back knee and sitting bones forward Paddy will have firmness in her lower belly and freedom in her lower back. Only if she uses this trick can she move deeper into the back bend with a free or, as Paddy calls it, a dancing spine.
Application to your yoga practice
Now, you may not be able to attempt the pose that Paddy is doing. And, to be honest, it probably does not matter if you can ever do it. But, we practice poses that have a similar idea in yoga all of the time. One of the most common is the standing lunge or the kneeling lunge.
Bianca in san calasana (high lunge)
In these sorts of lunges you are trying to do exactly the same thing. That is, attempt to drag the back knee forwards and sitting bones towards the navel to firm the lower belly. You will feel that this frees your lower back.
In Bianca's high lunge (pictured above) you might find it is easier to think of dragging the back foot towards the front foot. But if the knee is on the ground you will find it easier to think of dragging the back knee forwards.
The other pose you will encounter frequently in most yoga classes where you can apply this trick is bhujangasana (cobra).
Paddy transitioning to cobra
In the photo above you can see Paddy about to transition to cobra. One of the interesting things about this transition is you can see her upper spine is like the kneeling plank and, in fact, the whole pose has a kneeling plank look about it!
To come into cobra pose, Paddy has come from downward dog towards kneeling plank and is now about to try to let her pelvis lower (not fall) down while simultaneously dragging her knees towards her hands.
Once she has lowered her pelvis as far as it will go (without feeling any squash in her lower back) she will raise her chest.
Importantly, if her pelvis would not go down any further without compressing her lower back then she would just lift her chest from here with her pelvis high off the ground.
I couldn't find a photo of Paddy in the full cobra on the internet. It seems people like to take photos of her in pretty extreme poses only. However, this photo of her transitioning to cobra is probably more useful than one of her in cobra because it really demonstrates the 'feel' of the pose and sometimes we get too caught up in the look of a pose.
People often come into cobra from the floor. But coming into it this way (from kneeling plank) will help you really engage the legs and lower belly and teach you a movement pattern that frees your spine.
Summary
This trick of trying to bring your knees towards your hands or chest and sitting bones towards your navel works in most of the backbends. However, it is harder to get the feel when your knees are not touching the floor and when your legs are straight so it is really helpful to practice in poses like a kneeling lunge or a transition from kneeling plank to cobra. This helps your body begin to understand the firmness in the belly combined with freedom in the lower back while back bending.
You can watch the full youtube video of Paddy practicing extreme backbends below, including the transition from kneeling plank to cobra. Beware! They are extreme. Paddy is an extraordinary teacher and yoga practitioner. What I hope your body learns from watching her is the beautiful freedom that is present in her spine as she practices. She got there with years of practice and listening to her body. Some of us might never come into such extreme postures and it doesn't really matter. We can all, however, learn to move with greater awareness and freedom.
Happy and safe practicing!
Classes (current at time of posting. See class schedule page for updated details):