Showing posts with label hanumanasana. Show all posts

Sunday, 5 July 2015

Fun With Splits!


If you clicked on this post you probably are interested in doing the splits.

Great!  In this post I share two places where some splits or splits-like postures sneak into the current sequence I am teaching.

But as you watch the videos (there are two), look at the photos and read through just remind your self that when you practice anything, try your best but do not be attached to an outcome.

If the splits come they come.  If they don't they don't.  Accept that.  Do not force.  Do not strain.  Move slowly.

This is not an instructional post about how to do the splits.  It is a post to show where you can slip them (or like postures) into parts of your practice.

The first of these postures does not come until at least a good 15-20 minutes of the sequence. That means we have moved and warmed ourselves.

Watch the first video, below, which is an interesting variation on a side bending upside down splits that starts with parsvakonasana.  I deconstruct the posture afterwards with step by step photos and instructions.

Then, in the middle of our sequence, take a look at how we move from gadjastan (elephant stance) to the more traditional seated splits.

Upside down side bending splits
The video shows the transition from parsvakonasana to upside down side bending splits.


Deconstructed
1. Come to parsvakonasana.  Watch previous posts on parsvakonasna if you are not sure how.


2. Pelvis remains in place, turn navel, ribs, chest and bring shoulders to the inside of thigh or knee if possible.  Press inner thigh and outer arm into one another.  Be mindful that your butt does not swing out to the side here.

3. Bring inside hand to back of calf from the inside.  Keep nuzzling knee and shoulder into one another.  Press that hand into the calf and calf into hand.  Again, mindful your butt is not off out to the side. 


4.  Other hand comes to ground.

5.  Lean forward and begin to bring that back foot in.  Be on toe tip so there is as little weight on that back foot as possible. 

6. Keep leaning forward, nuzzling arm and leg, pressing calf and hand, and lift off if safe and comfortable.  Look towards your back foot.


Fun on the floor!
Below is a video that shows how we transition from standing to splits on the floor.  

I show two variations--the first is for people more familiar and comfortable with full splits.  

The second is for those less familiar and less comfortable with the splits.  Remember, try your best without being attached to an outcome. 


To come into this posture we start here.

Make our way mindfully to the ground.  Pause and get that tummy firm in a way you can still feel the movement of the breath there!


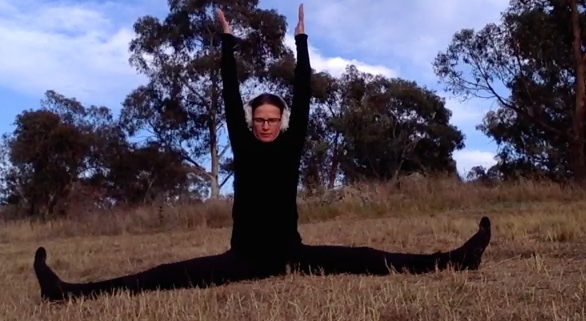
Go for a upavista konasana--a sort of wide legged side split type posture.  I have my arms reaching up to lengthen my spine and I am working with sitting bones down and top of pelvis back so I am not being too archy in my lower back.


Then, either turn spine and lift and make my way to a split like this....


...or, bend both knees then lift and turn to a long lunge.


Smile and have fun.


Only do what feels comfortable.  Try to practice to your own body and how it is at that moment and not to what you think you should to be doing.  


This is a pose in our current sequence as we work our way through outdoor yoga in chilly Canberra (the ear muffs might be a give away!).  The posts are intended for students who work with me and know my teachings.  Overseas we can work on these in my upcoming retreats in Sri Lanka (July 2015) and Bali (September/October) 2015 (see www.artofliferetreats.com).

Happy and safe practicing!

Much metta,
Samantha

www.yogacafecanberra.blogspot.com
www.artofliferetreats.com
www.yogacafelk.blogspot.com


Saturday, 31 January 2015

Working Towards Hanumanasana/Splits (James Brown Version—Gotta Go Up To Go Down)


Working Towards Hanumanasana/Splits (James Brown Version—Gotta Go Up To Go Down)

Hanumanasana (henceforth to be called the splits in this post) is a pose to work towards with caution. 

It looks so impressive most people’s egos get the better of them.

Or, perhaps it was just my ego?  As I tell my students, when I first started yoga I injured myself with over-zealous practice of the posture.

Actually, the practice was not over-zealous.  This was a case of pure ego.  I actually practiced mindfully and diligently.  The day I made it into the pose after many months of practice I was so pleased with myself that later on (several hours after my practice and we could almost call it the next day) I met a friend and said ‘Look, I can do the splits!’

I proceeded to do the splits right there and then, with no preparation.

Well, let’s say I managed the position but did something to my butt that had me limping for a month!

These days I can do the pose almost first thing in the morning as I have been practicing for many years.  However, most people will need quite a bit of preparation. 

Hopefully my previous posts should have lead you towards an understanding that the splits should not feel like too much stretching. 

It is not about splitting apart. 

Using active movements means the pose is actually about coming together again. 

If you are working towards this posture I recommend you work with an experienced yoga teacher to guide you.  Do not confuse flexible with experienced and also, I think it is better to make sure your teacher can do any pose they are trying to instruct you in. 


In the photos below I have shown one progression.  Watch the video above to see the movement in action.  The video at the end of the post shows advanced variations of the posture (intended for demonstration not for practice).

You remain at whatever stage you feel comfortable in (feel like lengthening and relaxing, not stretching and tugging).

There are two key things I am doing in each stage.   The first thing also has a little subplot. 

First, my front thigh is rolling out and my back thigh is rolling in. 

This means the thigh bone of the front leg feels as though the side butt (near the crease) is firming slightly.  What you see is that the knee might roll away from the centre line of your body.
The back thigh is rolling in, which means you might feel the inner thigh firming a little.  If you could turn around and see your knee is trying to move so it is more towards the centre line of your body. 

The subplot here is that I am also trying to move the side of front hip back and draw side of back hip forward. 

If you are not mindful the opposite tends to happen.  That is, when you roll the front thigh out it can often bring the side of front hip forward and when rolling the back thigh in it can often send the side of back hip backward. So you need to watch out for this.

The second key thing I am doing is to try to suck my legs or feet together. 

Yes.  I am not actually trying to split them apart. 

Sucking them together could be likened to someone at foot trying to push your legs back together (what I am doing). 

Whereas most beginners just try to let their legs come apart, almost as though there is a person at either foot pulling them in a tug-o-war.  Actually, they do not even do that so much as let the weight of their entire pelvis and torso just hang and sag in the middle. 

Ouch!  It is obvious when put that way that it would not be a pleasant feeling.

Sucking it up is key. 

This is where I put in the James Brown analogy in class.  He was a guy who sort of did a type of a split while on-stage singing but leapt straight back up again.  It looked really cool as a dance move.

In our yoga practice of this pose we need to be thinking of trying to draw our feet back together again (while they move apart). 

This makes the posture active rather than passive.

It will help make you stronger and more mobile.

Step 1

A standing lunge.  Stay here.  I am trying to pull my feet together.  No need to go further unless comfortable.
Step 2

Kneeling lunge.  Be soft on the back knee by being active in the legs and feet.  I am drawing front heel back and back knee forward.  You can stay here.  No need to go further.
Step 3

I start to move the front foot further away.  I go slowly so I don't elicit a stretch reflex.  You can see the back knee slightly raised.  I try and draw my feet together as though trying to stand up.  I am not sinking into my shoulders or hands at all.
Step 4

That front foot just keeps moving slowly forward.  
Step 5
I have come all the way forward.  I have moved my torso back while trying not to arch my lower back (tummy firm but calm).  I am reaching forward and up through my armpits to lengthen my spine.  

Of course, there is really no reason you need to do this pose.  It is fairly extreme. 

One of the benefits (which is not going to make you a happier or healthier person by any means) is that if you are coming into some other inverted postures like pincha mayurasana you can tap into the pose with greater ease. 

 Below is a video of me coming into active hanumanasana with a variation.


Some additional points you might notice from the videos:

  • I am not sinking into my hands or shoulders at any point.  I am trying to cultivate lift and length and freedom in the spine through the actions of my legs.  This is clearly shown in my fuller versions of the posture where I take my hands off the ground, arms overhead, and reach for the sky.
  • I am using my back foot strongly.  You can do a  top of foot down version if you like.  I just prefer this one.
  • Most people think of this posture as something to do with hamstrings.  As soon as you practice you should get an appreciation that the front of the thigh of the back leg needs to be lengthened.  If it is not you can squash your lower back.
  • You can see that in my versions I begin to move the whole spine back over the pelvis, trying to lengthen my spine while coming into an upright position.  This is actually a pretty tough back bend and you need to monitor that the spine is not squashing.  I am firm in my tummy in a way that I can still breathe into it, which helps.
  • I am reminding myself periodically to relax my face, my tongue, my lips.
  • I am breathing naturally. 
  • I am enjoying the sun on my face, the chirps of the birds, the call of loud children in the background playing with their dog.  I am feeling radiantly alive! Firm but calm.  Delighted with where I am and what I am doing, whatever that is. I am connected to my body but not so inward looking that I cannot sense others and I smile and nod as they pass by.
This is the type of thing we workshop in classes, and in our retreats in Bali and Sri Lanka.  Hope to see you there.  (www.artofliferetreats.com).

Happy and safe practicing!

Samantha

www.artofliferetreats.com
www.yogacafecanberra.blogspot.com
www.yogacafelk.blogspot.com

Sunday, 21 April 2013

Hanumanasana: Two Great Prep Poses


Hanumanasana, or the front splits, combines backbending and forward bending.  There are lots of ways to prepare yourself for this pose.   Here I will show two of my favourites asanas to get you on your way.

Parsvottanasana

Parsvottanasana using wall for support (Yoga Journal Magazine)

This is one of the all-time most effective poses to open the muscles along the back of front leg and outer hip.  When performed mindfully it will strengthen as well as lengthen the hamstrings and hip extensors.  Some tips to come into this pose:
  •             Outer edge of front foot parallel to outer edge of the mat—the heel turns slightly out. 
  •             Back foot positioned about 30 degrees from parallel—toes out and heel in.
  •             Hips pointing straight ahead (tail pointing straight back).
  •         Squeeze heel of front foot in towards the centre of the mat and press ball of foot outwards.  Note the foot doesn’t move but you should feel ankle stabilise and some movement at the hip joint.
  •        Lift outside edge of the foot towards the outer ankle.
  •       Press firmly through the ball of the foot, as though trying to push it through the floor and forwards.
  •        Stretch the mat with your feet—try to push the front foot forward and the back foot backwards. Then, try to pull the front thigh towards the back and the back thigh towards the front as though they were moving towards one another.  Lift them up into the sockets as well.
  •       Scoop the front sitting bone down and under towards the centreline of the body, as though it is moving towards the opposite sitting bone.   Another way to think about this is to see if you can roll the front thigh bone out (as though the knee were trying to turn out) from high up near the hip.  This is one of the most important actions and when performed, will make an enormous difference to the feel of the pose.  

All of the work being done with the feet and legs should combine to make the torso, spine and arms feel light and free.

From here, lift up out of your legs and start to fold forward.  Think up and forward rather than down. 

You will need to keep the front hip scooping and maintain the other leg/foot actions as you start to go up and forward or you will lose the freedom in the spine.  There is a lot of hard work going on in the legs.

In this variation, resist the urge to drop your chest and round your upper back.  Rather, try to maintain a long spine and keep it parallel to the earth.  Try to keep a feeling that you are doing a back bend in your upper back.  It doesn’t have to be a big effortful backbend—a baby one is just fine. 

Take your arms onto your front leg (or a wall as in the photo) without reaching so they are not just dangling.  Pull your armpits lightly towards your waist. 

Try to keep your natural lumbar curve.  Then, maintaining the natural curve, attempt to push your sitting bones down and forward (as though they were arcing in a circle towards your navel).  This will bring a light firmness to your lower belly and enhance the activation of the hamstrings which will be lengthening and strengthening. 

In Between
Take downward facing dog in between sides.  Feel the difference between the two legs.

Standing lunge
Bianca Machliss (Yoga Synergy) in san calasana with arms overhead

With the forward bend taken care of, move to the backward bend. When practicing this variation try not to keep the spine upright but relaxed.  Watch for the ribs that can tend to project out. 

Step into a long lunge and follow the following steps:
  •            Outer edge of front foot parallel to the outside edge of the mat, it will feel like the toes are turning in slightly.
  •            Scoop the front sitting bone under as for the previous pose, as though the front sitting bone is moving in an arc down and to the opposite side.  If you can manage to think of it, focus around the hip socket itself and try to roll the thigh bone out.  Then, try to pull the knee in towards the hip socket from the inner thigh.  To enhance these two actions try to squeeze the heel of the front foot in towards the centre of the mat (without moving it) and try to press the ball of the front foot out to the edge of the mat (without moving it).
  •            The back heel points up to the sky.  Draw the outer edge of the foot closer to the outer knee.
  •           Press the ball of the back foot strongly into the floor.  Try to move the top of the foot closer to the shin without moving it. Try to pull the heel towards the back of the knee without moving it.
  •           Attempt to pull the back foot forwards towards the front foot.  At the same time attempt to pull the front foot backwards. 
  •           Make sure the back thigh bone/knee points down to the floor.
  •          ‘Suck’ the back thigh bone up towards the torso, as though your leg started from your armpit.  If this makes no sense to you then try to flex the back hip (bend it) from its extended position (as though you were trying to bend at your hip to bring the back knee to your chest).
  •           Scoop the back leg sitting bone down and forward in an arc.  This will firm the lower belly and, when performed in conjunction with the instruction above, will start to activate the muscles that you are stretching.  You will feel the posture becomes much more active.
  •           Try and keep the scooping down and forward arc of the sitting bones with the sucking of the back leg to get a feeling that the sitting bones are lifting from beneath you and sending your whole spine upwards. 
Simon Borg Olivier (Yoga Synergy) in parsva san calasana.
The back foot is different but note the arm variation here, which is really a side bending variation. 
  •           Try an arm/side bending variation to enhance the stretch felt across the front of the back thigh. Take the arm of the back leg up to the sky and push the armpit up and forward in the direction it is facing.  Press that elbow over towards the opposite side of the body.  Take the arm of the front leg down beside the front hip and push the armpit down.  The torso will be in a side bend.  Press the front sitting bone down and forward and keep pressing the front knee in towards the centre line of the body. 
  •           Breathe.
You can see how this long lunge can keep extending into a backbend, as my teacher Paddy McGrath demonstrates below.  The more you scoop and suck the legs and sitting bones the more freedom in the spine, which can start to lift up and into a circle.  If Paddy just snuck her front leg out straight (which she can) she'd be in a(n extreme) version of hanumanasana!
Paddy McGrath in a very long lunge and backbend


The End


Hanumanasana is a combination of the forward bend of parsvottanasana and the back bend of the long lunge.  You could do a lot of different poses to prepare yourself for the challenge of the forward splits but I would recommend that whatever other poses you do, you perform these two actively.  They will give you strength and flexibility.  Be sure to combine the 'scooping' of the front sitting bone down and towards the centre of the body and the 'sucking' of the thigh bones into their sockets that is present in both of the poses to help you on your journey!