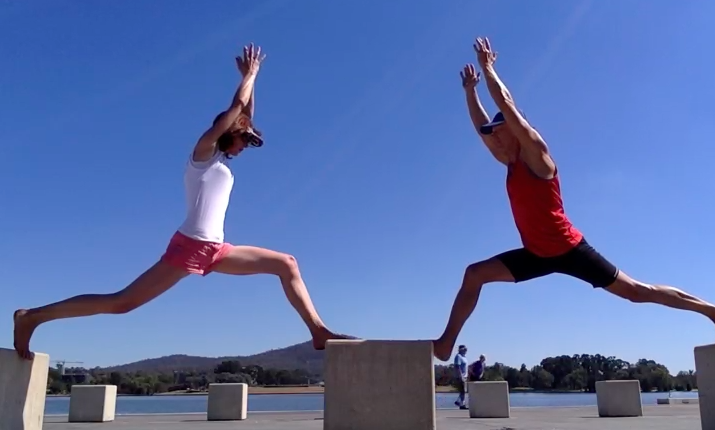
We have been challenging ourselves beyond the high plank to bakasana and handstand of last week's post.
This week we discovered how great a pair of blocks can be to enhance strength, stability, and mobility around the shoulder and spine.
The video shows us working to a chandra namaskar variation. Some step by step instructions are below. I have skipped the half push up that we did. On reflection it is probably not ideal here.
Some of the instructions on the block might not be exactly what you do on the ground. However, the arm actions are pretty similar. When you do this sequence then do a normal down dog on the ground it will feel as though you are as light as a feather.
Downward facing dog
You can start with downward facing dog.
We put our wrist on the bevelled edge of the block and the ball of the foot on the other block.
Push down and forward strongly through the hands. Stay here, make sure you are firm but calm. No need to go further.
High plank
Then slowly move to high plank.
You want to try to avoid sagging in the shoulders or hips here. That means you need to really push down and forward with your hands into the blocks. Lift the lower ribs into the upper back.
With your feet, you also push on the edge.
The tummy needs to be firm in a way that you can breathe into it so you might just try the high plank on these blocks, rather than the whole sequence.
Legs are firm as well. Pushing thigh bones to sky.
You can stay here if you like. No need to go further.
Upward facing dog
I have skipped the push up we did. Too stressful for most. Instead, you could try up dog.
Again, you push your hands down and forward. Armpits pressing down. Strong in the legs so you do not sag.
We lowered our pelvis carefully so there is no strain in the lower back. We kept the firm tummy we had in the high plank.
We lift the chest to lengthen the front without squashing the back.
Go back through high plank and down dog.
Lunge
Step a foot forward for a high lunge.
Front foot pushing down and forward strongly. Pressing with back foot as well. Trying to keep hips raised and tummy stays firm.
You can stay or raise the body and arms.
Hip variation
From there we lowered the torso, hands to block. We turned the front foot out to the side and allowed the thigh to drop out as well.
Keep legs firm. Raise the body if you like but remember to lengthen the front without squashing the back. Do not feel squashing anywhere.
Back and do it all again on the other side
Back to plank and down dog and repeat on the other side.
Optional extra
Since we were up there already, we decided to try a side split.
Make sure you try and push the feet down and feel as though you are trying to pull them together.
Ankles are firm. Tummy is firm.
The end
This was a fun sequence for us to try and enhance our practice. You can get lazy with your yoga practice sometimes and this type of practice forces you to be mindful and stable.
You cannot collapse into your flexibility here. Being between the blocks obliges you to be strong.
We tried downward dog and handstands after this. They felt light and free. Although I was pretty tired I must say!
I always recommend you practice with a teacher. Do not do anything that strains, squashes, or hurts.
A handstand is an arm balance. The foundation of the arm balances I do is the high plank.
If I was super strong I could transition from my high plank to bakasana then to a handstand. But I am a bit weak.
Not all high planks are equal. Some will not teach you the requisite postural firmness you need for better arm balances.
In this post I show a video where I give some of the fundamentals of the high plank that I do that changed my practice phenomenally and helped me to develop into this handstand.
Watch the video first to see the movement in action. Then follow the step by step instructions. I have written about bakasana before so you can also refer to that post (bakasana on a block).
Do not do anything that hurts. It is better to practice with a teacher.
Get Set
Come onto your hands and knees. You need to make sure you are using your hands properly so you don't feel sinking into your wrists. This means pressing with your fingertips, feeling as though you are trying to grip at the floor or make fists. Imagine there are little holes in the ground like a tenpin bowling ball that you are trying to press your fingertips into to lift up the ground.
Knees are behind hips. Shoulders are over wrists.
Lift ribs into upper back. Can you see how rounded and lifted my upper back is? This feeling of being broad across the upper back is important. I feel as though I am pushing the arms downwards into the floor. My shoulder blades come right around the sides of my chest.
My sitting bones go down towards the back of my knees and top of pelvis moves towards the sky to lengthen my lower back. My lower back is not arched.
The sense is the entire back of my body is lengthened. This shape is important. You will need to maintain it.
The actions in my arms are important and maintained.
I push my armpits in the direction they are facing. Here that sort of means down and back.
I push my hands down and forward--away from my knees.
I feel as though I am pulling my knees towards my hands.
I feel as though I am pushing my hips forwards towards my hands but they do not go anywhere.
You cannot really see these actions. That is what makes the practice of this posture difficult. My kneeling plank is already cultivating a postural firmness for me so that my tummy is getting firm through the posture but in a way where I can still feel that when I breathe the tummy can move.
In fact, if you look at my waist area you can see it is like I have little gills there--you can see movement when I am breathing. I am breathing a lot here! It is hard. If I could I might try to breathe less.
Lift Up
Maintaining all previous actions, I put the tips of my toes on the ground and lift my knees.
I am careful not to sag my chest or lower back.
Performed well, you should feel very firm in the tummy area without needing to actually try to firm it. It should come naturally because of the posture.
See how I am trying to be right on the tops of my toes. Not the balls of the feet. That is important.
Tip toe forward
From there I try and maintain the same actions but I just tip toe forward--on the very tops of my toes.
A common challenge as you tip toe forward is to keep the tummy firm. It helps if you keep your knees bent and stay on the tops of your toes.
I keep all the same actions from before, lifting chest up into upper back, sitting bones down and top of pelvis back to lengthen lower back, feeling as though I am moving my hips forward.
Stay or bakasana
You can just try and stay there, on the very tops of your toes, lifting your chest, firming your tummy. It is really hard!!
Or you can initiate bakasana by dropping your butt a little, lifting your knees up higher as though into your chest, lightly resting them on our upper arms.
You can stay there or, if you feel light, you can lean forward until the toes feel light and then you can pull the heels into the bottom.
You can still see my little gills breathing. That is important. I am firm but calm.
Optional extras!
I am too chicken to do handstand on a bench like that. I have not yet got the strength.
But if you have built these foundations then a handstand should get easier.
I do the same thing but get onto my tip toes and start to take one leg up.
I give a little tap...
...and up I come...
Sthira sukham asanam. Firm but calm. Summary
I have written a few posts about bakasana and even kneeling plank and plank before.
That is because they are really important!
Get a good high plank. Then keep the actions and get a good bakasana.
These will help build the foundations.
There are other poses that you can do from bakasana so that you do not need to kick up into handstand but instead float from bakasana straight up. I am still working on that one! In the meantime, I enjoy the inversion with free spine.
This is the type of step by step approach to movement and posture I use in classes, workshops, and retreats. You are welcome to join me any time!
Use a trick from kneeling plank to help you get here
I have just had the pleasure of spending a week taking daily (sometimes twice daily) classes at Yoga Synergy in Sydney and will be heading to Townsville next week to spend time with my own teacher, Paddy McGrath. I am so excited.
The teaching styles of these great yogis are very different but I was recently struck by how some of the cues in two very different looking postures were almost the same.
Bianca Machliss from Yoga Synergy in kneeling plank
I love the Yoga Synergy high plank (above is the kneeling version) for many reasons. One of the least obvious is that it can help teach you a trick to free your spine for serious back bending as used by my teacher, Paddy (below).
Paddy (Dancing Spine Yoga) in an extreme backbend
Outwardly, what Bianca is doing seems to have little to do with what Paddy is doing. But they are more alike than you might think. The trick is what you feel inside.
Here's the trick
Come into kneeling plank like Bianca. Notice this is a high kneeling plank. By that I mean the chest is pushed back between the shoulder blades (or the shoulder blades are wrapped around the chest in protraction). This action is important in other arm balance poses but that is a discussion for another post. For now, let's focus on what is going on in the lower body.
Also notice Bianca's knees are behind her hips--make sure your knees are also slightly behind your hips. This is also important for the actions we want to create next.
Notice the footwork. The toes are pressing firmly down into the floor. The firmer you can press your toes, the lighter the pressure on your knees. You can press the toes down and try to push the heels back.
From this position lightly hug your armpits towards your waist.
Now, and this is the trick, try to drag your knees towards your hands. The knees will not actually move because you are pressing with your feet. What you should feel instead is activation of muscles low in your belly without you having to pull your navel to your spine. Stop trying to pull the knees and you should feel them relax.
Then you can also try a more subtle move. Try to move your sitting bones forward as well--as though they are moving towards your navel (don't pull that navel in though!).
What you should feel with these combined actions is that you have created firmness in your abdomen without having to tense the belly or pull the navel to the spine. You should still be able to breathe freely although you will feel the breath higher up in the torso (since the belly has become firm you it won't move out as you breathe).
From there you can try to keep pulling your knees towards your hands and your sitting bones in the same direction (without pulling your navel to your spine) but at the same time push your heels further backwards so the knees come off the floor and the legs are straight. You will now be in the high plank.
With your legs straight, keep trying to pull your knees towards your hands and your sitting bones towards your chest just like you did in kneeling plank. It is harder because the legs are straight and your hips might want to bend (don't let them) so if you can't get it then go back to practicing in kneeling plank to recapture the feeling.
For those of you who lower to the floor from plank or kneeling plank (I really recommend just lowering from kneeling plank until you are really sure you know what you are doing with your shoulders, torso, and legs or you might just set up bad habits that will later lead to injury) you can now try to keep these actions as you come down. It should feel very supportive of your lower back and make lowering much easier.
So what?
Ok, so what does this have to do with Paddy's extreme backbend (don't worry if you can't do it--I am still working to get there!)? A lot actually.
This is because, in her backbend, Paddy is trying to do exactly the same thing with her knee and her sitting bones! That is, she will be trying to move her back knee forwards along the mat and her sitting bones towards her navel.
By attempting to drag the back knee and sitting bones forward Paddy will have firmness in her lower belly and freedom in her lower back. Only if she uses this trick can she move deeper into the back bend with a free or, as Paddy calls it, a dancing spine.
Application to your yoga practice
Now, you may not be able to attempt the pose that Paddy is doing. And, to be honest, it probably does not matter if you can ever do it. But, we practice poses that have a similar idea in yoga all of the time. One of the most common is the standing lunge or the kneeling lunge.
Bianca in san calasana (high lunge)
In these sorts of lunges you are trying to do exactly the same thing. That is, attempt to drag the back knee forwards and sitting bones towards the navel to firm the lower belly. You will feel that this frees your lower back.
In Bianca's high lunge (pictured above) you might find it is easier to think of dragging the back foot towards the front foot. But if the knee is on the ground you will find it easier to think of dragging the back knee forwards.
The other pose you will encounter frequently in most yoga classes where you can apply this trick is bhujangasana (cobra).
Paddy transitioning to cobra
In the photo above you can see Paddy about to transition to cobra. One of the interesting things about this transition is you can see her upper spine is like the kneeling plank and, in fact, the whole pose has a kneeling plank look about it!
To come into cobra pose, Paddy has come from downward dog towards kneeling plank and is now about to try to let her pelvis lower (not fall) down while simultaneously dragging her knees towards her hands.
Once she has lowered her pelvis as far as it will go (without feeling any squash in her lower back) she will raise her chest.
Importantly, if her pelvis would not go down any further without compressing her lower back then she would just lift her chest from here with her pelvis high off the ground.
I couldn't find a photo of Paddy in the full cobra on the internet. It seems people like to take photos of her in pretty extreme poses only. However, this photo of her transitioning to cobra is probably more useful than one of her in cobra because it really demonstrates the 'feel' of the pose and sometimes we get too caught up in the look of a pose.
People often come into cobra from the floor. But coming into it this way (from kneeling plank) will help you really engage the legs and lower belly and teach you a movement pattern that frees your spine.
Summary
This trick of trying to bring your knees towards your hands or chest and sitting bones towards your navel works in most of the backbends. However, it is harder to get the feel when your knees are not touching the floor and when your legs are straight so it is really helpful to practice in poses like a kneeling lunge or a transition from kneeling plank to cobra. This helps your body begin to understand the firmness in the belly combined with freedom in the lower back while back bending.
You can watch the full youtube video of Paddy practicing extreme backbends below, including the transition from kneeling plank to cobra. Beware! They are extreme. Paddy is an extraordinary teacher and yoga practitioner. What I hope your body learns from watching her is the beautiful freedom that is present in her spine as she practices. She got there with years of practice and listening to her body. Some of us might never come into such extreme postures and it doesn't really matter. We can all, however, learn to move with greater awareness and freedom.
Happy and safe practicing!
Classes (current at time of posting. See class schedule page for updated details):