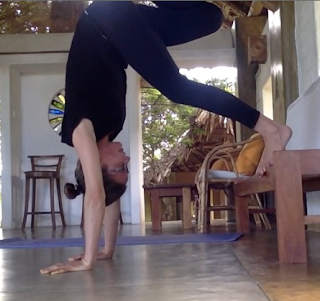
Away on retreat last week in Sri Lanka we took use of the furniture to learn a bit more about positioning for handstands.
Normally I do not use a wall for teaching.
The main reason is that I saw too many people using the wall as a support to lean on, collapsing in the spine, and not seeming to have the foundations in core and shoulder stability. I speak from experience here, as an ex-wall user.
Doing a handstand is not important (don't be attached to an outcome). And while the tips in this video will help you to a handstand if that is what interests you, there are more important lessons about core stability, shoulder stability, spinal freedom, and being calm in a challenging situation that can be learned.
Despite the wall space available in the room we practiced in, I chose not to use it. I wanted to find something lower, around knee height, that we would use to put a foot on. This was so we would not be tempted to go into the ever popular 'l' shape commonly taken at the wall which can tend to encourage shortening of the lower back in particular.
A few important ideas from the video.
Lengthen spine
I lengthen the spine from the inside. From the organ side of my spine. It feels non-muscluar. You can see I am not dipping in my lower back.
I am breathing naturally. I am not sucking my tummy in or trying to tense it.
Shoulder joint complex
I bend my elbows slightly so they point back to my knees. Then I press my elbows in lightly together. I feel firm around the armpits and side of my chest.
Then I straighten my arms again by pushing my hands down and forward while trying to maintain the previous actions.
I did a slight micro movement from the inside, which was to lengthen the front of my chest forward a little.
Short dog
Keeping the shape of the spine, actions around the armpits, move bottom back towards the feet, lift knees to chest, and start to come into a short down dog.
One toe tip to the edge of the chair.
Lean forward
Take a slow lean forward. Your shoulders will come over and then in front of your wrists. If you have not developed strength and stability around the wrists you need to go back to that type of work. Make sure you are using your hands well (as though you are making a fist with your hands, press inner wrists towards one another, press through finger tips).
This leaning forward is a slow lean. As you do so you should feel the tummy naturally activating. Your grounded foot should start to just slide forward along the floor.
Knee to chest, to sky, then straighten
Keeping all preceding actions, on the condition you feel comfortable and can breathe naturally, bring the ground knee towards your chest. Try to be light on the foot on the furniture. It is only lightly touching.
You could then take that knee up. It is still bent as though trying to bring heel to bottom.
And then, if you still feel comfortable, can breathe easily without tension, then you could straighten out that leg.
Make sure you reset the spine (lengthen it from the internal organ side). Make sure you are not dropping into your shoulders (try and reach your shoulders to your ears). Make sure your foot is not heavy on the furniture (this lightness will come when you maintain the abdominal activation you established naturally earlier).
Be comfortable in this challenging position.
You can step on your wrists afterwards as shown in the video if needed. Then repeat on second side.
Have fun. Don't hurt yourself. Don't do anything that hurts. Be able to smile and talk as you practice. This is intended for my students. Learning from a physical teacher is best.
Happy and safe practicing!
Samantha
www.yogacafecanberra.blogspot.com
www.yogacafelk.blogspot.com


This post is amazing- thank you for the steps :-)
ReplyDeleteInspiring writings and I greatly admired what you have to say , I hope you continue to provide new ideas for us all and greetings success always for you..Keep update more information..
ReplyDeleteYoga Temple in India
Very Nice Post really explained good information and Please keep updating us..... Thanks
ReplyDeleteYoga Teacher Training in Goa
Thank you. After using a wall for a long time the chair at knee high is great. Meanwhile I'll work on core and shoulder stability.
ReplyDeleteVery Nice Post really explained good information and Please keep updating us..... Thanks...
ReplyDelete200hr Yoga Teacher Training Rishikesh
Inspiring writings and I greatly admired what you have to say , I hope you continue to provide new ideas for us all and greetings success always for you..Keep update more information..
ReplyDeleteYoga Teacher Training Goa
Really i am impressed from this post...
ReplyDeleteThanks for sharing this with us found it informative and interesting. Looking forward for more updates..
200hr Yoga Teacher Training Goa