
Forearm balancing, when done well, is a great way to release tension in the spine, which includes the neck since it is part of the spine. It also includes the shoulders. That means you are in the wrong pose if you practice this posture and have a sense of tension or strain anywhere but especially around the neck or shoulders.
This is the pose I recommend you be able to complete before making efforts to do a headstand.
In this posture, which we call horn stand (your hands are clasped except for your baby finger which is sticking out to form a horn) there is no weight on the head at all.
To do it you must have adequate strength and mobility around the shoulder joint complex while your feet are both on and off the ground.
As in many postures, the preparation is more difficult than the final posture.
In this post I share a few tips about preparing to come into this balance. This includes my thoughts on the use of the wall and how I use it in a limited fashion, along with common errors and how to use a block to help you prepare.
First, here is a video of me free balancing so you get an idea of the final posture.
I practiced on the grass today since I was matless and sleeveless and the concrete was too scratchy on my elbows.
Now, to get there I recommend a few stages of specific preparation (as distinguished from the non-specific just general stability and strengthening and movement you do through my classes).
Base preparation
Number one is to get the horn. See the picture below.

The 2-4 digits are interlaced. The palms are pressed together. The thumb and baby finger are free. The baby fingers point out like a horn. The horn is going to help you balance in the final posture, with the weight shifting between horn and elbows.
The elbows are about shoulder width apart but I prefer to try a bit narrower since the tendency is for them to splay out on tight shouldered people.
Then get the lower ribs high up away from the ground and get your head and neck so you are looking to your navel. The upper and middle back will feel rounded. The lower back is lengthened, not arched.


When you get your lower ribs far away from the ground your head will come away from the ground. You cannot see it in the photos because there is so much hair tumbling down. In the first video I kept my head forward so you could see it is not on the ground.
In the wall video I kept it looking to navel and then moved it back and forth a bit so you can see it there as well.
I am firming my tummy in a way that I can still breathe. If you don't know how to do this you need to look back at previous posts or come to class. It is important.
I push my horn and wrist downward and feel as though I am pushing my elbows forward. I can't show a picture of those things. They are 'secret' internal actions.
Beware the sinking shoulders
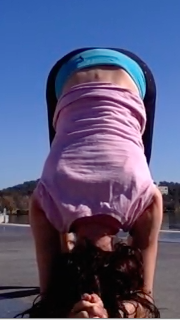
Sinking the chest and into the shoulders is one of the common errors in this posture. See the example of sinking shoulders from the side and front views, below.


Compare this with the lower ribs lifted into lower back in the next picture. You can see that the wrinkles in my t-shirt have ironed themselves out.

And sinking with the knees raised...
Versus lifting with the knees raised...

Again, you see how many wrinkles in the shirt appear around the lower back in the sinking version.
Get strong!
With the base set, I start some strengthening and mobility practice.
I take my knees just a tad from the floor. Enough so an ant or grasshopper could go underneath without being squished.

Move slowly and do not sink into your shoulders or drop the ribs.
This should create postural firmness in the tummy in a way you can breathe if it was not there already (and if you had not sucked it all in).
You can go a bit higher so a little puppy could run under your knees.

I go slowly up and down. I make sure I do not drop in my shoulders. I keep horn pushing down, elbows pushing forward, neck free, tummy can breathe (but firm).
I can come higher and perch on the very tips of my toes. I try to get off the balls of my feet. If you have weight going through the balls of your feet you won't get enough weight through the arms.

You just stay there and breathe. Make a few jokes to passersby. Be firm but relaxed and calm.
If you can, you take a knee into chest, heel to bottom. But you go slowly and make sure you do not collapse into one shoulder or drop the chest.
Take note. If this feels tough it is because THIS IS REALLY HARD!
It is really hard to go through these stages without sinking into your shoulders and feel comfortable.
Stay here and keep practicing at this level until you can at least feel comfortable for more than 30 seconds I say. That's not science but hopefully you get the picture.
Block practice
The video below shows my block practice.
I go to the blocks in class sometimes to help people get an idea of what it can feel like to be upside down.
You don't need to kick up to do this so as long as you have some good strength around shoulders and core it should be accessible.
If you are not strong enough you will find it difficult to get a leg off the ground so go back to the first (ground) practice.
I push the ball of one foot into the block and then the other foot starts to come up. Alas, most of the important parts to see are in shadow in the photo below!

You can just hover a little away from the ground or start to bring knee to chest.

And finally take the leg directly up.

The head is down and looking towards the navel. It feels really great if you are in the correct position.
A word of caution about block practice is that it can feel so good you might like to take both feet off. I don't advise trying. Mainly because if you crash down you are going to smash your feet into the block. Ouch.
Wall practice
Ok, so I really don't use the wall for any of the inversions. All of my students will know how I sort of begrudgingly take us over there only on very rare occasions! The video below shows how I use the wall if I use it.
You can see I missed the first two times because I was trying to lightly kick up.
One of the reasons I have developed a no wall practice is because I think people go to it too early. They try to build strength at the wall when you need to build strength on the ground. It is actually much harder to do the first position that I described (ground version) than it is to do either the block or wall variation. Perhaps that is why people go to the wall!!
Anyway, if you are going to a wall, psychologically you will know it is there. Most people will therefore just over-kick or not worry about refining their kick because we know the wall is there to catch us. People who spend too much time at the wall seem to take longer to learn to free balance.
Thus, if you use it do so sparingly I say! And, if you must, then perhaps try this way.
I show using the wall with just a toe tip touching. I try and take one leg straight up and be on the other toe tip. I then figure out where that up leg needs to be to help me find my centre of gravity. I can also learn to 'play' with the weight between horn and elbows. You should find that if you are on a toe tip and you press through the horn that the toe tip starts to float away from the wall.
So for me the lesson of the wall is to learn about how to play with and find your centre of gravity upside down. But this is a refining technique to try once you have built the strength!
Summary
Look for lifting not sinking. Firmness but calmness. Lightness not heaviness. This is a great way to practice all postures, but especially for these inversions.
This is the same approach I take to handstand so you can apply these ideas on ground, block and wall but just with the arms straight!

Happy and safe practicing! Remember, these videos and posts are intended for students who come to my classes and who can ask questions and interact with a real person about their own bodies. Learning from the internet is not recommended.
This is the type of thing I teach in my classes and which we regularly workshop in retreats. Join us if you like!
Much metta,
Samantha
www.yogacafecanberra.blogspot.com
www.yogacafelk.blogspot.com
www.artofliferetreats.com
This is excellent information. Thanks for sharing.
ReplyDeleteYogatemple India is one of the best 200hr Yoga Teacher Training in Rishikesh
They provide the experienced teachers in traditional yoga practice is built on yoga asana, pranayama, meditation.
Yoga Teacher Training Rishikesh
Very Nice Post really explained good information and Please keep updating us..... Thanks
ReplyDeleteYoga Teacher Training in Goa
Really i am impressed from this post...
ReplyDeleteThanks for sharing this with us found it informative and interesting. Looking forward for more updates..
200hr Yoga Teacher Training Goa